
As you’d expect, DIY Rustic Wide Plank Plywood Flooring takes much longer to finish than just installing pre-made planks.
This project was the truest sense of DIY. Everything from cutting the plywood into wide plank boards, to sanding, staining, finishing and installing the plywood planks down… all of it DIY.
All things considered, the entire project, from start to finish didn’t take that long.
From cutting the planks out of plywood, to finally installing the floors in both the dining room and kitchen – took about a week.
If you’re willing to put in the time and sweat, it is absolutely worth it!
The floors look gorgeous (the pictures don’t do it justice) and you really would not know that they are stained plywood floors.
Lesen Sie weiter, um zu erfahren, was zur Herstellung und Verlegung unserer rustikalen Breitdielen-Sperrholzböden nötig war und wie Sie Ihren eigenen, einzigartigen Sperrholzboden verlegen können.
Bekanntgabe: Einige der Links unten sind Affiliate-Links. Wenn Sie sich entscheiden, eines dieser Produkte zu kaufen, Wir verdienen eine kleine Provision ohne zusätzliche Kosten für Sie. Wir empfehlen diese Produkte nur, weil wir haben Erfahrung mit ihnen und sie für unsere eigenen Projekte. Als Amazon Associates, Wir verdienen mit qualifizierten Einkäufen.
Aktualisieren: It has now been several years since we first laid these plywood plank floors, and they have held up great to everyday use and vacation-rental traffic. We get asked about longevity a lot, and the honest answer is that the finish is what makes or breaks it. Keep a solid coat of polyurethane on them and they wear really well.
Is Plywood Plank Flooring a Good Idea?
Ja. Plywood plank flooring is a durable, budget-friendly alternative to hardwood when it is sealed well. You rip sheets of plywood into planks, then stain and seal them, so you control the plank width, Farbe, texture, and finish for a fraction of the cost of solid hardwood. Our floor came to about $1,040 in materials for roughly 700 square feet, around $1.50 a square foot, and it has held up to years of vacation-rental traffic. The main trade-offs are the labor, since cutting and finishing the planks takes time, and the need for a good polyurethane sealer to protect the softer plywood surface.
Inhaltsverzeichnis
Warum Sperrholzböden verwenden?
Der Nachteil von Sperrholzböden
Dicke der Sperrholzdiele
Breite der Sperrholzdiele
Die Art des Sperrholzes
Vor den Bildern
Wie viel Sperrholz haben wir verwendet?
Vorbereiten des Unterbodens
Unterbodenanstrich
Schneiden der Bretter
Eine Vorrichtung herstellen
Schleifen der Planke
Charakter hinzufügen
Die Sperrholzplatten verbrennen
Die Planken färben
Auftragen des Finishs
Die Bretter verlegen
Sicherung der Planken
Einige Bilder
Warum wir uns für W entschieden habenIdealer Planken-Sperrholzboden
Ein Teil des Bodenbelags in unserer Ferienwohnung in Poconos musste ersetzt werden. Nämlich, der schwimmende Hartholzboden im Esszimmer und in der Küche und der Teppich im Wohnzimmer.
Unser Ziel war es, neue Böden zu haben, die alt aussehen, warm, und abgenutzt – als wären sie schon immer da gewesen. Grundsätzlich gilt, Je mehr es nach Bauernboden oder Scheunenholz aussah, desto besser war es für uns.
Wir haben uns Fliesen angesehen, Stein, und Hartholzböden. Das Problem bei allen war, dass sie alle einen ebenen Unterboden brauchten und unserer uneben war… wie wirklich uneben.
Da das gesamte Haus aus grob geschnittener Eiche besteht, Der Bodenbelag ist nicht einmal annähernd eben.
Das macht Fliesen, Stein- und sogar Hartholzböden sind sehr schwierig zu verlegen. Die zusätzliche Schwierigkeit führt auch zu sehr hohen Installationskosten.
Es war Zeit, kreativ zu werden, DIY-Böden waren unsere Zukunft. Um weitere Ideen für Bodenbeläge zu erhalten, haben wir uns an Pinterest gewandt. Nach langem Scrollen, Wir stießen auf breite Landhausdielen-Sperrholzböden im Landhausstil!
Auf Pinterest, Es gab eine Unmenge (Na ja, vielleicht nicht ganz so viele) Ideen für Sperrholzböden, Aber am besten passte für uns der breite Dielenboden.
Die Bilder der Projekte mit breiten Sperrholzböden, die andere gepostet hatten, waren unglaublich – Das war es! Dies war der perfekte Bodenbelag für unebene Böden.
Wir waren von der Idee überzeugt.
Im Zweifelsfall – Wabi-Sabi
Auf Pinterest bin ich auf ein Konzept gestoßen, das ausschlaggebend dafür war, dass ich mich für Sperrholz gegenüber anderen Bodenbelägen entschieden habe.
Es heißt Wabi-Sabi.
Es ist eine japanische Tradition, die die Kunst darstellt, kaputte Dinge besser zu machen als ganz neue.
Die Idee besteht darin, die Unvollkommenheiten hervorzuheben und sie vollkommen unvollkommen zu machen.
Mit dieser neuen Perspektive, Ich suchte nach Unvollkommenheiten, die ich zur Schau stellen konnte – anstatt sie zu meiden.
Wenn (oder wann) Die Böden bekommen neue Abnutzungsspuren oder Kratzer, it will add to the floor’s character. It’s a very freeing concept that I am really glad I came across.
Click on the picture to see the Pinterest pin that inspired me, I hope it does the same for you.

Warum Sperrholzböden verwenden?? It’s Affordable.
Most people decide to install plywood plank flooring because of it’s affordability.
It’s much cheaper to install a plywood floor than traditional hardwood or even a laminate, heck it’s even cheaper than doing vinyl.
For our plywood farmhouse floors, the cost wasn’t much of a factor in our decision-making process.
Versteh mich nicht falsch, it’s always nice to save some dough… it was just lower on our list.
Higher on our list was flooring that was sturdy, looked like it has always been there, fit with the style of the house and would be easy to install on an uneven floor.
Between the option of making wider planks and the spacing between each one – wide plank plywood flooring was a perfect fit for this house.
The spacing between each board makes it more forgiving in scenarios like ours where the floor isn’t level.
On top of that, the Japanese concept I came across helped me realize that any blemishes the floor will gain as it ages will only add to the floor’s beauty.
So it didn’t need to be as sturdy as hardwood, we’ll just embrace the imperfections that come along with it! 🙂
Another Reason To Use Plywood Floor Planks? The Versatility
Another huge benefit to plywood floor planks is the design versatility.
I love how my plywood plank floors turned out. There really is nothing I would change, but one thing that’s great about plywood planks is that there is no limit to what you can do.
I LOVE the way the rustic plywood floor planks came out, but the plywood planks could have looked just as good with a modern look.
Take a look at plywood floor planks on Pinterest. You’ll see there is no limit to the style, Farbe, shape, size, or texture. It’s all just a matter of preference – how cool is that?
The Cost Of Our DIY Plywood Flooring
We knew that we saved quite a bit of money by choosing plywood faux plank flooring but we didn’t realize how much until someone asked for a breakdown in the comments.
We saved a ton!!
Natürlich, what you save in dollars you lose in time. We didn’t look at it as a lose of time though, it saw it as a great way to get our creative juices flowing and gave us a flooring that is completely unique – and it saved us a bunch of money to boot! Win – win – win!
Gesamtkosten
22 Sperrholzplatten zu 32 $/Blatt = 704 $
17 quarts of stain @16.30/quart = $276
5 gallons of Poly @ $12/gallon = $60
TOTAL = $1040
Quadratfuß
22 Sheets * 32 sq. ft./sheet = 704 sq. ft.
1040 $ / 704 m². ft. = $1.47 per sq. ft.
The Down-side to Plywood Flooring
The only negative I saw with plywood floor planks was the durability. It’s not a hardwood so it would scratch easier than an oak flooring would.
Now with my new wabi-sabi perspective, I’m actually looking forward to the scratches and dents.
The blemishes will only add to the floor’s beauty. If there’s a scratch that is really ugly, I can add something creative to give it beauty.
Perfectly imperfect.
Die Einkaufsliste
Werkzeuge Liste
Hier ist eine Liste der Werkzeuge, die wir für dieses Projekt verwendet.
Affiliate-Links unten auf ähnliche Elemente sein kann, wenn genaue Einzelteile nicht online gefunden werden können.
Extra-Batterie für Fertig-Nagler
Supplies Liste
Dies sind die Vorräte an diesem Projekt verwendet.
Affiliate-Links unten auf ähnliche Elemente sein kann, wenn genaue Einzelteile nicht online gefunden werden können.
Varathane Kirschbaum Gel Stain – Wir haben etwa 7 Liter verbraucht
Ölmodifiziertes Polyurethan auf Wasserbasis – Wir haben 2 Gallonen verbraucht
3″ Bürste mit Naturborsten – 6 Pinsel zum Auftragen der Beize
4. April″ Synthetische Polyesterbürste – 4 Pinsel zum Auftragen der Poly
Abdeckpapier – Wir haben das Abdeckpapier verwendet, um das Deck beim Auftragen der Beize und des Polystyrols zu schützen
The Plywood Plank Flooring Thickness
The plywood plank flooring thickness we used is 1/2″ thick. If our floors weren’t so uneven we could have used 3/4″, but the flexibility that a 1/2″ plywood has was perfect to conform to our uneven sub-floor’s contours.
I think an added benefit to the 1/2″ plywood is that the spaces in between the planks doesn’t hold dirt as easily.
It may sound like that’s a bit of a stretch but I think if it was 3/4″ plywood, the extra 1/4″ of plywood thickness may make it harder for a vacuum to suck out things that get stuck in the spaces.
Wir waren uns nicht sicher, wie die Räume mit Staub und hineinfallenden Dingen zurechtkommen würden, aber bisher ist alles gut – nichts, was ein gutes Staubsaugen nicht beheben könnte. 🙂
Abgesehen davon, dass möglicherweise Dinge in den Zwischenräumen zwischen den Dielen stecken bleiben, Ich sehe keinen Grund, warum Sie 3/4 nicht verwenden können″ dickes Sperrholz für Ihren Dielenboden. Davon abgesehen, Ich sehe auch keinen wirklichen Vorteil darin, es länger als die Hälfte zu verwenden″ Sperrholz.
Die Sperrholzbrettbreite
Wir wollten den Bauernhaus- oder Landhaus-Look, Also haben wir uns für ein breites Brett entschieden.
Wir wollten auch die Menge an verschwendetem Sperrholz reduzieren, Die Breite, die wir uns ausgedacht haben, betrug also 5 7/8″ für jedes Brett. Das ergibt 8 Bretter pro Platte und einen winzigen Streifen, der am Ende übrig bleibt.
We’ve seen other plywood floors where they went for 8 inch or even 12 inch boards. We didn’t want to make them that wide because we felt it made it obvious that it was a plywood floor.
And a wide board would have shown the dreaded plywood zebra pattern that I don’t care for (more on the plywood zebra pattern later).
The Type Of Plywood We Used
There were a couple of questions in the comments about the type of plywood that was used for the plywood planks.
The plywood is regular 3-ply, cheapy weepy, plain Jane, rough finished 1/2″ pine plywood.
The exact name from Lowes is:
Plytanium 15/32″ CAT PS1-09 Square Structural Plywood Pine
Grundsätzlich gilt, the cheapest plywood we could get.
Since we wanted a rustic look the knots and imperfections weren’t a problem.

Einige Vorher-Bilder
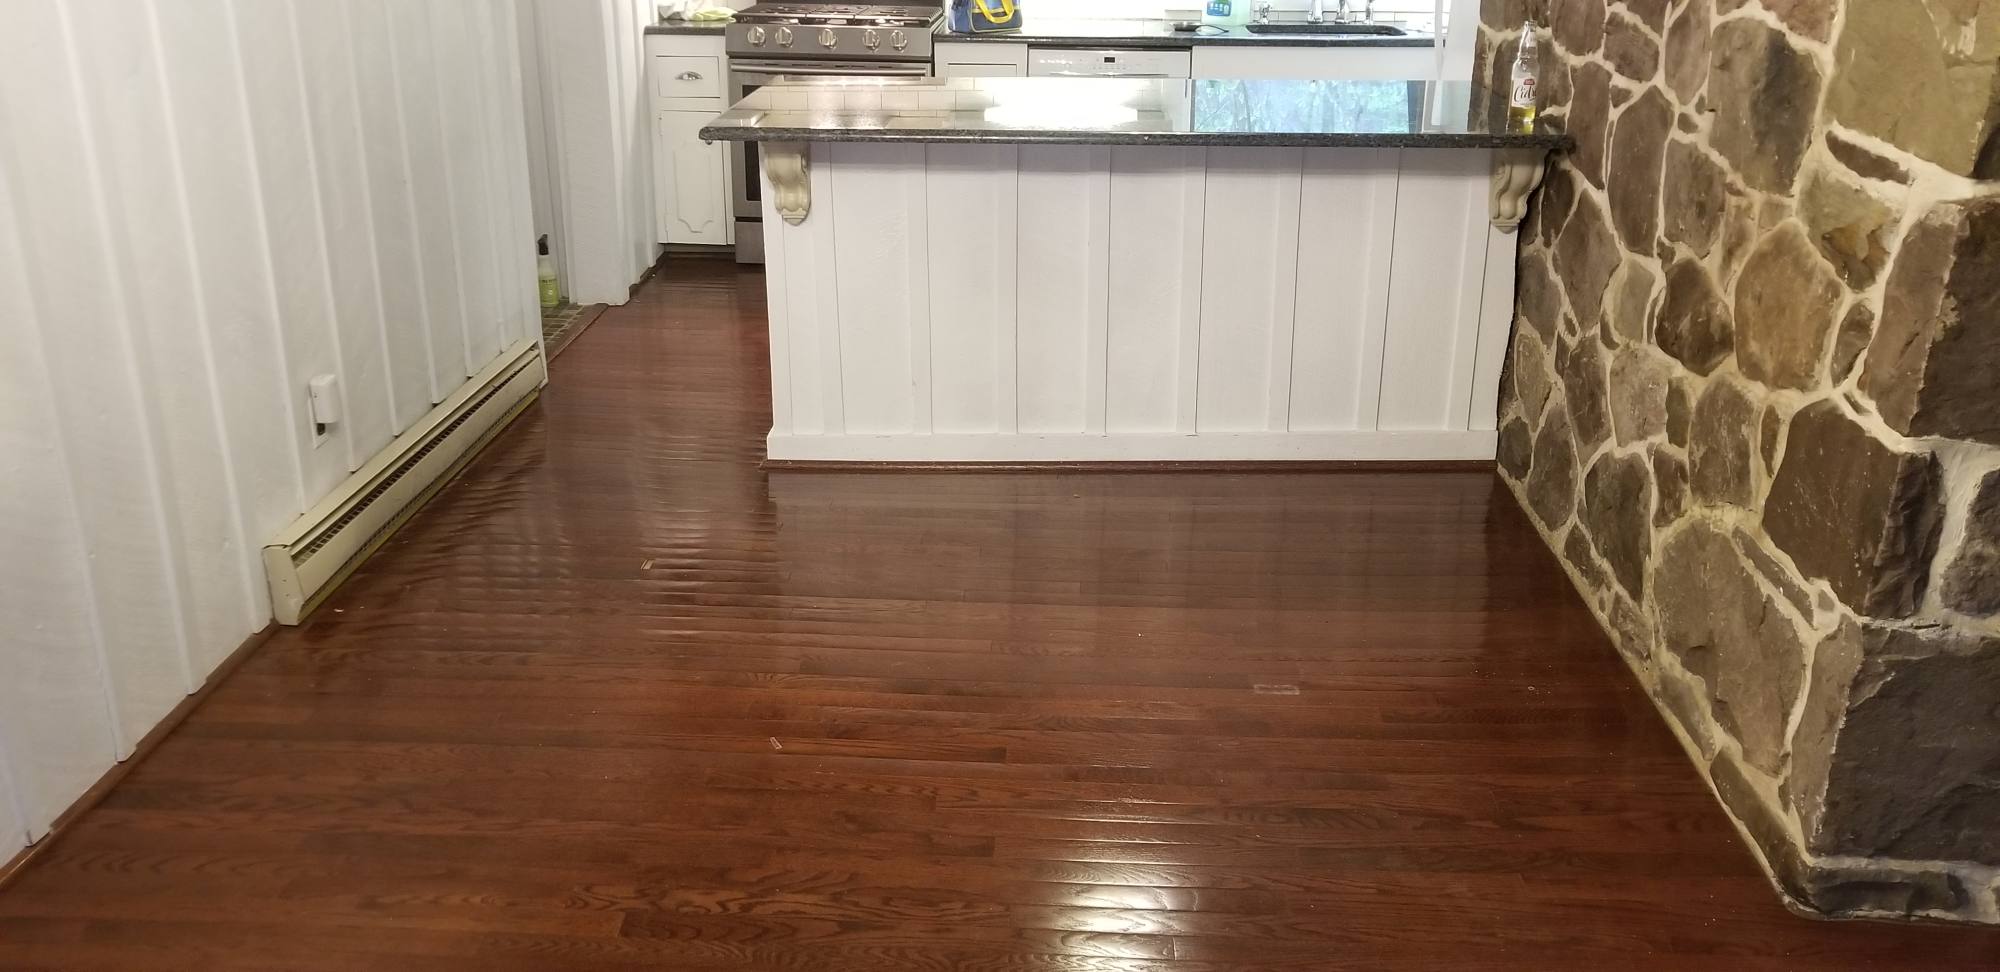
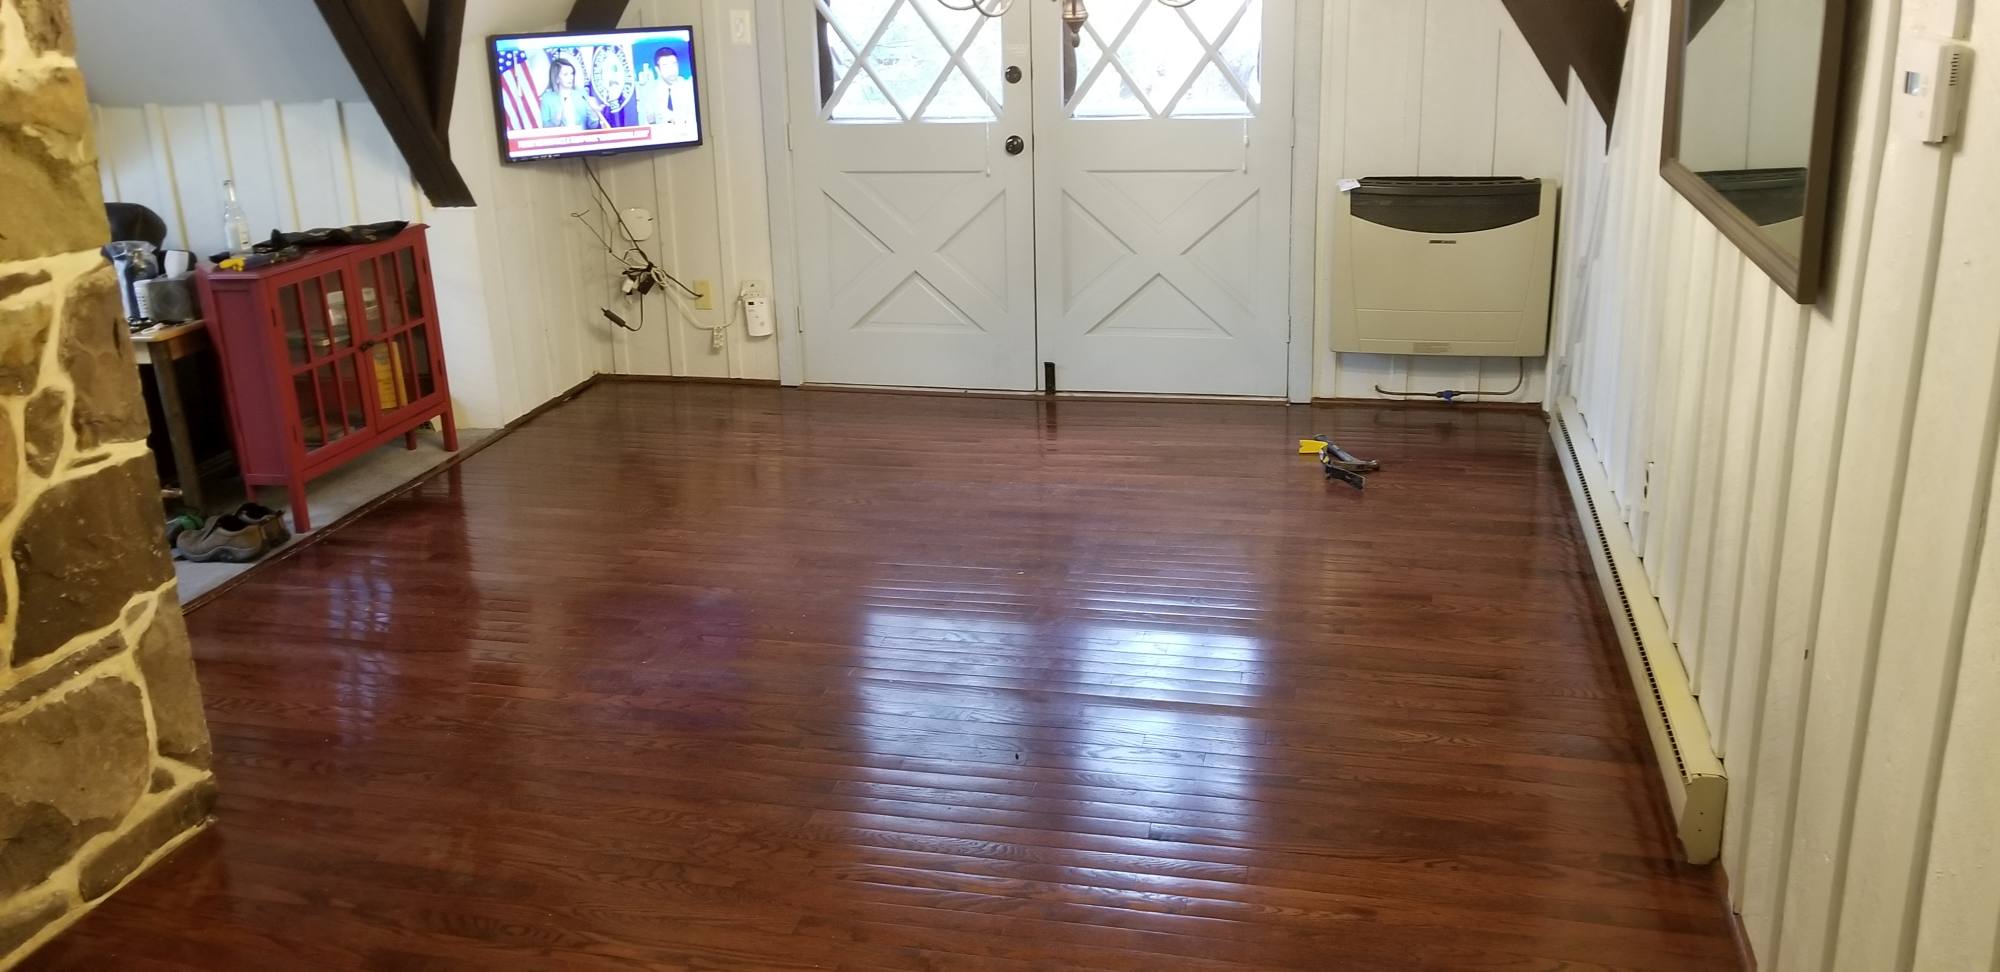
Hier sind einige Vorher-Bilder des Raums mit dem Originalboden.
Wir waren von der Farbe der Originalböden begeistert, Aber der Bodenbelag passte nie wirklich zum Stil des Hauses. Es war ein 3/8″ schwimmender Boden und die Holzleisten waren ziemlich dünn. Weil es schwebte und ein ziemlich dünner Boden war, Es klang immer etwas hohl, wenn man darauf ging.
Das eigentliche Problem des alten Bodenbelags war, dass er sich an einigen Stellen verformte, Wahrscheinlich liegt es an der Art und Weise, wie es installiert wurde.
Dieses Knicken war einer der Gründe, warum wir der Meinung waren, dass der breite Dielenboden aus Sperrholz perfekt für diesen Raum wäre.
Der breite Dielenboden hat einen Abstand um jedes Dielenbrett herum, Dieser Abstand würde verhindern, dass der neue Boden einknickt.

How Much Plywood Do You Need
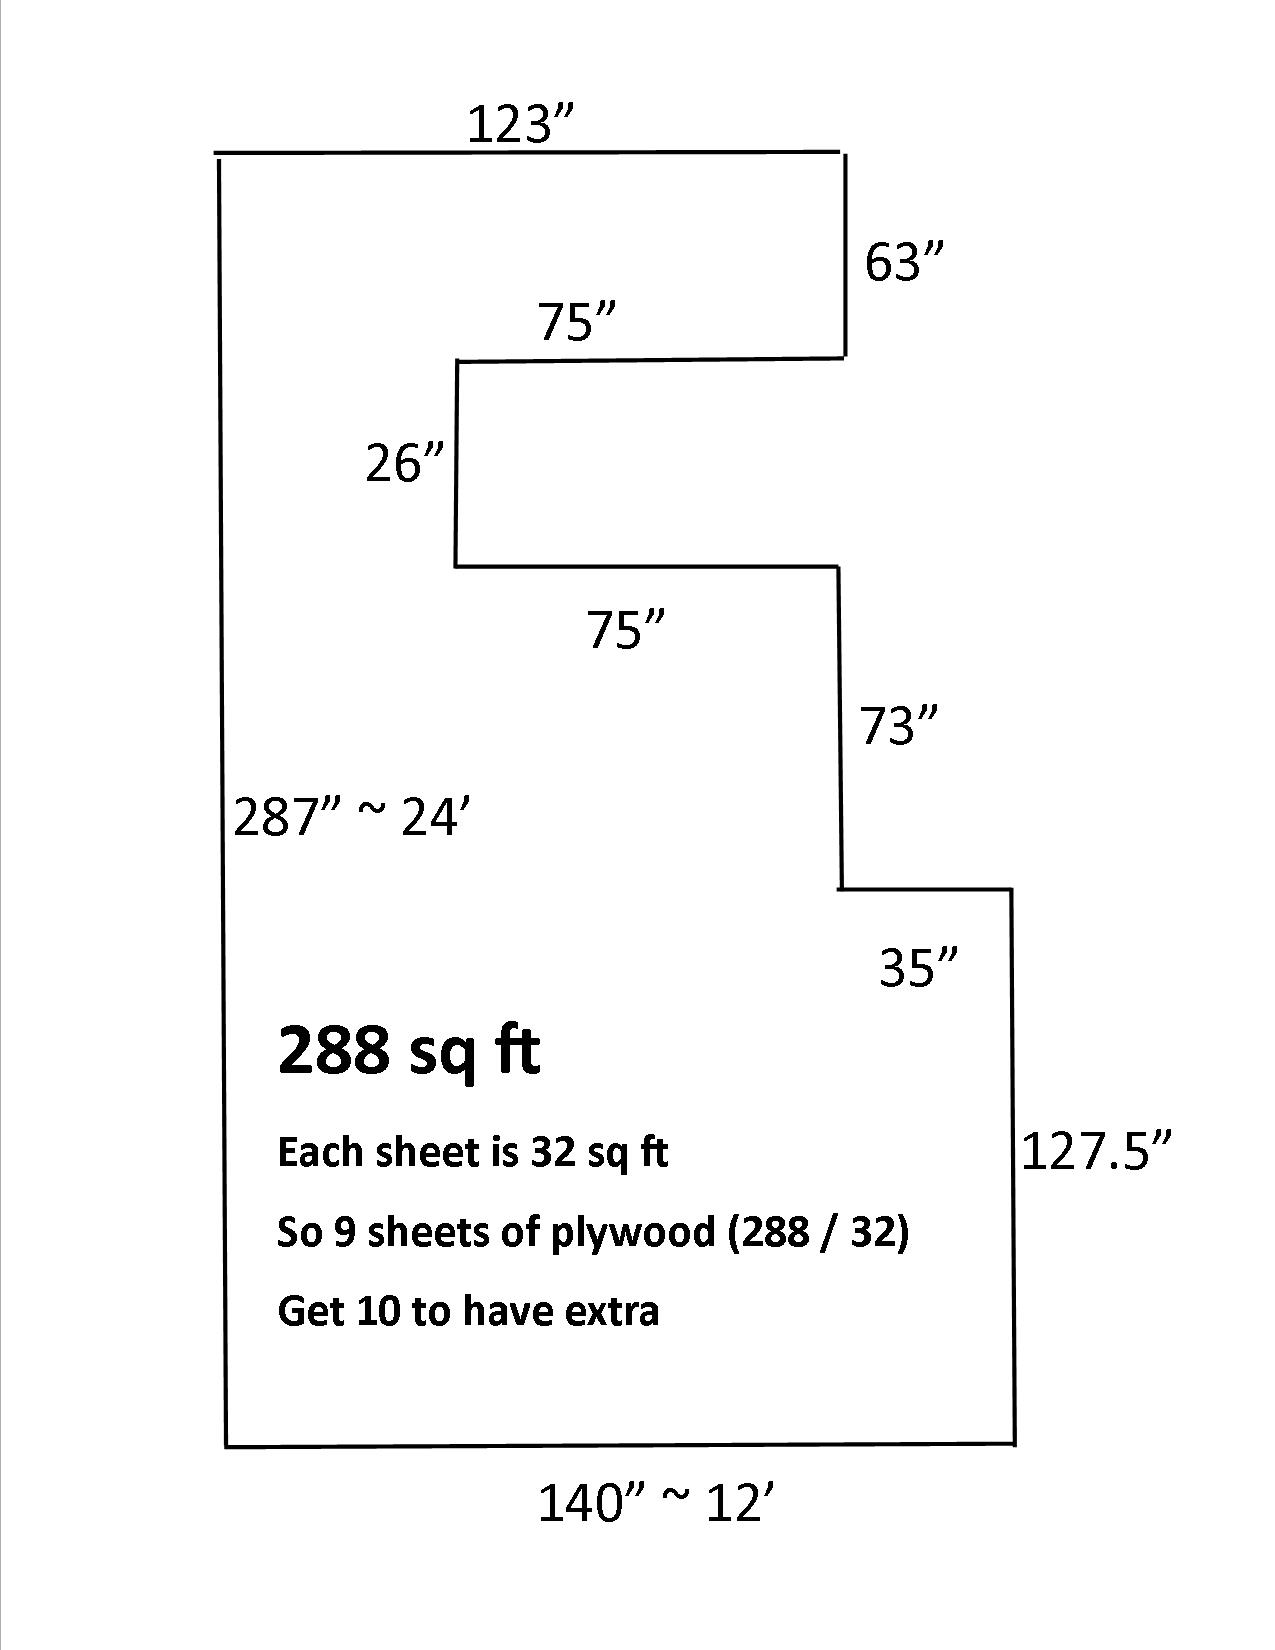
The measurements don’t need to be super precise. Rounding up the measurements and adding an extra plywood sheet to the total should give you enough wiggle room.
For our space, I treated it like a big rectangle. The length was 287″ (rounded up to 24′) and the width was 140″ (rounded up to 12′).
24 x 12 is 288 sq feet.
Each sheet of plywood is 4′ x 8′ so that gives you 32 square feet per sheet.
When I divided the total sq feet (288) by the sq feet per sheet (32) it told me I needed 9 sheets of plywood.
Then I added an extra sheet as a buffer.
The Final Numbers
Wir haben für unser Projekt 10 1/2-Zoll-Sperrholzplatten gekauft und nach Fertigstellung fertiggestellt, wir hatten noch ca. 1 Blatt übrig.
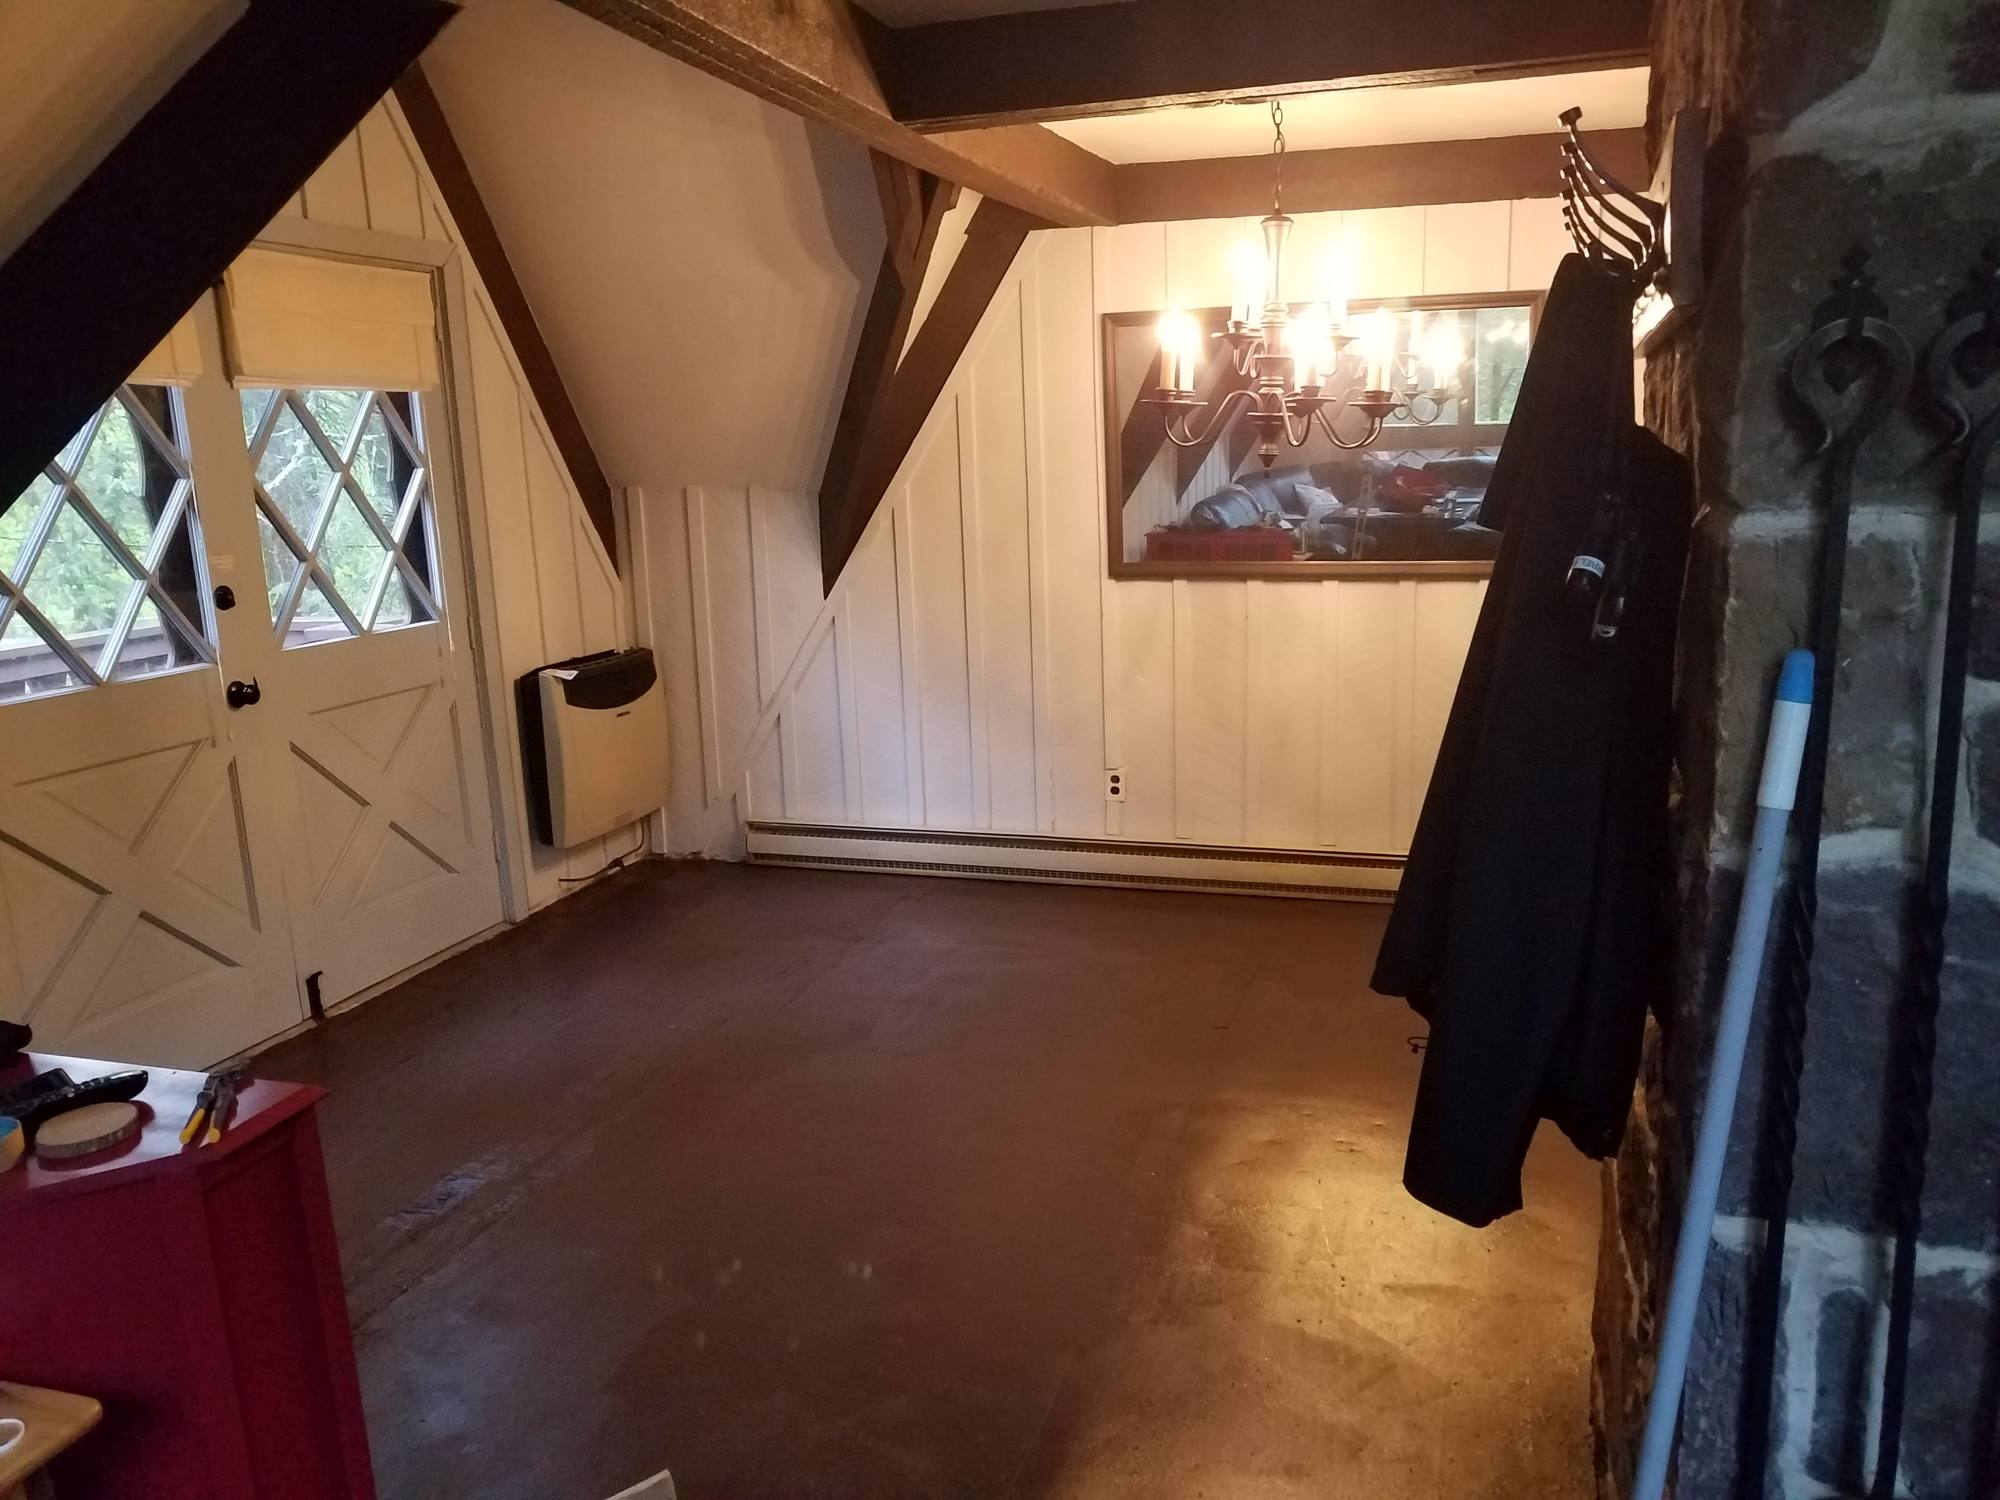
Vorbereiten des Unterbodens
Gesamtzeit: 2 Personen ca. 2 Stunden
Der ursprüngliche Boden war ein 3/8″ Hartholzboden, der mit vielen Heftklammern verlegt wurde …. wie viele Grundnahrungsmittel.
Zunaechst, Es fühlte sich an, als würde die Entfernung der Klammern EWIG dauern.
Sobald wir jedoch einen Rhythmus gefunden hatten, dauerte es wirklich nur ein paar Stunden, bis wir fast alle geschafft hatten.

Unterbodenanstrich
Der Unterboden, den wir hatten, bestand aus unbemaltem Sperrholz.
Wenn wir den Breitdielen-Sperrholzboden verlegt hätten, ohne vorher den helleren Unterboden zu streichen, es hätte durch die Zwischenräume zwischen den Planken hindurchscheinen können.
Damit das nicht passiert, Wir haben den Unterboden in einem sehr dunklen Braunton gestrichen, mit Farbe, die wir bereits hatten.
Jede dunkle Farbe würde den Zweck erfüllen – Kleben Sie einfach eine Eierschalen- oder Satinfarbe auf.
Sie möchten nicht, dass ein glänzender Unterboden durch die Zwischenräume zwischen den Dielen hindurchscheint.
Das Sperrholz in Bretter schneiden
Gesamtzeit: Mit der richtigen Klinge würde dies für 10 Blatt weniger als 2 Stunden dauern
Ich nenne sie weiterhin Planken oder Bretter, aber grundsätzlich, In diesem Schritt habe ich die Sperrholzplatten genommen und sie in lange Streifen geschnitten.
In vielen Pinterest-Beiträgen, auf die ich gestoßen bin, stand, dass sie eine Person von Lowes oder hatten Zuhause Depot hat die Laken für sie zugeschnitten.
Es ist definitiv eine Option. Ich habe ihre Schneidedienste in der Vergangenheit in Anspruch genommen, als die Schnitte nicht sehr präzise sein mussten.
In diesem Fall, Ich wollte präzisere Schnitte, Also habe ich mich dafür entschieden, es selbst zu tun.
It takes A LOT longer but I thought having consistently sized plywood planks was worth the extra time.
Dieser Weg, I was sure each piece was going to be about the same width.
To make cutting the pieces MUCH easier and to keep them the same width I made a jig.
They say hind site is 20/20, well looking back on it I would still cut the plywood strips for flooring myself.
I recently used the cutting services for another project where I didn’t care about the width they cut it an man o man, I don’t think there were two cuts that were the same width.

The Best Saw Blade To Use
We had 10 sheets of plywood to cut into wide plywood planks. I figured that a plywood blade would be the best. I thought anything else would leave a really rough edge on the wood.
Gut, I was very, very wrong.
Do Not Use A Plywood Blade – Use a Cross Cut Blade instead
The plywood blade didn’t last very long and took a lot of effort to go through the plywood. It started smoking and having a lot more difficulty cutting barely halfway into the second sheet of plywood.
I ended up having to go out and buy another blade. This time I tried a cross cut blade, OMG what a difference.
The cross cut blade went through the plywood like butter and left an even better cut than the plywood blade did. I was able to do the rest of the plywood using just that one cross cut blade.
If you want to get the same cross cut blade I used, just click the picture below.

The Jig
A jig is fancy talk for a template. It really made a tedious and time-consuming task super easy.
It was basically a 1/2″ piece of scrap plywood I had with a scrap piece of 1 x 4 screwed to it.
The space between the saw blade and the piece of 1 x 4 was 5 7/8″, the thickness we wanted our plywood flooring planks to be.
To make the jig I put the blade of the saw all the way up, secured the saw to the plywood with screws all around the saw, wedging it in place.
Then I slowly lowered the saw into the plywood and measured 5 7/8″ from the inside of the plunge cut and that’s where I screwed in the 1 x 4.
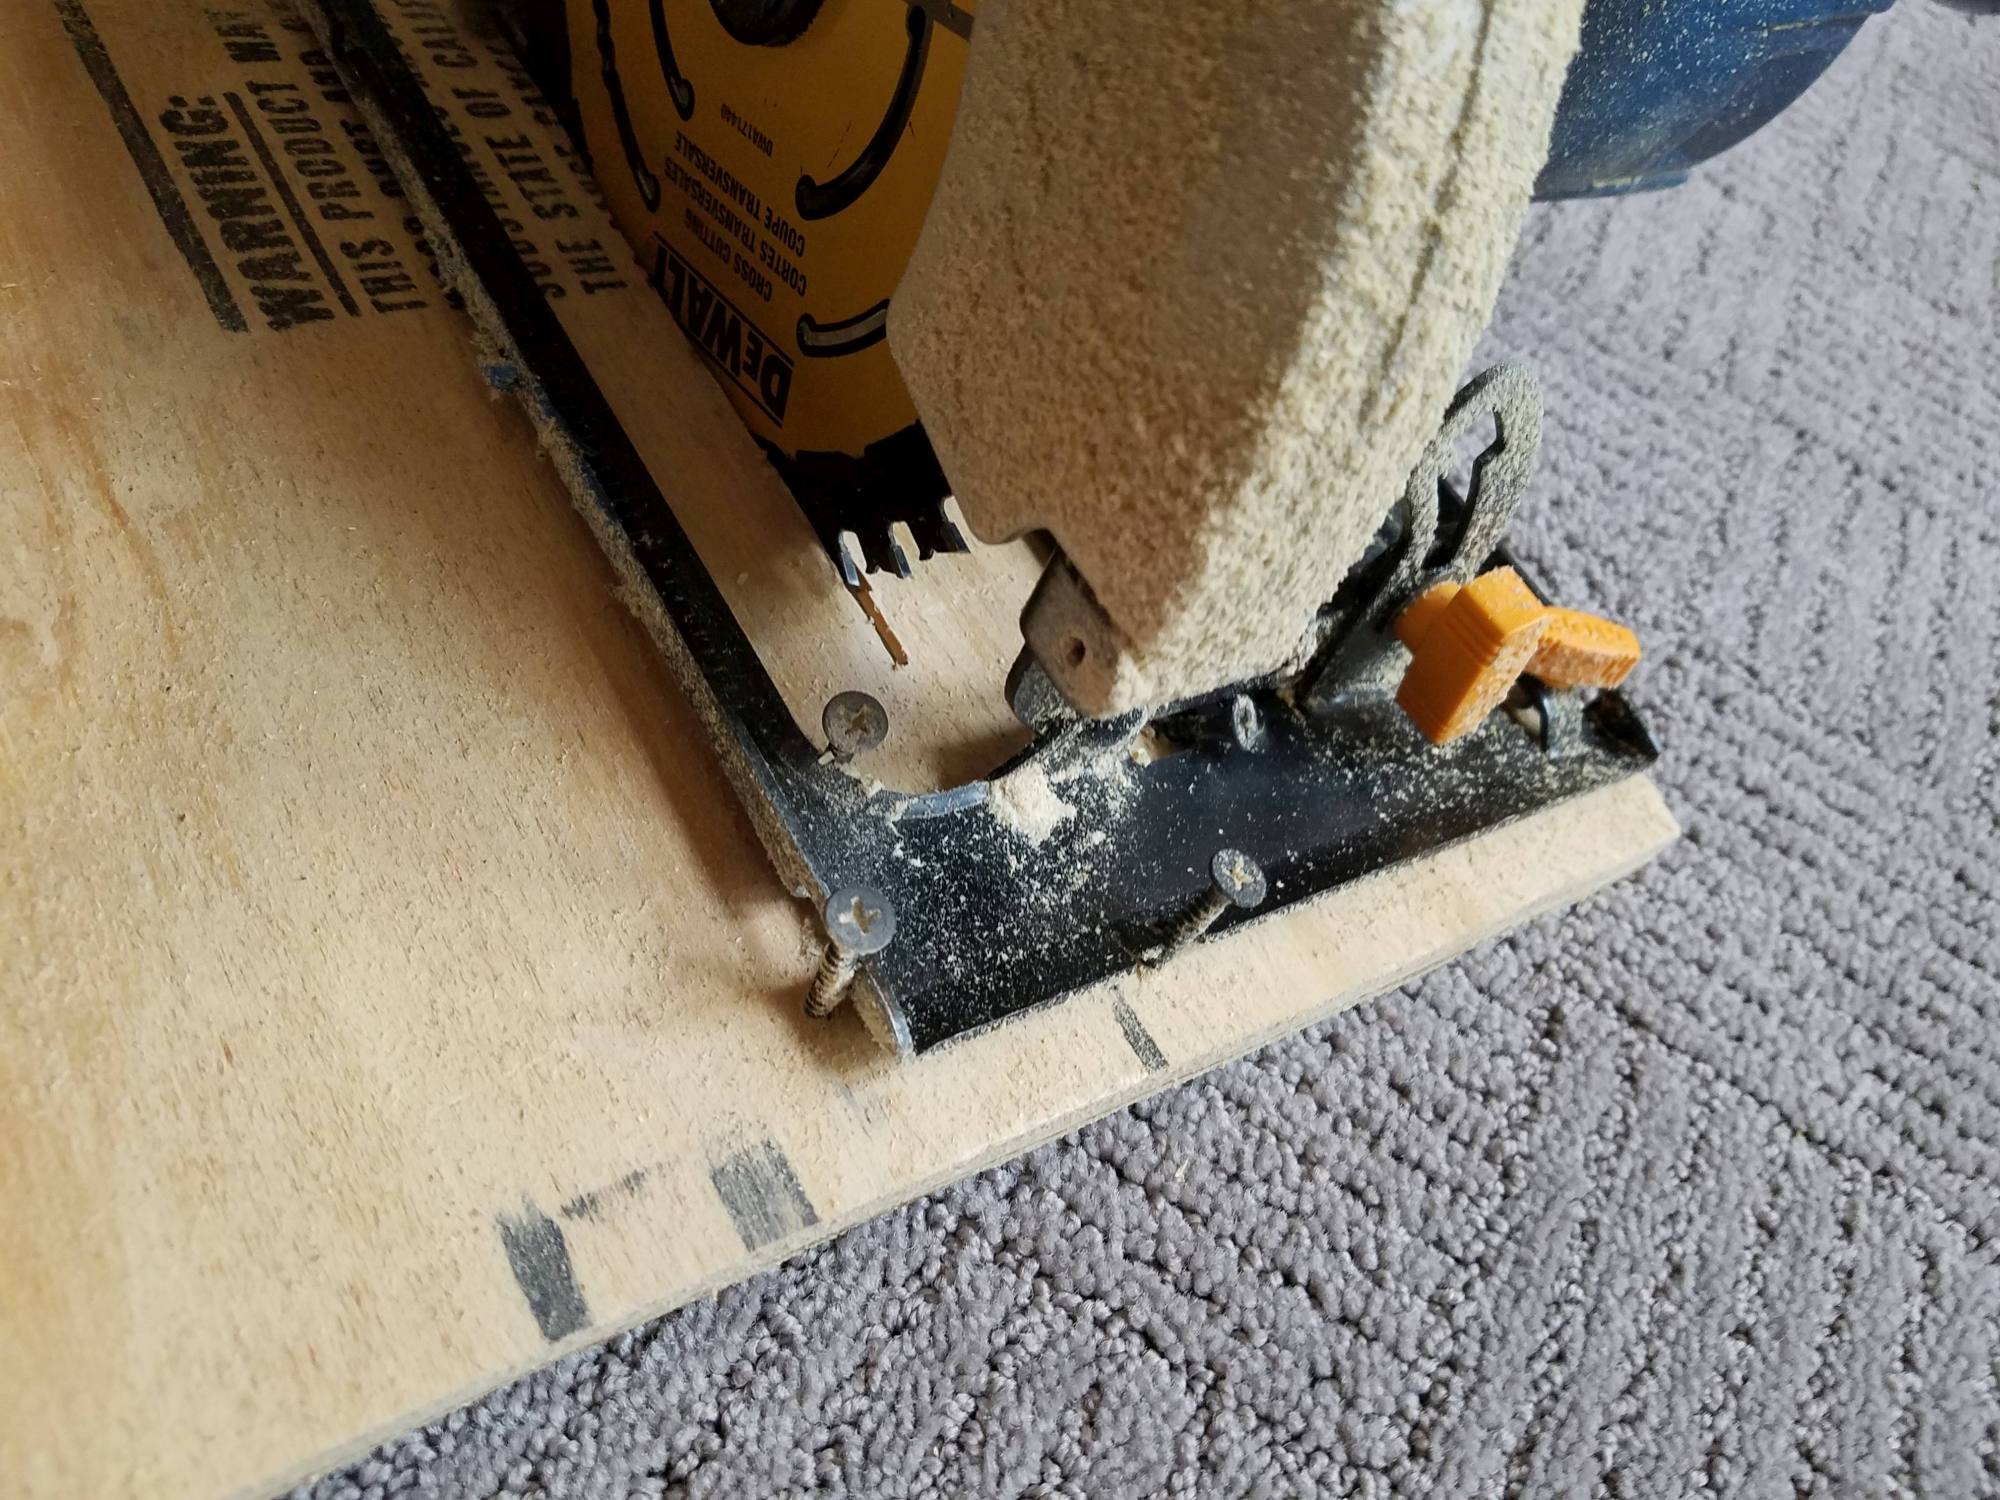


Weitere Informationen zur Schablone und einige zusätzliche Tipps zum Schneiden der Bretter finden Sie in diesem Beitrag, 3 zeitsparende Tipps für DIY-Dielensperrholzböden.
Spitze: Wenn Sie Ihre eigenen Bretter schneiden Du musst eine Schablone machen. Bei der Herstellung Ihrer Vorrichtung, Verlängern Sie den 1 x 4-Weg vor und hinter der Säge, wie es auf den Bildern ist.
Dadurch können Sie die Säge so ausrichten, dass das Sägeblatt das Sperrholz berührt. Es gibt auch mehr Stabilität, Am Ende erhält man einen geraderen Schnitt.
Schleifen jeder Planke
Gesamtzeit: 2 Personen etwa anderthalb Tage
Dieser Teil hat eine Weile gedauert, Aber es ist wichtig, sich die Zeit dafür zu nehmen.
Wir haben die Oberfläche des Sperrholzes abgeschliffen, um eventuelle Splitter und den Text zu entfernen, der manchmal auf dem Sperrholz eingeprägt ist.
Außerdem haben wir mit dem Schleifer die Kanten rund um die Vorderseite jeder Diele abgerundet.
The rounded edge gives it a really nice finished look and helps in cases like ours, where the floors aren’t very level.
Rounded edges give a soft transition between two planks when they don’t quite line up.
This is also where you choose which side of the plywood will be the face, the pretty side or the ugly side.
When we were choosing sides, I’d say we chose the ugly side 80% of the time.
It went against what I would normally do, but now I kinda wish I went with the ugly side more.
We used a belt sander to do most of the sanding. You could use a palm sander if you’re not doing too much flooring but in our case, the belt sander was much faster.
The sandpaper we used was 120 grit, it was perfect for the belt sander.
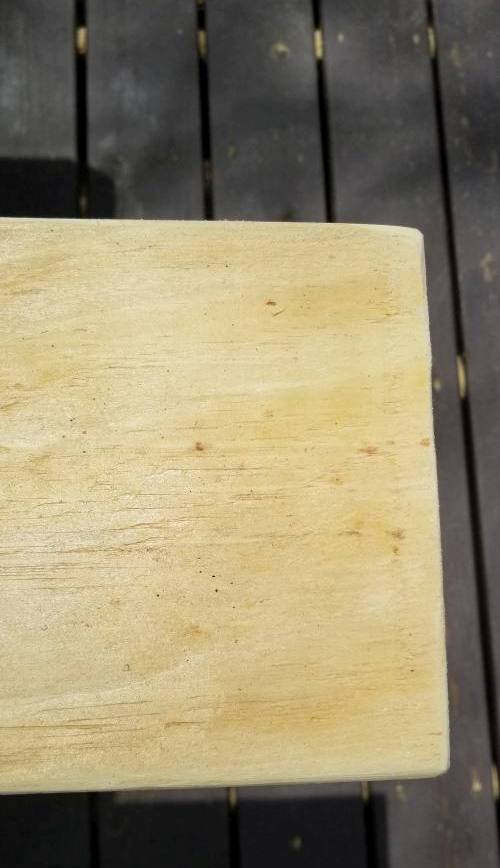
Während dieses Teils des Projekts, Sie werden Zweifel haben, ob Sie den knorrigen Teil des Sperrholzes verwenden sollten.
ABER VERTRAUEN SIE MIR – sobald Sie den Fleck auf das Sperrholz aufgetragen haben, werden Sie überwältigt sein, wie gut es aussieht.
Schlussendlich, Die schönsten Bretter waren diejenigen mit Unvollkommenheiten.
Spitze:
Wenn ein Brett einen Knoten oder einen Riss aufweist, Legen Sie es nicht zur Seite und verwenden Sie es nicht in einem Bereich, den Sie nicht sehen können.
Stattdessen, machen Sie es auffälliger. Graben Sie mit der Schleifmaschine in den Knoten oder Riss, um den Riss oder Knoten stärker hervorzuheben. Es hilft dabei, Splitter zu entfernen, die sich um den Knoten oder Riss herum befinden, und verleiht ihm Charakter.

Beanspruchung des Sperrholzdielenbodens
Gesamtzeit: Wir haben dies gleichzeitig mit dem Schleifen durchgeführt, sodass es in den anderthalb Tagen, die wir mit dem Schleifen verbracht haben, enthalten ist
Dies ist der beunruhigende Teil der abgenutzten Sperrholzböden.
Für den Charakter des Sperrholzes standen drei Waffen zur Auswahl (a.k.a. beunruhigend), ein Hammer, eine große Zange und ein Propanbrenner.
Von den drei habe ich die Zange am häufigsten und den Hammer am wenigsten benutzt.
Mit einer Zange, Ich habe wiederholt mit der hinteren Ecke der Zange auf die Oberfläche des Sperrholzes geschlagen.
Mit dem Hammer, Ich habe die Seite des Hammers verwendet, und die Klaue, um Vertiefungen in das Sperrholz zu machen.
Wenn Sie auf dem Bild direkt über dem Hammer auf den Boden schauen, sehen Sie die Vertiefungen auf der Rückseite der Zange links.
Ich habe auch ein Universalmesser verwendet, um eventuelle Risse im Holz zu öffnen, um sie stärker hervorzuheben.
Ich habe das gemacht, indem ich das Messer schräg gestellt und entlang des Risses geschnitten habe, den Riss öffnen, Ähnlich wie bei Rissen im Beton, wenn man einen Riss füllen möchte.
Das Beunruhigende (auch bekannt als Charakterbildung) ist ein wichtiger Schritt für rustikale Sperrholzböden im Used-Look.
Durch die Verfugung und den Riss wirken die Dielen authentisch, je belastender, desto besser.

Noch mehr Charakter hinzufügen – Die Sperrholzplatten verbrennen
Der Propangasbrenner war bei weitem mein liebster Charakterbauer – Und das lag nicht daran, dass es meinen inneren Pyro ansprach…. Na ja, vielleicht ein bisschen wegen meiner inneren Pyro-Stimme, lol.
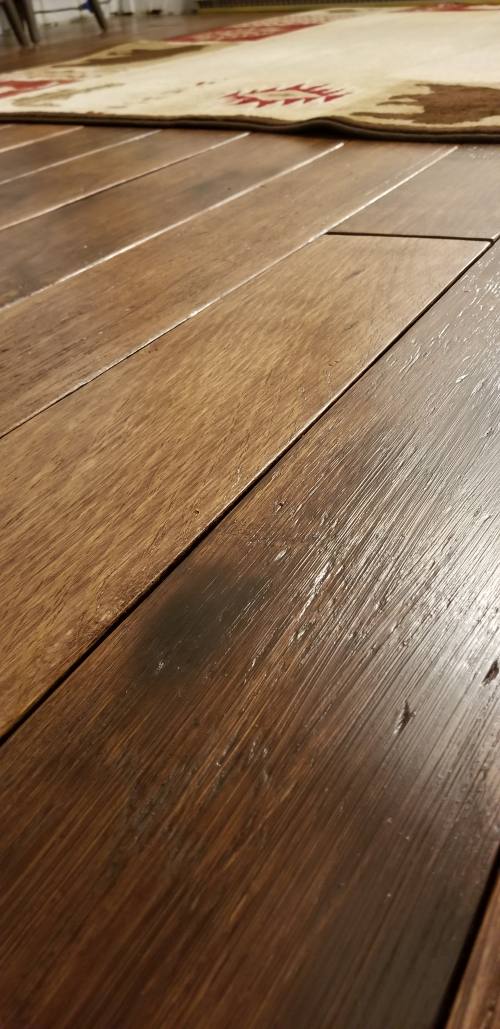
Durch das Verbrennen des Sperrholzes entsteht sofort ein erstaunlicher, gealterter Look.
Dies ist ein weiterer Teil des Prozesses, bei dem ich sehr gezögert habe.
Aber sobald der Fleck weitergeht, Die Sperrholzbretter verwandeln sich sofort in eine wunderschön gealterte Diele!
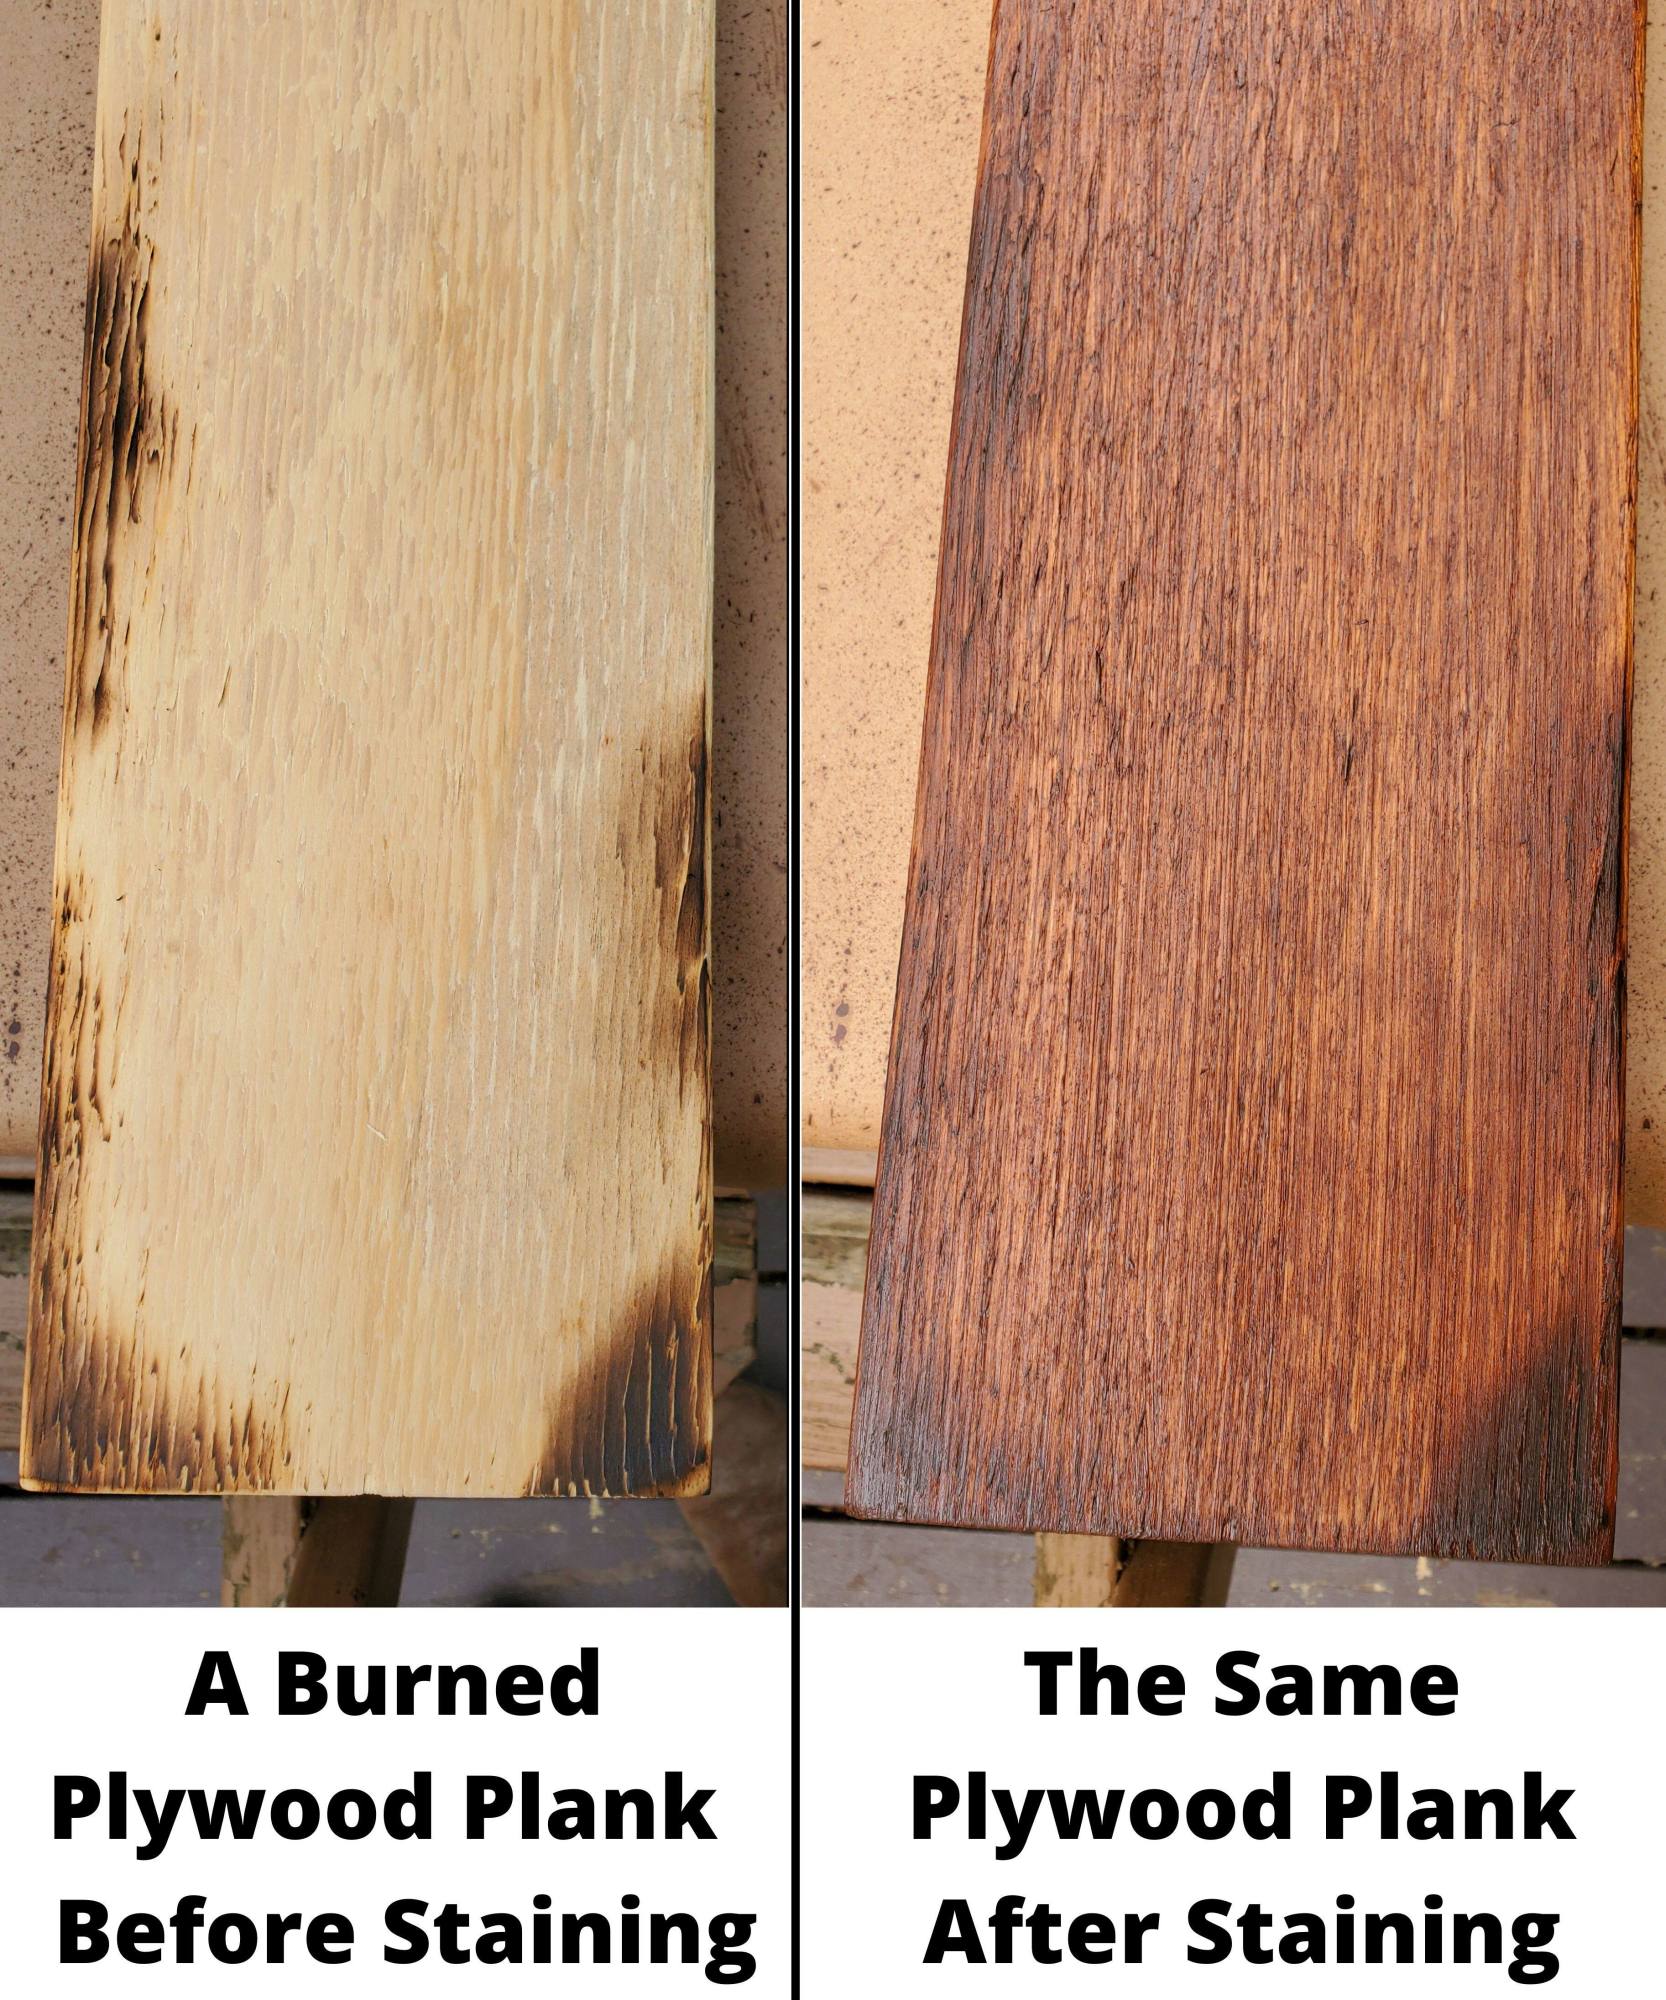
Take a look at the before and after picture of the burned plywood plank.
When burning the wood there are definitely thoughts of Oh My God! This is too much!
Aber, as soon as the stain goes on, it blends the darkness of the burn the the rest of the plywood colors beautifully.
Whenever we came across a plank that looked a little boring, we burned some character into it to liven things up. 🙂
Take a look at the arrows in the picture, each one of those dark marks is the work of the propane torch.
Spitze: When burning the plywood, the lighter parts of the wood burn much easier than the darker parts.
Since I was avoiding that plywood zebra pattern, I didn’t burn the wood where there was a heavy pattern.
Burning that area would only emphasize the pattern – and I didn’t want that.
Wenn der Teil des Holzes entweder nur dunkel oder nur hell war, konnte er verbrannt werden.

Hier ist ein Video, wie wir den rustikalen Sperrholzboden aus breiten Dielen verbrannt haben.
Wir haben uns für Gel Stain entschieden, Das ist der Grund
Der Prozess begann damit, zunächst eine Reihe verschiedener Beizen auf Sperrholzresten auszuprobieren, und das war bei weitem unser Favorit!
Wir haben uns für eine Gelbeize anstelle einer normalen Beize entschieden, weil sie das Sperrholz-Zebramuster, das wir nicht wollten, wirklich gut überdeckt.
Es ist völlig eine persönliche Präferenz, but I don’t like the pattern you get from regular stain on plywood floors.
Take a look at this picture I copied from Pinterest, for an example of what I’m talking about.
Regular stain is more liquid and gets absorbed by the plywood at different rates. Softer parts of the wood absorb the stain faster than the denser parts of the wood.
A workaround would also be to use a wood conditioner before applying regular stain.
Stattdessen, we used the gel stain.
Because we used the gel, we were able to skip the wood conditioner.
Plus, the gel stain added a nice wood grain pattern on the surface of the board, making it look less like plywood….BONUS!

The Gel Stain We Chose
The gel stain we used had a dark color and created a lighter stain on the wood. The result was a cherry colored wood with a dark grain pattern on top, exactly what we were looking for.
The thicker you applied the stain the darker the board would be.
Auch, the longer you waited before brushing the excess stain off the darker the plank will be.
If a plank had a heavy zebra pattern on it, we put the stain on thick and waited a bit more before dry brushing it.
That did a pretty good job of minimizing the zebra pattern.
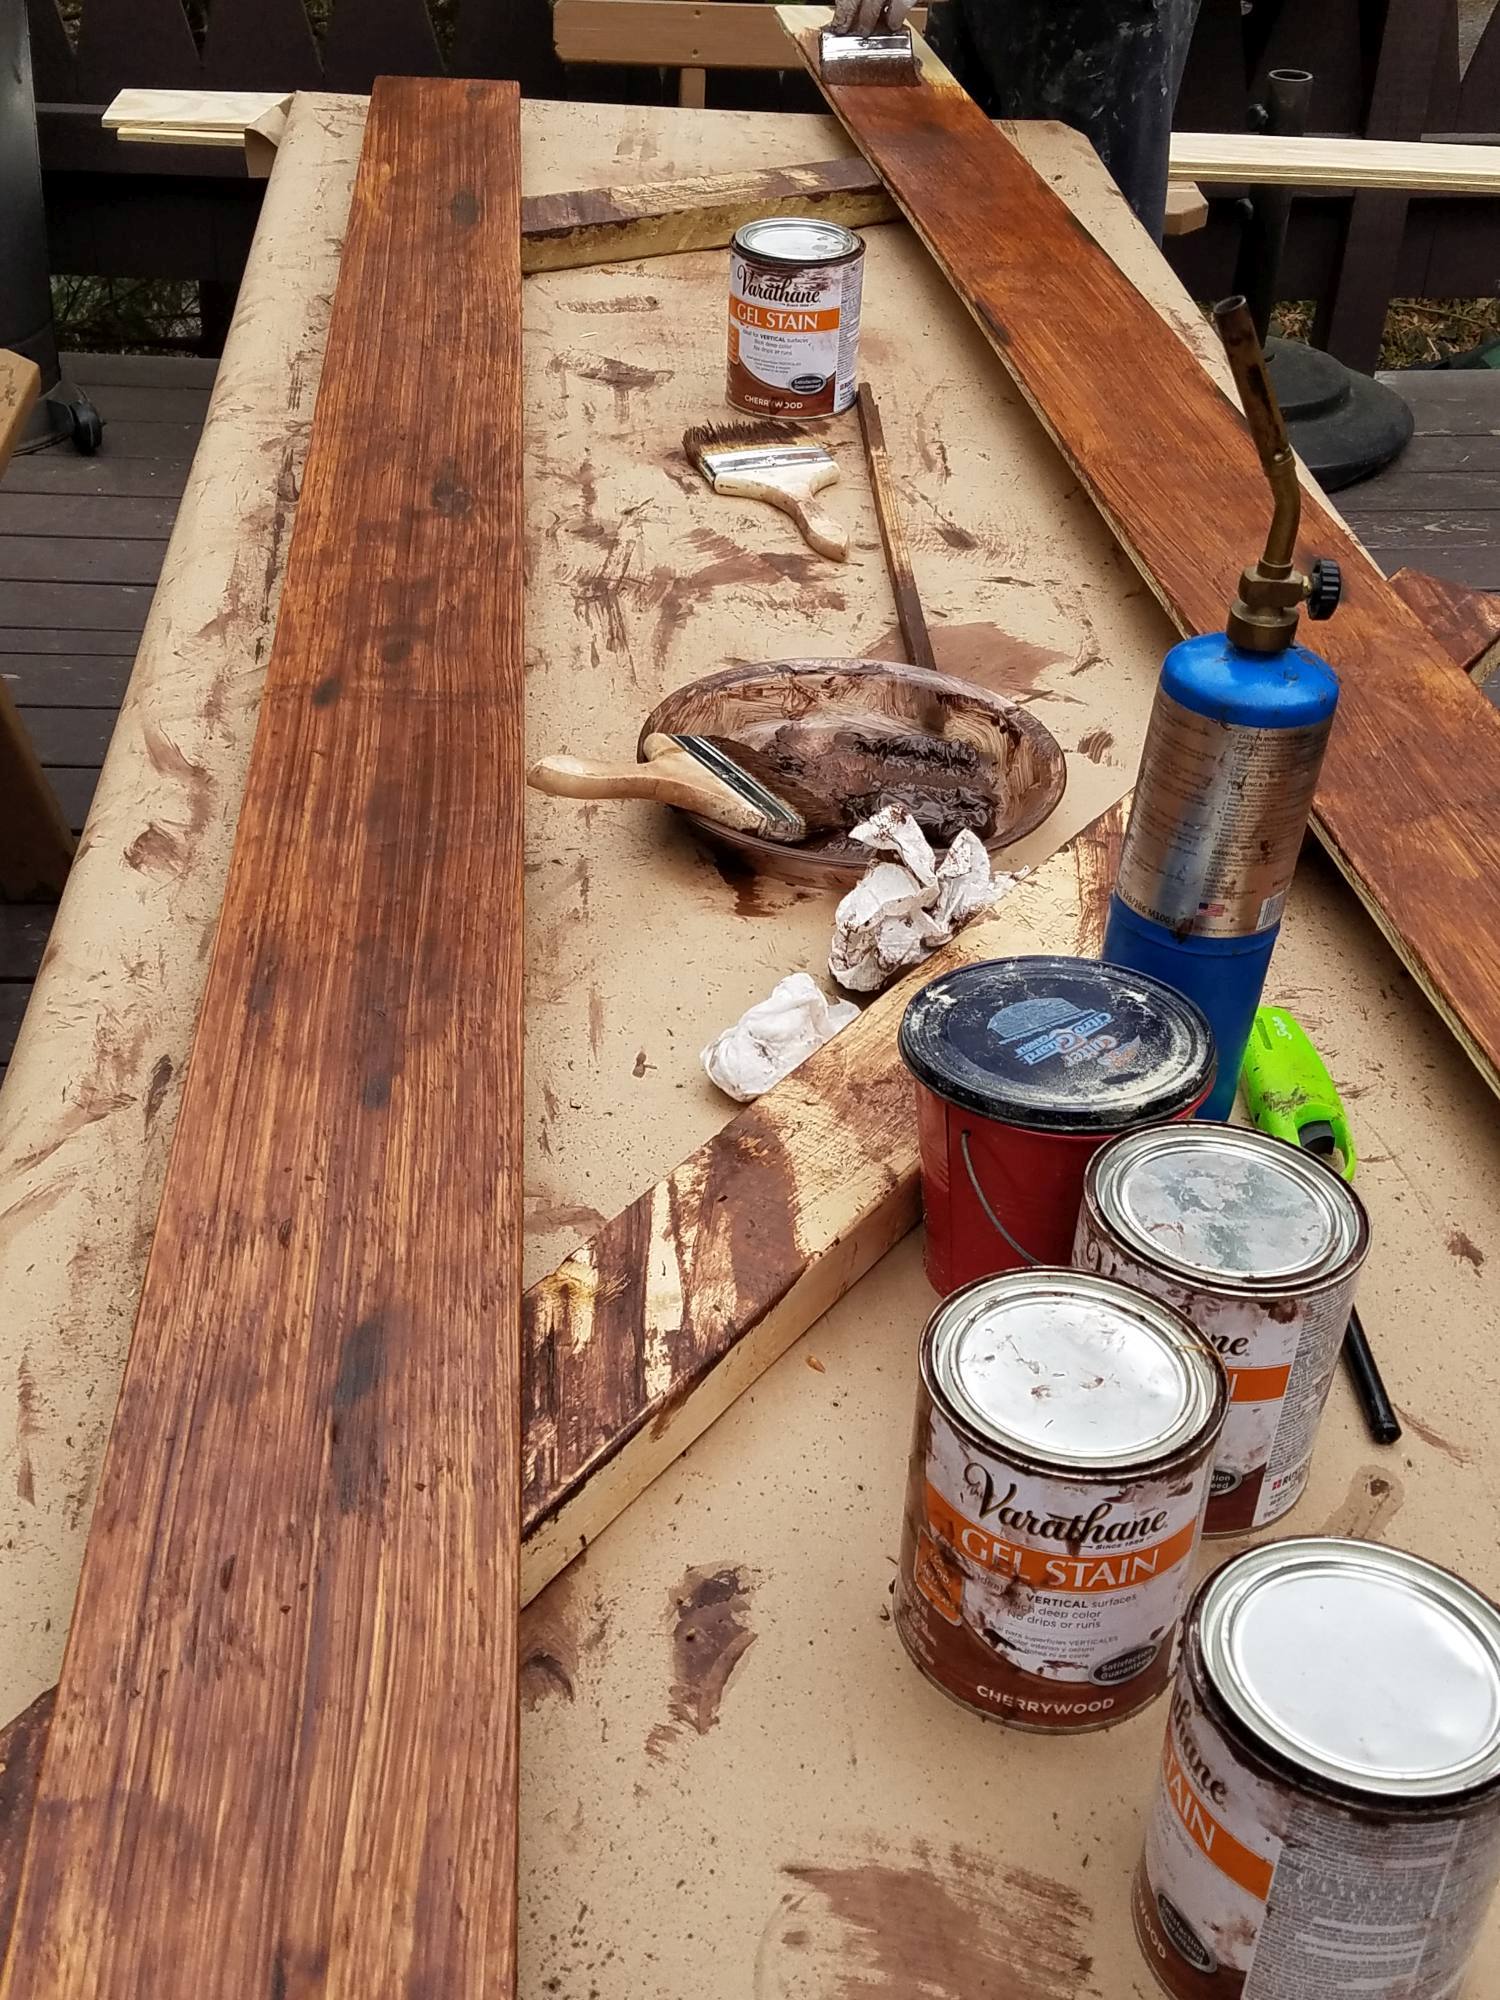
The brush we used for the stain was a cheap wide (about 4″) real bristle brush.
The stain has a strong polyurethane smell to it, so we did the staining out on the deck and also let the boards dry out there.
If you’re going to do the same, make sure to first check the weather forecast!
We used about 7 quarts of stain to do our project.

Staining Plywood Floors
Gesamtzeit: 2 people about a day
When we stained the plywood floors, we did one coat of stain using the dry brush technique.
Grundsätzlich gilt, first we applied the stain with the wet brush, then used a dry brush to brush off the excess stain.
With every pass of the dry brush, we would wipe off the dry brush on a paper towel to remove the majority of the stain from it.
We chose the dry brush method because it leaves a nice dark wood pattern.
When applying the stain and dry brushing, we were able to play with the texture that the stain leaves on the plywood.
Das Mischen und die Verwendung wellenförmiger Pinselstriche, um eine Maserung zu simulieren, oder das Bürsten um einen Ast im Holz herum verliehen jedem Brett seine Einzigartigkeit.
Merken, Je länger der Fleck einwirkt und desto länger trocknet er, bevor er mit der Trockenbürste aufgetragen wird, desto dunkler wird die Tafel.
Normalerweise haben wir den Fleck aufgetragen und ein paar Minuten gewartet, bevor wir den trockenen Pinsel verwendet haben.
Wenn wir auf ein Brett stießen, auf dem sich viel Zebramuster befand, trugen wir eine dickere Schicht auf und ließen es etwas länger einwirken.
Durch das dickere Fell und die längere Wartezeit konnte das Zebramuster besser maskiert werden.
Nach dem Auftragen der Beize warteten wir 24 Stunden, bevor wir das Polyurethan auftrugen.
Auftragen des Finishs
Gesamtzeit: 2 Personen etwa anderthalb Tage
For the finish we used a clear satin, water based, oil-modified polyurethane.
This product was perfect for our project because it didn’t change the color of the stain, dried quickly and best of all – it’s oderless!
If you’ve ever done any sort of polyurethane project. you know that the smell from polyurathane is no joke… and it lingers for days and days. This has no smell at all!
We went with a satin finish because we wanted an aged look and a glossy floor would be the opposite of that.
Three thin coats of poly were applied on all the boards, including the sides of the boards. Between each coat, we waited about 2 hours before applying the next coat.
We then waited 24 hours after the last coat before installing the boards.
We didn’t sand between the first and second coats but did do a light hand sanding with 120 grit sandpaper before applying the final coat.
The brush we used for the poly was a cheap wide (about 6″) synthetic brush.
We used 2 gallons of polyurethane for our project.

Spitze: When applying any polyurethane, bubbles are something you want to avoid.
That’s because the bubbles don’t pop. Stattdessen, they dry into poly… and that’s not a good look. lol
To prevent bubbles, mix the poly using a mixing stick using smooth circular motions.
No shaking the can here!
Aktualisieren: When we originally did the dining room floor we did a light sanding before the final coat of poly.
Recently we did the living room floor and for that flooring, we skipped the sanding before the poly.
We figured not sanding would give the planks a bit more texture and save us a boatload of time.
Es hat wirklich gut geklappt! From now on, we won’t be sanding before the final poly coat.
It’s All About That Space
The spaces between each plank were perfect for the style we were looking for.
The spacing would give it more of that farmhouse feel and prevent the buckling that the previous floor suffered from.
A few of the posts on Pinterest mentioned using quarters as spacers, so that’s what we used.
Our breites Brettsperrholzboden has small variations in the spacing, mostly because of the uneven floors – but that’s ok – wabi-sabi. 😉
Where To Start Laying The Plywood Planks
I used a tip I came across on one of the Pinterest posts, starting on the side of the room where the floor is the most visible.
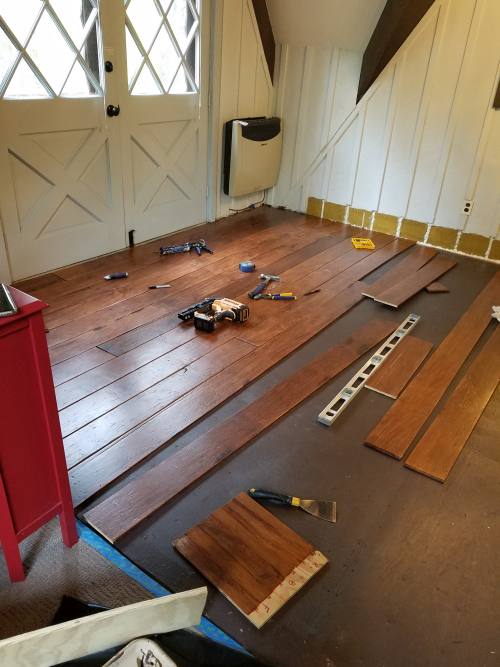
For our space the most visible part of the floor was by the front door so that’s where we started.
When we reached the opposite end of the space we ended up with the last row of planks needing to be ripped in half.
Make Sure To Space Out The Seams
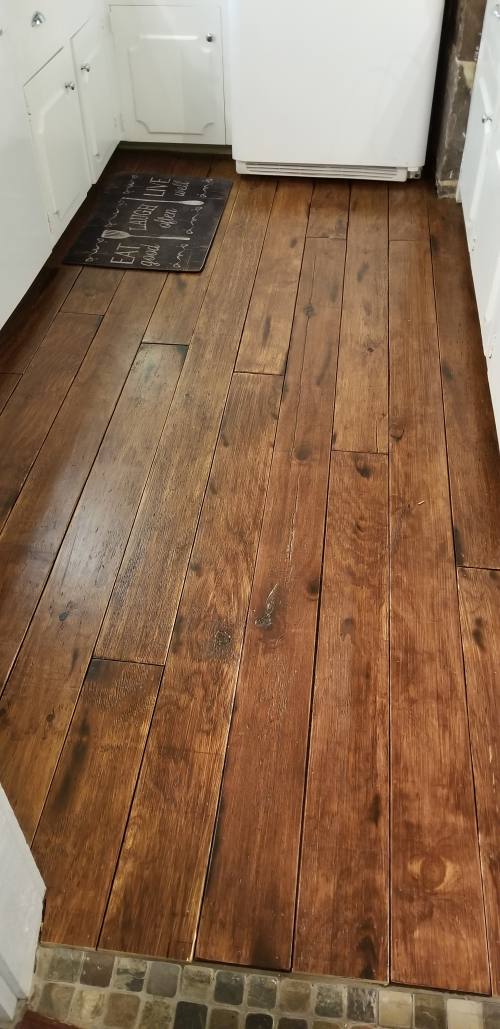
Each plank was 8 feet long and the room was a little over 12 feet wide, so there weren’t too many seams to work with.
The rule of thumb is to not have two consecutive rows with seems less than a foot apart from each other.
Cutting The Plywood Boards To Length
I used a miter saw to cut the boards to length. Pretty straight forward. One tip is to make sure the blade reaches full speed before you start cutting into the plywood. That’ll give you a clean, smooth cut.
Spitze: Every once and a while making a cut would create a thin line of bare wood at the very edge of the cut. When that happened I used a dark colored sharpie to color that bare wood and that blended it right in.
I used a black sharpie but a brown sharpie would work just as well.
I actually used the sharpie a lot with the length-wise cuts.
Securing The Rustic Wide Plank Plywood Flooring In Place

Spitze: If you end up buying the same nail gun I’d recommend also buying an extra battery. It already comes with one battery, buying the extra battery will help keep your project moving along.
One More Note
The plywood flooring we installed is 1/2″ thick and the previous flooring was 3/8″ thick.
The 1/8″ difference meant any spaces where the previous flooring used to fit – the new flooring no longer did.
That difference meant a lot of undercutting. Not only the door moldings but all the furring strips that cover the seams of the oak boards on the walls.
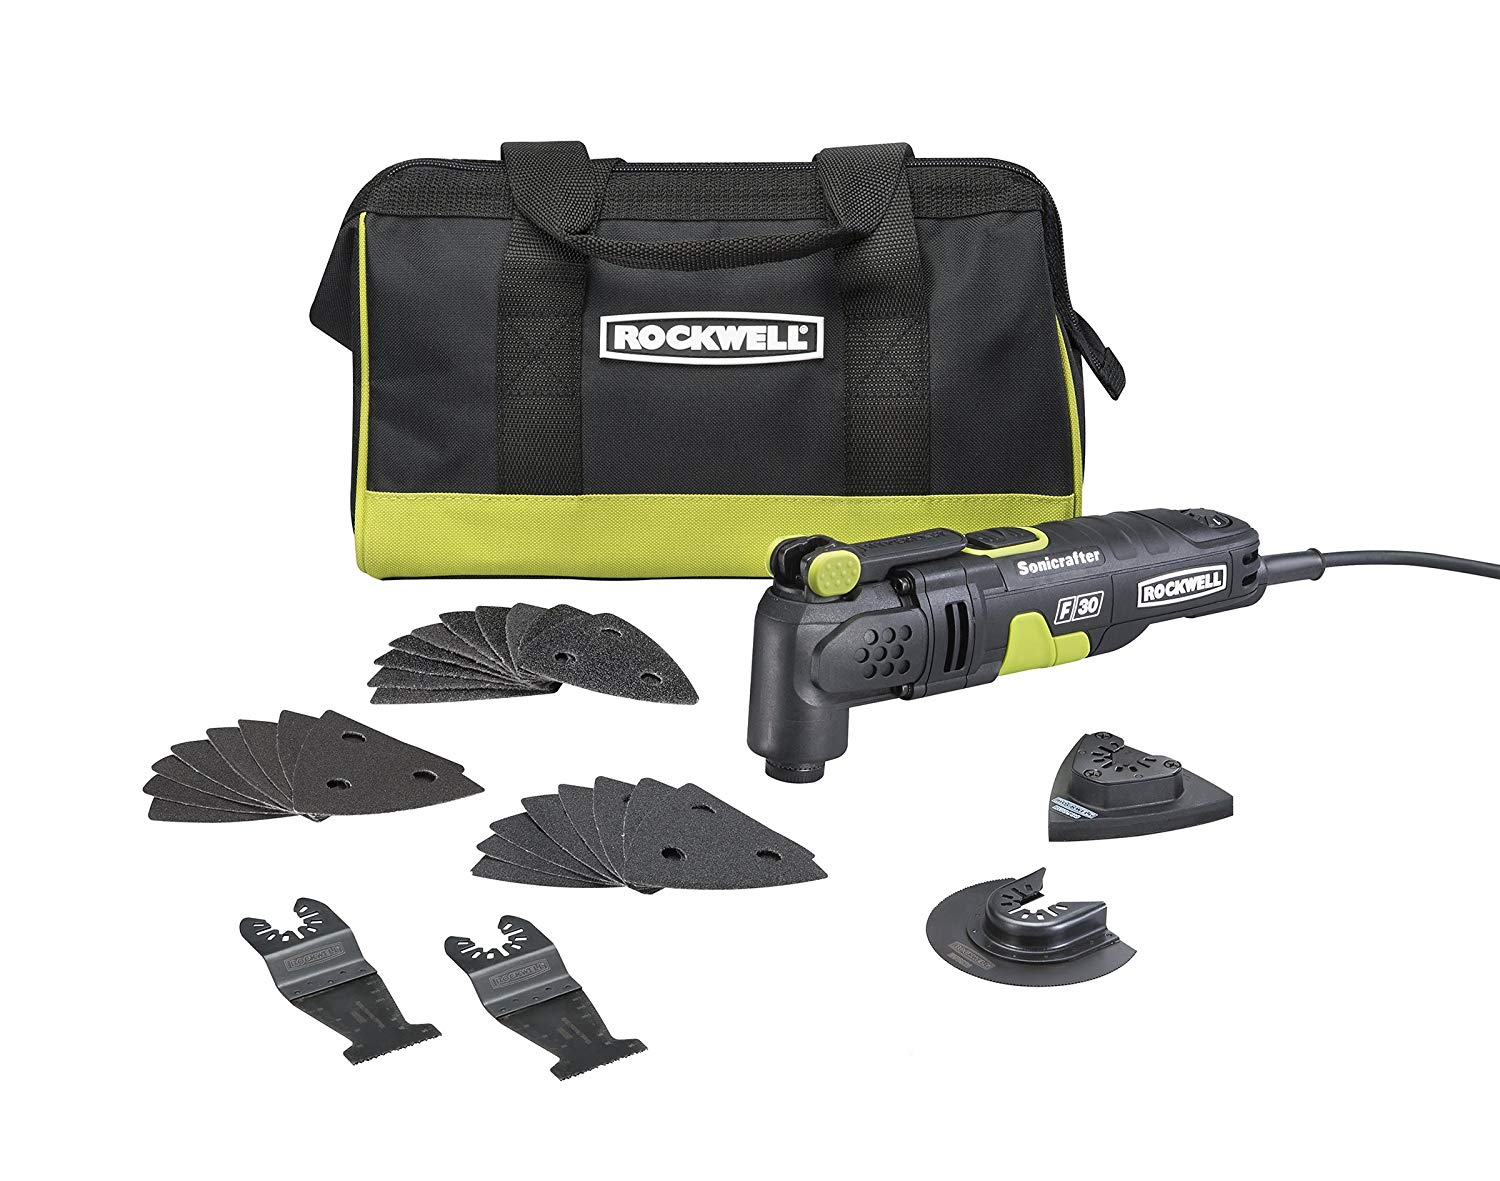
I could have done it with a dovetail saw, but since I had quite a few cuts to do, I bought an oscillating tool. It worked perfectly!
The tool comes with a bunch of different attachments. I haven’t used it for anything else yet but I can think of a few different uses for it in the future.
All Done – Das ist es!
Also, all told, it took roughly a week to do the plywood plank floors – from complete start to complete finish. Including the old floor removal, subfloor painted, 10 sheets of plywood cut into strips, geschliffen, betrübt, stained, polyied and installed.
This was a good sized project with a lot of effort put into it, but it was well worth it. We now have a completely unique floor that fits perfectly with the house, and looks fantastic!!
In the fall, we’re going to install the same rustic wide plank plywood flooring in the living room, und ich freue mich riesig darauf.
Wir werden auch einen einzigartigen Übergang zwischen den Böden des Wohn- und Esszimmers schaffen… Ich kann es kaum erwarten.
Aktualisieren: Gut, we redid the living floors recently and we also installed the wood slice accent flooring. Es hat alles perfekt geklappt!
Wir haben auch über diese Erfahrungen geschrieben, Schauen Sie sich diese Beiträge hier an:
[et_bloom_inline optin_id=”optin_7″]
Einige Bilder
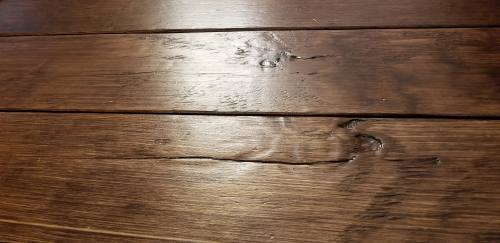
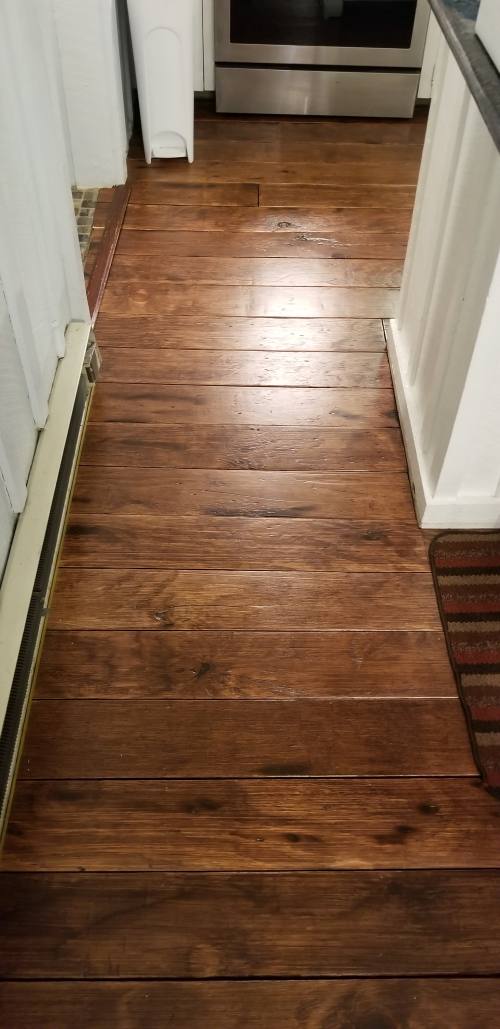
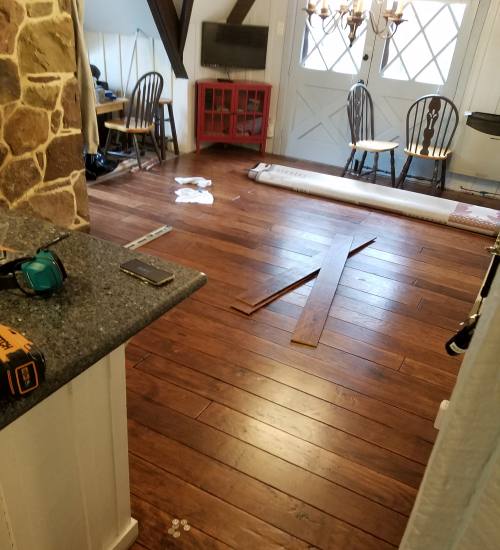
Hier sind einige weitere Bilder der laufenden Arbeiten und des fertigen Sperrholzdielenbodens.
Lass mich wissen was du denkst, dort etwas hätten Sie getan haben unterschiedliche?
Sagen Sie Ihre Meinung in den Kommentaren unten!




Plywood Plank Flooring FAQs
How much does plywood plank flooring cost?
Our plywood plank floor cost about $1,040 in materials to cover roughly 700 square feet, which is around $1.50 per square foot. That was $704 for 22 sheets of plywood, $276 for stain, and $60 for polyurethane. It is a fraction of what solid hardwood would have cost.
How thick should plywood plank flooring be?
We used 1/2-inch plywood. A 1/2-inch plank is flexible enough to conform to a slightly uneven subfloor, and the thinner gaps between planks trap less dirt. You can step up to 3/4-inch if your subfloor is nice and flat.
What kind of plywood is best for plank flooring?
We used the cheapest rough-finished 1/2-inch pine plywood (Lowe’s Plytanium 15/32-inch structural plywood). Because we wanted a rustic look, the knots and imperfections were a feature, not a problem. For a smoother finish you can move up to a better-grade sanded plywood.
Is plywood plank flooring durable?
Ja, as long as you seal it well. Ours have held up to years of vacation-rental traffic. The key is several coats of polyurethane, since that finish is what protects the softer plywood surface from wear and moisture.
Viel Spaß mit diesem Beitrag? Pin es und teile es mit anderen!




Well finally here is the best plywood plank flooring tutorial I have found. Thank you so much for sharing this. I to have been bothered by the zebra effect that you get when staining plywood. And you’ve given me the solution, I’d almost given up on plywood flooring. Fingers crossed I’m off to Home Depot. Danke noch einmal
Hallo Gott! Thanks for the feedback, glad the post helped. Best of luck with your plywood project! Feel free to reach out if you have a question along the way. 🙂
The main question we have is about how you keep dirt out of the spaces between the boards. Did you put a finish coat of poly on the entire floor after it was done? How do you keep it clean?
Hallo David!
That’s a great question! The 3 coats of poly were applied to each board individually, before putting them down.
We figured it was more important to have a good coating of poly on the sides of each board, to make them a bit more resistant to moisture (especially in the kitchen).
The dining room/kitchen floor is about 9 months old, and so far everything has cleaned up very nicely.
We were a little worried about having little bits of food falling in the cracks in the kitchen, but vacuuming seems to pick up everything that’s in the cracks pretty easily.
Maybe it’s because the floors are only 1/2″ dick? It’s possible a thicker flooring (like 3/4″ flooring) would make it harder for the vacuum to get debris out of the cracks.
Ich hoffe, das hilft!
What kind of plywood did you use? My dad keeps telling me he thinks it’s an oak plywood.
Hi Brook!
I just used regular 15/32 in. (1/2″) 3-Ply RTD Sheathing plywood, like this https://www.homedepot.com/p/15-32-in-x-4-ft-x-8-ft-3-Ply-RTD-Sheathing-132411/100067329
The oak plywood is usually a lot more expensive and is usually finished plywood. I was looking for a rustic look, so the regular plywood was a perfect fit… not to mention a lot cheaper!
Ich hoffe das hilft!
What kind of plywood did you use? Was it oak plywood?
Hi Brook,
I added a blurb to the article about the type of plywood since that was unclear before.
Thanks for the feedback!
Thanks for your time and effort putting this together. Your systematic, step by step explanation of the process is a real confidence booster and the result is beautiful. I agree that the typical plywood zebra pattern is not desirable. Am I understanding correctly that the gel stain and dry brush technique is used to CREATE a more pleasing wood grain pattern? In a sense “painting” on a wood grain look?
Hi Dan,
Vielen Dank für die netten Worte, I’m glad it’s been helpful to you. 🙂
That’s exactly right! This stain is the same stuff that’s used to create a wood pattern on surfaces like steel doors.
The grain you see in the close-ups is, for the most part, a pattern created by the stain.
What type of plywood did you use? I can’t seem to find that anywhere.
Hi Courtney,
The plywood is regular 15/32 in. (1/2″) 3-Ply RTD Sheathing plywood. You’re the second person to ask what the type of plywood it is so I’ll make sure to add that info to the article.
Thanks for your comment!
Hallo Steve, this is great. Loved your ideas! My question is about moisture – with the cracks between the planks and the sub floor underneath, could you put a top coat of sealer to fill the cracks or possibly seal the sub floor? Any ideas? We have kids and are considering doing this in our main living area which includes the dining room. I am pretty confident it will subject to moisture sometimes. Vielen Dank!
Hi Jeremiah,
Vielen Dank!!!
Hmmm, our plywood flooring is on the second floor so we didn’t have to worry about moisture coming from underneath.
If the moisture your concerned about is coming from above – as in kids will be dropping water on top of the flooring, that shouldn’t be a problem.
By finishing each board individually, you’ll be able to apply “poly” all around the plank, making it more resilient to water being dropped on it. That’s why we chose to finish each plank individually, instead of finishing the whole floor at once.
We did add a couple of coats of dark paint on the subfloor to give it a layer of protection from moisture from above.
If you’re really concerned about the subfloor getting moisture (which sounds more and more like what you’re concerned about as I go through the process of answering your question) then you can definitely apply a sealer to the subfloor before installing the plywood flooring.
Als Alternative, you can apply a coat of the “poly” on the subfloor. If that’s the path I was taking, I’d paint the subfloor a dark color first, then apply the “poly”. I’d use a flat finish poly on the subfloor, that way the cracks won’t be shiny.
Oh one more thing, you mentioned filling the cracks with sealer. I’d avoid doing that. We face-nailed the planks to the subfloor and kept spacing between each plank to allow for expansion. If the cracks were filled, the plywood wouldn’t have the space to expand and that may lead to problems.
Ich hoffe, das hilft!
Best of luck!
A great, step-by-step , comprehensive explanation of how to go from start to finish with the plywood floors! Excited to try. Thank you for taking the time to share.
Grateful,
Sallye
Thank you so much Sallye! Best of luck with your flooring!
Hi great article. Danke. I would like to use this technique of flooring in an outdoor patio. It is screened in but occasionally rain is blown in and the floor becomes wet. Do you think I could put a sealer on top? Or do you have advice for outdoor use of plywood?
Hi Patz,
Vielen Dank! I’m glad you enjoyed it. Wow that’s a tough one. The obvious question is how much rain gets blown in? If the existing flooring (or subflooring) is plywood and is holding up, then I can see this working well.
In the kitchen, the flooring does get its fair share of “accidents” and it has held up perfectly… but my occasional accidents are no measure to what mama nature can throw at the floors.
If I were thinking of doing this project in an area that is partially exposed to the elements, I’d probably lean toward using pressure-treated plywood. Its pricier but it would be worth the additional cost.
It would be horrible to finish a project like this and love the way your floors look, only to have the floor ruined by unusually heavy rain.
Ja, my suggestion would be to use pressure-treated plywood. The stain will cover up the yellow tint of pressure-treated plywood, so it would basically look the same and you wouldn’t have to worry about the rain.
Ich hoffe das hilft.
Steve
This is absolutely beautiful. Thank you so much for putting together such a detailed tutorial. This is exactly what we’re looking for in our new home. We haven’t moved in yet, but I will be taking the next few weeks to make all of the plywood boards for when we do move in! Did you finish all the sides of the plywood planks including the underside? And then when you made cuts to length and had unfinished wood, did you do anything to finish it before installing?
Hi Eric! Vielen Dank, and congrats on the new home!
At the start of our project the plan was to finish the boards on every side. But once we started we realized that was a lot of extra work and changed our minds.
If the floor was going in an area that had a lot of moisture then I would have definitely added a coat of the polycrylic to the underside. Since this was on a second floor there would be less chance of moisture entering the wood from underneath.
With the cuts to length, that cut goes toward the wall, so we didn’t need to add any finish to it. Since the cuts from the compound miter saw were so clean (no splintering) none of the bare wood was visible.
Oh, there is something I never mentioned in the post, for cuts that went length-wise, like around kitchen cabinets, the cuts were not nearly as clean. With those cuts I used a dark-colored sharpy (brown or black) to color in the cut so that it wouldn’t show.
I used the sharpie to color in any part of the wood that we had somehow missed when applying the stain. There weren’t many but there were more than one spot that needed some coloring. Mostly around the holes and once in a while there was an edge that didn’t quite get enough stain. The sharpie covered it up perfectly.
I hope that answers your questions. Best of luck with your project!!
Steve
When you were putting the boards i lace where in the board did you nail them? I love this look but my husband doesn’t want the nail to be seen.
Hi Nikki,
I nailed the boards on their faces about every foot all around the board, sometimes more if I noticed the board wasn’t quite snug enough.
I’d recommend getting a rechargeable nail gun like the one that is in the post. It made the project go so much faster than nailing them in manually. Heck, I think I’d still be nailing boards in if I had to do it manually! lol
The nails have super tiny heads that the nailgun does a really good job of countersinking.
Take a look at all the pictures in the post, can you find a nail head? I just looked at the pics and I can’t any… and I nailed them in! 🙂
If you do the same look on your boards you’ll have a ton of texture on the surface. That texture also helps hide the nail holes by distracting the eyes.
Ich hoffe das hilft. 🙂
I don’t know if I just overlooked it in the article or not, but what did you use to keep even spacing in the gaps between the boards?
Hallo David,
We used quarters as spacers between the boards. I’ve heard of also using credit cards or nickels for spacers. We tried it out with a few different things before nailing down the boards and liked the spacing we had with quarters the most.
Ich hoffe, das hilft!
Steve
This is the best blog post I have read, and I have read a lot on plywood flooring! I put mine down in my living room in 2015 and in my kitchen in 2018. I wish I had known a few of your tips then. I will be doing my dining room soon and plan to try them this time around. Thank you for taking the time to share all of this! Your floors look incredibly awesome!!
Hi Wren, Danke! That is so nice of you to say! I’m really glad you’re finding this post useful.
Best of luck with your dining room floors!
Hallo!
I love this post so much. You explained everything perfectly. I was wondering if I could use a filler or something between planks? I know it needs space. Would filler stop it from flowing?
Hi Evelyn!
Vielen Dank, I’m glad you found the post helpful. For our look we liked the spacing between each plank. If you didn’t want to have gaps between each plank there may be fillers you can use. I’ve seen a few on Pinterest which may work for you. One idea I’ve seen is using rope, another is the sawdust grout I used for the end grain inlay.
I don’t know how well the sawdust grout would work between the planks but it’s held up well (so far) in the inlay.
Not sure what’s involved with using the rope as a gap filler but I can tell you that if you choose to use the sawdust grout it will require a TON of time to finish. If the room isn’t too big it may be manageable but if I had chosen to use sawdust grout as a gap filler in our floors I think I would have died LOL
It would have been too much of a project for me.
Ich hoffe, das hilft, let me know how your plywood plank project turns out.
Best of luck!
Loved your floors so gave it a try. So excited they turned out… your detailed instructions were perfect. Danke!
Hi Sandy!
Wow that’s fantastic!!
You made my day, I’m so glad to hear that my post helped you out. And that you love your new floors. 🙂
Thanks for sharing!
Steve
Good evening Steve! This seems to be a nice substitute for tile. What are your recommendations for attaching the wood plank strips if your sub floor is concrete and not wood?
Hallo David,
That’s a great question. I haven’t tackled installing it on concrete yet but I’m planning on doing the same floors downstairs and that is a concrete slab. Maybe I’ll do another article on that when I go through the install. I found some info on installing wood flooring over concrete that seemed promising. I’ll look for it in my pins tomorrow and post links to the info here.
Really great tutorial thanks for posting it! I have just put the last coat of poly on my planks and they are staggeringly beautiful.. from ugly plywood sheathing! They really do look and feel like expensive hardwood. I would never have even attempted this without your tutorial. The process has been so inexpensive and the results are so wonderful that I’m looking to do the same for a ship lap type ceiling covering.
I used a weed burning type torch with a 5 gallon propane tank to burn all of my planks quickly and easily. With the relatively even heat (vs. the small torch) applied over large area they ‘paint’ themselves along the grain lines in the presttiest way. Absolutely gorgeous deep tones and contrast.. I am thrilled. Danke noch einmal!
Hi Jess, that’s fantastic! I’m glad to hear you love your floors.
Thats awesome! I love the look the big blow torch give – it wasn’t quite the look I was looking for in this house.
I’m thrilled that it workedout for you!!
Steve/Sandy:
Incredible! You have inspired me and I am going to do this in our old farmhouse. You noted 1/2 inch plywood worked for you and 4′ x 8′ Blätter. Would this product here work for me then? https://www.menards.com/main/building-materials/panel-products/plywood-sheathing/roseburg-fir-plywood-sheathing/1231100/p-1444452505667-c-13331.htm?tid=9156335534500254858&ipos=1
Hi Frank,
Sicher, you could use that plywood. I think the plywood I used was a bit cheaper but basically the same. I used something like this:
https://www.homedepot.com/p/15-32-in-x-4-ft-x-8-ft-3-Ply-RTD-Sheathing-132411/100067329
Grundsätzlich gilt, I used the cheapest 1/2″ plywood they had. Normalerweise, the cheaper sheets have an ugly side and a not so ugly side. You can use either the ugly or not so ugly side of the plywood. Not so ugly to have a pretty normal looking floor and the ugly side for a dramatic aged flooring look.
Since you said it’s an old farmhouse I would absolutely use the ugly side up. That will give you an instant aged look with tons and tons of character.
Ich hoffe das hilft!
Best of luck,
Steve
First off, BRAVO on a gorgeous job and thank you for the well articulated breakdown. It is my forever dream floor and now I have the confidence to give it a whirl.
Thanks Jayleen! I’m glad you found it inspiring. It’s a big project, but take it one step at a time and before you know it you’ll have your own beautiful version of these floors!
Best of luck!
Hallo David,
I when through my pins and this was the post I came across that gave me the idea that this could be done on concrete too.
https://www.familyhandyman.com/project/how-to-carpet-a-basement-floor/
My ground floor currently has carpet on top of concrete. I think I’d probably use the dimpled polyethylene to make sure no moisture affects the floors but that is not a bridge I have crossed yet.
I hope this info helps you with your floor.s
Steve
Your floors look fantastic. I was surprised to read they were plywood planks. From the article it appears you put these down about 1.5 years ago. How are they holding up in the kitchen? Do you keep rugs down to protect the area?l from water?
Thank you so much Brenda!
Wow, it’s already been a year and a half?! That was fast! The floors are holding up great. We have an area rug under our dining room table but everywhere else it’s just the beautiful wood floor.
Keep in mind this house is also a vacation rental!
Typically guests don’t treat a house quite as nicely as you would, and despite that, the floors have still faired really nicely. 🙂
Hallo! This tutorial is so helpful! I’d love to try this technique in our new home. I have a question – how would you suggest we install these over a cement subfloor? We are moving into a home with epoxy painted cement floors.
Hi August,
I’m glad you found it helpful!
A cement subfloor is much trickier. I’ve thought about it but haven’t done this type of flooring on cement yet.
The biggest gotcha applying this flooring on concrete is the moisture. There needs to be a good vapor barrier between the concrete and the plywood flooring.
Here’s a link that has some insight on installing carpet on a concrete floor:
https://www.familyhandyman.com/project/how-to-carpet-a-basement-floor/
the only difference is that you’d be installing plywood planks instead of carpet. 🙂
Ich hoffe, das hilft!
Steve
Love love this project! My husband and I are in the process of staining the plywood. We are using the same gel stain. We had to bring the boards inside to stain them. We stained 7 boards last night and this morning they are still not dry. Not sure what we did wrong?? Any suggestions??
Hi Melanie,
I’m so glad you like it!
Hmm, we brought ours indoors to dry overnight also.
My first thought was maybe the coat was too thick but the. I thought about my boards and I had some boards that I put pretty thick coats on and they dried at about the same rate as my other boards.
One thing that may have sped up the drying time for us is the temperature. We put them in a room where we were able to crank the temperature.
Maybe you can try using a blow dryer to speed up the drying.
I hope that helps you out!
Whoa! I’m glad I found this tutorial! Since it’s been some time, would you change anything? I had thought about a barrier, like the snap together planks in the store require. Do you is the plywood planks on plywood sub floor sufficient for you?
Thanks so much for sharing!
Erin
Hi Erin, I’m not familiar with the snap-together planks you’re referring to, but yeah I feel the plywood planks on the plywood subfloor was sufficient. Maybe if I saw the snap-together planks I’d feel differently. 🙂
Looks absolutely amazing… Yall done a wonderful job.. Thanks for sharing, Im getting ready to build a small cabin and After seeing your project I think im gonna do the same thing with the floors. Thanks for breaking all the steps down and sharing your experience. You guys really done an amazing job. Thx Tim
Thank you so much Tim!
Hallo Steve, thanks so much for this incredible tutorial.
Ich habe mich gefragt, because the boards don’t seem to be nailed specifically to joists below but just to the plywood subfloor, have they warped and lifted at all? I, too, am looking for something rustic to lay on top of extremely uneven subfloor—did the boards have any sort of give that allowed you to follow the curvature of the subfloor while you were nailing them down? Thanks so much for putting this together!
Hi Kate! Thanks so much for the kind words. 🙂
The boards haven’t warped at all. There have been a couple of boards in the high traffic areas that needed more securing. It was just a matter of getting the nail gun and adding a couple more nails.
That was the beauty of this flooring! Ja, there is A LOT of give. It would have been impossible to install tongue and groove flooring in those spaces. That floor is rough cut oak, and when they say rough they really meant it. LOL
Die 1/2″ plywood is pretty flexible, and since it’s rustic and there are spaces all around each plank, nothing needs to be perfect. 🙂
I’ve done this type of flooring on a previous house in a pantry and did a whitewash and absolutely loved it. I’m thinking about it in my current home but am on a concrete slab, so I can’t nail it down. What would you recommend in this case?
Hi Angela! That’s awesome! A concrete subfloor is definitely much trickier. I haven’t done this on concrete… noch. You’ll definitely need to a vapor barrier between your flooring and the concrete and you would also need to put something between the concrete and your planks to be able to nail the planks into something. Concrete nails on the top of the plywood planks probably wouldn’t be a great look. 😉
A possibility would be to install a vapor barrier over the concrete, then install sheets of plywood nailed to the concrete, and finally the plywood planks nailed into the sheets of plywood.
Viel Glück damit!
Love the floors! Seriously looking for an economical way to do flooring in my 890 sf cottage using real wood. I would really enjoy aging them just as you did! Love the color too. Spot on!
Thank you so much Renee! Best of luck with your cottage!
This is absolutely beautiful! We live in an old farmhouse and our floors are uneven in the kitchen and living room. I have been researching the plywood floors and i think this is what I will do! Have your floors scratched easily? Are they still holding up?
Hi Stacy, Vielen Dank!
Ehrlich, they’ve held up better than I ever though they would! They have gotten scuff marks, not bad at all though. It being a vacation rental I figured they would be in worse shape by now, but no. 🙂
I always try to remember that I’m going for the old worn look so scuff marks just help with that.
Steve, I concur with everyone else… GREAT job. The floors look great! I am thinking about not leaving a gap between planks. But distressing the corners and edges more. Is the threat of expansion and buckling really that great. I thought that that was one of the great benefits of plywood. The alternating directions of the plys prevented that. The floor is in an off grid cabin and cracks would fill with dirt/dust. Thanks for any opinion.
Thanks John! That’s a great point, it’s what I thought also. The previous flooring in the dining and kitchen area was a floating floor that was basically thin finished plywood strips and when that floor was installed, they didn’t leave any room on the sides of the walls for expansion and it was buckling in a lot of spots.
I was afraid of that happening to the floor I was putting down, so I added a space between each plank. Maybe I didn’t need to add that much space between each plank, but in the end I really liked the look and I wasn’t willing to take the chance. 🙂
This is a great blog post. Thank you so much for putting the time in for it.
I’m wondering if you think finishing the boards before installing would work. I have 3 cats and 3 dogs, so finishing it in place would mean trying to keep pet fur out of the finish and that would be nearly impossible around here. Can you see any issue with finishing each board in my shop before bringing it in and installing them? I’m sure it would take a lot longer, but I can’t think of any other solutions. Even if I could keep all 6 animals out of the main living areas I need to put flooring in, the hair still manages to float around.
I feel like little touchups would be doable. Just not the entire surface at once.
Hi Candace,
Oh yeah, definitely! That’s exactly what we did! I guess I need to make that clearer in the post. 🙂
Ja, we didn’t have a shop to finish them but We did all the cutting, sanding, staining, and poly-ing out on the deck.
Finishing the boards before installing them I think was the key to them holding up so well, because it allowed us to stain and poly the board tops as well as each side of the boards, That protects them from spills.
It didn’t really take all that long to finish them before installing them. I kinda prefer doing it that way anyways. No worries about the stain smell in the house, no waiting for it to dry and of course no desperate attempts to stop anyone from walking on the floor before it was okay. 🙂
Pretty nice post. I just stumbled upon your blog and wished to say that I’ve truly enjoyed browsing your blog posts. In any case I will be subscribing to your rss feed and I hope you write again soon!
Thank you for such a great blog post. It looks as though you made the floor quite a few years ago. How is it holding up?
Hi Georgina! Vielen Dank!
It’s holding up really well. It gets nick and scratches, the beauty of it all just adds more character to the floors. I haven’t had to do much to it at all, there were a couple of places where the edge of a plank got dinged and the natural wood color was showing. I used a black sharpie to fill in the wood and voila, more character. I couldn’t be happier with the flooring. 🙂
Hallo. This was EXTREMELY thorough and helpful. I’m about to do this in my home. What I’m mostly curious about is how it’s held up all these years later? Because it’s a softer wood that’s been my biggest concern. Auch, are you satisfied with the 1/2″ or do you wish you’d gone with 3/4″ thickness? I’ve heard arguments both ways. Dank im Voraus!
Hi Allyson,
Vielen Dank für die netten Worte! I’m glad it’s helpful. 🤗
Ehrlich, it’s held up sooo much better than I would have ever expected, remember this flooring is in a vacation rental. There are new dings and dents that happen, but because I already added plenty of dings and scratches to the flooring I feel very differently about the new dings. It all just adds to the character!
1/2″ or 3/4″ is a fantastic question. I was VERY hesitant to do 1/2″ – I ended up going with the 1/2″ because the floor I was installing this on was SOOO un-even. I needed to install something with a certain amount of give and 3/4″ plywood has very little give.
Schlussendlich, I don’t regret using the 1/2″ plywood at all. I don’t think 3/4″ would have extended the life of the flooring at all.
One thing I do regret is not putting more spacers under the planks in the areas where the floor dipped significantly. Maybe I should have even used a floor leveling compound in those spots. I was eager to get started with the flooring and let that get the better of me. lol
Your question made me think of what I would have done differently, and that is basically the only thing I would change. If you have super un-even floors like I did, you should level off the floor as much as you can before installing the flooring.
Best of luck with your install!!
Could you do the staining after the floor is installed
You can of course. We did it before installing the flooring for two reasons. First we installed the planks with spacing between each plank and it doesn’t take much spacing to see the naked wood on the sides. The other reason was to protect the wood a bit more, especially in the kitchen. We were afraid that it would warp if renters (it’s a vacation rental) kept dropping liquids on the floor. we felt staining and poly-ing the sides of the wood helped give the flooring a bit more protection. 🙂
Hi again. Thanks for your previous response, it was very helpful. I did come up with another question about the quantity of stain & polyurethane. In the article itself you said you used about:
-7 quarts of the gel stain and
-2 gallons of the polyurethane,
but in the cost breakdown you said you used:
-17 quarts of stain
-5 gallons of Poly
Did I maybe misread it? I’m flooring about 1200 sqf so I’m trying to get the right ballpark amount of each item. Vielen Dank!
Hi Allyson!
Wow, great catch! They are kind of both right. 🙂
When I wrote the first article it was after doing the flooring in the dining room and kitchen, so the numbers in the article are relative to that space.
Then, after I did the living room I had more information to share and started writing another post, and updating the original post.
Das:
-7 quarts of the gel stain and
-2 gallons of the polyurethane
Was what we used when doing the dining room and the kitchen roughly, 288 sq ft
These:
-17 quarts of stain
-5 gallons of Poly
Are the sum of the living room AND the dining room and kitchen roughly 704 sq ft
Hope that helps and best of luck on your project!!!
Vielen Dank für die ausführliche Anleitung! My husband and I recently did our living and dining room with plywood plank flooring. For cost reasons we used a non gel stain. We also applied the polyurethane after installing the floors. Other than that we didn’t really make any changes. It turned out absolutely beautiful and we’re excited to tackle the remaining rooms soon.
That’s great Anita, congrats! 🙂
Excellent project and this is what were going to do now for our flooring. The link for the gel stain took us to Home Depot which seems they are going to discontinued this brand. At least for the color we want. Says discontinued. So will be looking for different brand of Gel stain.
Hi Ethan, I tried the link and it seems to be in stock again.
Vielen Dank! I’m glad you found it inspirational. 🙂
I am wondering now after all these years how has the floor held up? I am wanting to do this in my kitchen/dinning room. I do have animals and a couple kids still at home. Would you think I would need to poly both sides of the boards or if I just poly the sub floor that should be ok?
Hi Naomi,
The first area I did was our kitchen/dining area – that was really the reason I decided to poly the tops and the sides of each board. I figured that would give the wood an extra little protection since out of all the areas in the house the kitchen would be the space where the chances of the wood getting wet are pretty high. The floors are still holding up great, I can’t tell you if the reason they held up so well in the kitchen is because of the poly on the side – but I can tell you it didn’t hurt. 😉
Absolutely love it. How would mixing in 6 and 8 inch boards look do you think? Would you still use the back side of the plywood if you had to do it again? I want to do this in my work shop in the near future. You have really inspired me.
Hi Cory, Hmmm, that could be cool. I guess that would be doable, would it be complete rows of the same width or would you mix and match them? It sounds like you’d have an extra dimension of complexity where you’ll need to keep track of when to use which but if you’re feeling it, it’s definitely worth giving it a try!
Best of luck with your project Cory!