DIY Wainscoting – Part 3 – Installing The Molding

DIY Wainscoting – Part 3 – Installing The Molding

In this post I’m going to go over installing the wainscoting frames and the tips and tricks I found while installing them.

Okay, so you’ve figured out the measurements of your wainscoting frames, and you know how to cut the pieces of the frame.

Well here we’re going to go over how to install the wainscoting frames. 

Installing the wainscoting molding is a pretty repetitive task, but with the right tools and these tips and tricks you’ll get through it in no time.

Disclosure: Some of the links below are affiliate links. If you decide to purchase any of these products, we earn a small commission at no additional cost to you. We recommend these products only because we have experience with them and use them for our own projects. As Amazon Associates, we earn from qualifying purchases.

Step 1 – Make Sure Your Wainscoting Measurements are Right

The last thing you want is to cut all your pieces, then find out you cut the pieces too short!

This is what I did to give me some piece of mind.

Once I have the bottom pieces cut, I bring them to the wall they’re going to go on and lay them out on the floor along that wall spaced out the way they’ll be spaced out once they’re installed.

I wanted to make sure my measurements for the wainscoting frames were spot right. With my Wainscoting frames I decided to use 3 1/2″ spaces between the each frame. I did that because it looked nice, but it’s also the width of a regular 2 x 4, so it was easy to find a spacer. If you look in the picture below, I used a 2 x 4 to space the bottom pieces out on the floor.

If you want to use a different spacing you can just cut a piece of 1×4 or 1×6 to the right width and use that as your spacer. 

DIY - Wainscoting - Layout Bottom Pieces

Paint First Or Frame First?

I don’t think the order matters too much. We painted the walls first then we installed the frames. We felt like we needed to paint the walls first because we were dying to see what the colors would look like on the walls.

As you can see from the pics, we didn’t paint it anywhere near perfect. We knew full well we were going to have to paint for real afterwards, but we did a rough single coat of paint to get an idea of the colors.

DIY Wainscoting We Painted First
DIY Wainscoting We Painted First the theater door

Should You Start From The Top Or Bottom?

My first attempt at wainscoting was a few years ago on the ground floor of this house.

When I did the wainscoting on the ground floor I started with the chair molding that goes along the top, then I did the horizontal molding underneath it and I then filled in the space below it with the wainscoting frames.

When I did it this time around, I decided to install it from the bottom up.

Ultimately, I think it’s really just a matter of preference, but installing wainscoting from the bottom up is much easier.

The biggest difference between the two is that I can do most of the installation just by using the spacer, when starting from the bottom. Put the spacer on top of the baseboard, install the bottom of the wainscoting frame. Then build up the box, put the spacer on the top of the frame and install the top horizontal molding, and finally put the spacer on top of the horizontal molding and install the chair molding at the very top.

When I started from the top there was a lot more measuring and leveling and measuring and leveling to get that chair molding just right. 

DIY Picture Frames The design

How To Start The Wainscoting Frame

It’s really much easier than you would think. The key is using the spacers, they allow you to get everything done without too much measuring.

The one thing I’d like to also mention is everything does not have to be perfect, perfect. You don’t need to make sure every single piece is absolutely level.

Let’s just say this. When you do your very first wainscoting frame you are going to measure and level 1000 times more than you will the 500th frame. 🙂

If you start from the bottom and work your way up and use your spacer to keep the space around each frame consistent, the only pieces that you need to really check for level are the very top horizontal pieces.

The wainscoting in the stairs was a whole other animal!! The wainscoting in the stairs deserves it’s own post but when you are doing the wainscoting on a regular wall, the actual install goes pretty smoothly.

Tip:  Two things – First You NEED to use a nail gun to do this project. I can’t imagine doing this with a hammer.

Second I used nails to keep the frames in place but I also used a painters caulk on the back of the molding to help them be a bit more secure. It helps when doing the second vertical piece and the top piece.

The Order To Installing the Wainscoting Frame Pieces

This is the installation order when installing your wainscoting frame:

1– Install the bottom leg by putting caulk on the back of the leg, then nailing both ends of that leg to the wall.

2– Add caulk to the back of the right leg then nail both ends of that leg to the wall. I also like to add a little caulk in the miter joint before putting the pieces together.

3a– Caulk the back of the left leg and nail in the bottom of that leg

3b– Caulk the back of the top leg and nail in the right side of that leg

4a and 4b– Line up the top of the left leg and the left of the top leg so they are nice and tight together, then nail in both

That’s pretty much it! Rinse and repeat… a lot and you’re done. 🙂

Below are the details for each installing each of the legs.


DIY Wainscoting - The Frame Pieces Installation Order

Step 1 – Installing The First Wainscoting Piece

Okay, here we go, we are installing the picture frame for your wainscoting!

Of course, you want to start at one of the ends of the wall. If there’s a doorway on one end, that is where I started.

Place a spacer vertically AND horizontally, giving you the right spacing on the bottom and the side. Once you have it nice and snug use your nail gun to nail in the piece.

Woohoo! You installed your first wainscoting piece! That wasn’t so hard right? It’s basically a lot of that. 🙂


Installing the first Picture Frame Piece

Step 2 – Installing The First Vertical Piece

This is going to be the vertical piece that is either against the wall, the doorway, or the last frame you just finished.

Place your spacer against the wall, doorway or last frame you just finished, place the molding against the spacer and snug against the corner from the bottom piece and nail it into place.


Installing the second Picture Frame Piece

Step 3a – Installing The Second Vertical Piece Bottom Corner -ish

I say “-ish” because I don’t completely install this piece in. Installing this piece a bit more complicated than the first two pieces.

Since there isn’t anything to put a spacer against, you’ll need to use the level to nail in this piece.

Place the second vertical piece in place and the level vertical against it.  Now adjust its position left and right until it looks level. Once it’s pretty level, nail in the bottom of the molding.

Leave the top of the piece unnailed so it can be adjusted when we put in the next piece.

Full disclosure – This picture is the previous one I flipped vertically. I took so many pictures – yet I missed taking a pic of the right piece getting installed! 🙁 

On to the next step!


Installing the third Picture Frame Piece

Step 3b – Nailing In The Top Piece First Corner

Now we install the top piece. Put the piece in place, snug on the top corner of the vertical molding that is nailed completely and loosely on top of the piece on the other side.

Use the level to make sure things aren’t completely off, again if it’s off a little it is not going to ruin it. This is just to make sure you’re in the right ballpark.

Once it looks pretty level, nail in the piece on the end that’s touching the vertical piece that is completely nailed in.

You’re almost there, the last part of the frame is coming up.


Installing the top Picture Frame Piece

Step 4 – Nailing In The Last Corner

It’s now looking like a picture frame, the only thing left is to nail in that last top corner.

Here you can micro-adjust so the last corner looks tight, the the top piece is level-ish and the second vertical piece is plum-ish. 

Once it looks pretty good, finish nailing in the two pieces that make that corner. 

Woohoo! You did it! That is your first wainscoting frame.

Now it’s just a matter of repeating it over and over again. 🙂


DIY Wainscoting Nail In The Two Pieces For This Corner

Installing the Middle Molding

The space above the wainscoting picture frames and the middle molding in my layout was 3 1/2″, the same as the space between the picture frames, so I used the same 2×4 spacer for this spacing too.

To install the middle molding, I laid the 2×4 on top of the picture frame, put the middle molding on top of it and nailed it in. Before nailing it in I added painters caulk on the back of it.

Installing the Top Molding (Chair Molding)

The space between the middle molding and the top, chair molding is 3″, so I took a piece of 1×4 and cut it to 3″ wide and used that as the spacer.

To install the chair molding, I put the spacer on top of the middle molding, then nailed in the chair molding. Again, similar to the middle molding I put caulk on the back. It gives it more support and helps keep the molding in place while I nail it in.

Installing Wainscoting Around Outlets

When you’re installing your wainscotting you’ll come across obstacles on the wall that will sometimes force you to customize the wainscoting picture frames. Outlets are one of those obstacles.

Sometimes you’ll get lucky and the outlet will fall outside the path of your picture frame install, but more often than not they’ll be smack dab in the middle of your way.

When I was dealing with the outlets there were a couple of ways I did it.

Notch The Wainscotting Piece

You can notch out the picture frame piece to fix the outlet and the cover that will go over it. Notching is only an option when the outet/cover are only partially in the way of the picture frame.

If the outet/cover is more than a little in the way, I think it looks better if you do the next option, cut it in two.

When cutting the notch out I used the miter saw to cut the top and bottom parts of the notch, then used a utility knife to cut from the top cut to the bottom. Since the molding is PVC it’s pretty easy to cut into.


Wainscoting Frames Working around outlets the notch details for the cut

Cut The Wainscotting In Two

You can cut the picture frame piece in two. If the outlet or it’s cover is completely in the way of your wainscoting frame, then you’ll have no choice but to cut the wainscotting piece into two pieces.

When cutting the piece in two I call then end at a 45 degree angle so it looks more finished and eases the transition from the wainscoting frame to the outlet and back again. If it were a 90 degree cut I think it wouldn’t look as finished.

Wainscoting Frames Working around outlets cutting the piece

That’s it! That’s how I installed Wainscoting!

Let me know what you think. Did you find it helpful? Was there something you wanted to know that I left out?

Share your thoughts in the comments below!

Enjoy this post? Pin it and share it with others!

Easy To Do Wainscoting - Installing The Molding

Wainscoting Calculator – Super Simple

Wainscoting Calculator – Super Simple

Here’s A Simple Wainscoting Calculator

To use the Wainscoting calculator, change the numbers below to reflect what you have in your wainscoting project.
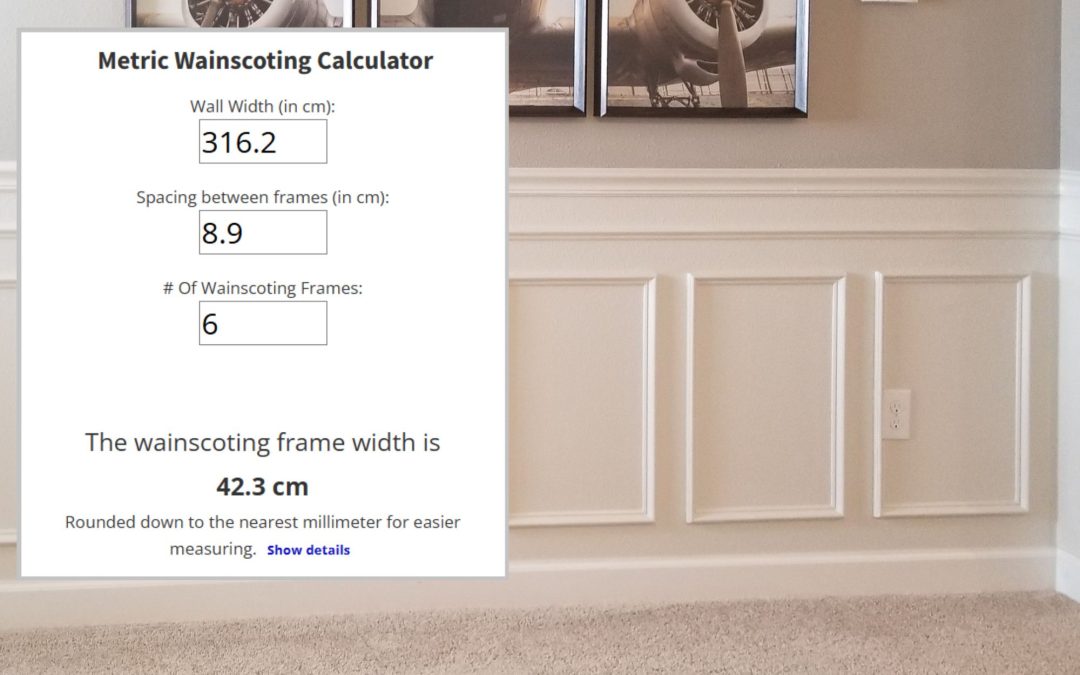
This Is The Calculator


I put the Wainscoting calculator up on the top of the page to make it easier to find. The last thing you need is having to go hunting for the calculator on this page when all you want to do is figure out your wainscoting frame width. 🙂

I made the wainscoting wall calculator because I remember searching a loooong time for something similar to it when I started my wainscoting project.

I think the math behind a DIY wainscoting project is the biggest road block for wainscoting, this will hopefully remove a lot of that. 🙂

How to measure for wainscoting and how do you figure out the wainscoting measurements are probably the two biggest questions that came to my mind initially… and I’m sure that I’m not alone (I hope so anyways 😄).


What Makes This Wainscoting Calculator Different?

It’s A Simple Wainscoting Calculator

I’ve seen other picture frame wainscoting calculators out there but they all seem crazy confusing and complicated. I think a lot of them focus on the layout. Many of them even show you a visual of what it would look like… but all the ones I found were so confusing – I ended up using a pen and paper!

This wainscoting wall calculator was created to help with the picture frame molding measurements that change with every wall you do. The height and spacing from the chair molding to your picture frames will be the same throughout your project, but the width of each picture frame molding will change with each wall width.

When you need to calculate the wainscoting frame widths for a new wall – this is the picture frame wainscoting calculator you should use. 🙂

It Uses Tape Measure Fractions

The results from this calculator are in fractions that you can use on your tape measure. The conversion from decimal to simple tape measure fractions is THE MAIN REASON I did that because when I was doing my wainscoting, I spent a whole lotta time figuring out the frame dimensions, and then my answer was in decimal.

Then I spent almost the same amount of time trying to convert the decimal amount to a fraction that I could then use on a tape measure.

It would take me a little time to figure out 16.6 is 16 11/16!  LOL This tool replaces all that crazy math. 🙂

My goal with the wainscoting calculator was simple. Give it the numbers you have from your tape measure and it gives you back numbers you can use on your tape measure (did I mention that you can use the results on a tape measure!).

If you’re interested in how the picture frame wainscoting calculator figures out the numbers, here’s a brief breakdown of how I calculated my wainscoting frames using pen and paper during my project.

How To Measure For Wainscoting Width

I took this from the post DIY Wainscoting – Part 1 – Design And Layout to help give you an idea of how I came up with the calculations used by the picture molding calculator.

FYI – The numbers in this example are the same ones that the picture frame wainscoting calculator defaults to.

Here’s the example using the 6 Wainscoting frames on the 124 1/2″ wall shown in the picture below. 

First, I subtract the left spacing from the total, which for me is 3 1/2″ or 3.5″, take a look at the picture for more of a visual.

That gives me 121″, now divide 121″ by the number of frames you think would fit. In the pictured example I used 6.

121″ / 6 = 20.16″

So each frame + it’s spacing on the right would equal 20.16″ in width (The red arrows).

That means the frames size would be equal to 20.16 minus the spacing on the right.

In this example it would now be 20.16 – 3.5″ = 16.6″ (The blue arrows)

Since I wanted the box molding to be a rectangular shape, 16.6″ worked well. Basically, I try the same formula with an additional frame or minus a frame, and figure out the one that looks best.

In the wainscoting calculator, just change the value in the # of wainscoting frames field and instantly know how wide the wainscoting frames would be.

I used 3.5″ as the spacer for the picture frame molding because it looked good, and it was easier to make spacers since that’s the width of a 2×4. BTW, that space between each picture frame is called the Stile.

For more details on how I came up with the design, check out my other post on how I chose the design and layout for the wainscoting picture frames.


Tip:  The Picture Frame Wainscoting Calculator above is basically doing all this math for you. If you want to see the steps it takes, click the Show details button at the bottom of the picture frame molding calculator. 

Wainscoting Box Measurements

Enjoy this post? Pin it and share it with others!

A Simple Wainscoting Calculator - Portrait
DIY Wainscoting – Part 2 – Cutting The Frames

DIY Wainscoting – Part 2 – Cutting The Frames

In the first post I went over how you go about designing the wainscoting, what things you should consider and how you go about laying it all out.

Now that you’ve designed the layout of your wainscoting, it’s time to get cutting!!

Cutting wainscoting is one of the two areas where you can save TONS of time… if you use the tips that you’ll find here.

 In this post we’ll cover how to cut wainscoting trim, the moldings for the rectangular wainscoting frames. Since the wainscoting frames are rectangular, all the moldings used for these frames will have 45 degree angled cuts.

 I’ll probably do a post on the non-45 degree angle cuts later. Those are much trickier. The frames that we installed in the stairs have a non-45 degree angle to follow the lines of the staircase.

Anyways, Let’s get to the tips! 


Disclosure: Some of the links below are affiliate links. If you decide to purchase any of these products, we earn a small commission at no additional cost to you. We recommend these products only because we have experience with them and use them for our own projects. As Amazon Associates, we earn from qualifying purchases.

The Shopping List

Tools List

Here’s a list of the tools we used on this project.

Affiliate links below may be to similar items when exact items couldn’t be found online.

Cordless Finish Nailer

Extra Battery For Finish Nailer

Miter Saw 

Supplies List

These are the supplies used on this project.

Affiliate links below may be to similar items when exact items couldn’t be found online.

4″ Polyester Synthetic Brush – 4 brushes to apply the poly

6 Gauge 1 1/2″ Finish Nails

Why You Need To Make A Jig

I’m sure this isn’t a surprise, but when doing picture frame wainscoting, you are going to be cutting A LOT of molding. Many of the pieces you’ll be cutting will also be the same length.

By spending a little time in the beginning creating a jig, you’ll save a TON of time cutting those same sized pieces to length.

The jig basically extends the miter saw platform and allows you to add stoppers at the length of the molding you want to cut.

By using the jig you’ll only need to measure the molding size for the first piece of molding.

Then you’ll use that piece to set the stopper and all the other pieces of the same size can be cut by butting the end of the molding against the stopper and cutting.

No need to measure after that. 🙂


Making The Cutting Jig

This is what my jig looked like. Here’s a breakdown of the pieces of wood used:

A scrap piece of plywood acts as the base of the jig. The plywood keeps everything lined up. The miter saw and the pieces of wood used for the jig are all screwed into the plywood.

A 2×4 standing on it’s end acts as an extension to the miter saw base.

A 1×4 screwed into the 2×4 acts as an extension to the miter saw backstop.

There really is no right or wrong way to make the jig.

As long as:

  • it’s longer than the molding pieces you’ll be cutting
  • the base extension is at the same or similar height to the miter saw base
  • backstop extension lines up with the miter saw backstop
cutting wainscoting - molding jig with details
cutting wainscoting - molding jig from behind with details

Using Your Cutting Jig

Now that you have a jig made here’s how you use it.

1- Cut The First Molding

You’ll need to cut your first piece of molding to the size you want first. Once it’s cut you’ll use that molding to set the stopper.

And with the stopper in place you’ll be able to cut all the other same sized moldings without having to measure again.

2- Use The Closed Blade To Keep Molding In Place

To set the stopper, place the miter saw in the closed position and place the molding you cut in step 1 against the blade.

cutting wainscoting - using the cutting jig place molding against closed blade

3- Set The Stopper

With the molding placed snug against the saw blade you can now set the stopper on the other side of the molding.

I marked the end of the molding on the back stop with a pen and lined up the edge of the stopper with the pen line and screwed it in place.

Now that the stopper is in place you can cut all your other same sized moldings without measuring.

cutting wainscoting - molding jig setting the stopper 2

Tip:  I also wrote the molding measurement on the backstop (as you can see in the picture) That way if I needed to cut another piece of molding the same size again I’d already have the stopper placement without having to measure again.

4- Cut The Angle That Will Be Against The Stopper First

I’m finding it tough to explain, but you want to cut the angle that would end up against the stopper first, then place that angle against the stopper and make the cut to size.

With my jig, since the jig is on the left I needed to do the left angle on my molding first.

So I set my miter saw to the 45 degree mark to the right and cut the left 45 degree angle.

cutting wainscoting - the first angle to cut with details

5- Place The Molding Against The Stopper To Cut To Size

Once the left angle is cut, spin the miter saw to the 45 degree mark on the left, place the molding against the backstop and the left angle against the stopper.

Now cut the second angle – which also cuts the molding to the correct length.

cutting wainscoting - molding jig setting the stopper details 2

Tip:  Instead of cutting the left angle then the right angle on each molding, it’s faster to cut all the left angles first, then spin the miter saw to the other side and do all the right angles.

Otherwise you spend a lot of time just spinning the miter saw left and right.

There You Have It

Now you can cut all the moldings you need for the rectangular wainscoting frames. In the next post I’ll share how I installed the wainscoting moldings.

Enjoy this post? Pin it and share it with others!

Easy Way To Do Wainscoting - Cutting the Molding - Portrait

DIY Wainscoting – Part 1 – Design And Layout

DIY Wainscoting – Part 1 – Design And Layout

If you look on Pinterest for wainscoting you’ll find all kinds of different styles and versions of wainscoting, from the super simple to the incredibly ornate.

I wanted a wainscoting design that looked fancy without going over the top and I didn’t want it to be too difficult to install.

I think what we chose did just that, it added a ton of style and character and looks great. And it didn’t take a ton of time to do.

I did the wainscoting in the downstairs first, then about a year later I decided to also do wainscoting upstairs. If I added up the time between the upstairs and the downstairs it probably took a total of roughly 2 weeks for both… but keep in mind they are pretty big spaces.

The project is going to be broken down into a bunch of posts.

In this post we’ll focus on the design we chose and why we chose it, how we came up with our wainscoting sizes, and how to measure for wainscoting.

Then in future posts we’ll go over cutting the wainscoting, installing the wainscoting and I think I’ll do another one on wainscoting in the stairs, (spoiler alert, there’s more math lol).

No matter what style you choose, you’ll find tips in here to make your install go smoother.

I think the secret to installing wainscoting is using templates and spacers. Since most of the pieces of the wainscoting are the same size you can make templates to cut them faster and spacers allow a consistent spacing without having to measure every space.

Using templates and spacers with your diy wainscoting will make a huge impact on the length of your installation time.

Disclosure: Some of the links below are affiliate links. If you decide to purchase any of these products, we earn a small commission at no additional cost to you. We recommend these products only because we have experience with them and use them for our own projects. As Amazon Associates, we earn from qualifying purchases.

Deciding On A Wainscoting Style

We looked at a lot of Pinterest pins of wainscoting to find one that fit the style we had in mind.

Honestly, if you don’t know what style you’d like, doing a search on Pinterest is a great way to find out what choices you have.

Of course if you like the wainscoting layout and moldings we used, feel free to copy what we did. 🙂

DIY Wainscoting Ideas – There are So Many Options

There are so many wainscotting ideas out there, and they all look great in their own way.

Take a look a the different wainscotting layouts that exist on Pinterest, do a search and you’ll find countless wainscotting designs.  If you don’t find exactly what you want, come up with your own wainscoting flavor that’s a mix of one or two designs you like.

Here are a few wainscoting designs that we liked:

wainscoting paint colors

The Pin The Inspired Us

This is the pin that inspired our flavor of wainscoting design. We loved how it looked and loved the second horizontal molding between the boxes or frames and the chair molding.

wainscoting paint colors

The Wainscoting Design We Used

Our flavor of wainscoting differs from the pin that inspired it in a few ways – but I think you can see the similarity.

The differences:

  • Uses a heftier second horizontal molding (it’s the same one we used for the wainscoting frames)
  • Has the chair molding higher (so it lined up with the kitchen bar downstairs and the half wall upstairs)
  • Use rectangles standing up instead of the squares or rectangles that are laying down (which seems pretty common)
  • Our spaces around the squares are 3 1/2″ (the width of a piece of 2×4)


wainscoting - molding the design we used

The Style

We looked at a lot of Pinterest pins of wainscoting to find one that fit the style we had in mind.

We liked the wainscoting frames to be more rectangular than square and taller rather than wider.

Initially, we were only going to have the chair molding on top of the frames, but after trying it we realized it needed an extra little something, so we added another horizontal molding between the chair molding and the frames.

The Wainscoting Height

How high do you want your wainscoting to go?

I came across a post that discusses wainscoting height in detail. Her tip was to use the rule of thirds, meaning the wainscoting shouldn’t go higher than a third of the way up the wall.

Here’s the link if you’d like to find out more.

I didn’t come across the article until I started writing this post, but even if I had come across it before, I probably still wouldn’t have followed the rule of thirds. That’s because for each floor we wanted the wainscoting height to line up with something else in the space – and that didn’t line up with a third of the wall height.

On the first floor it was the kitchen bar top and on the second floor it was the half wall in the loft space.

If you’re trying to figure out a height to use, try the rule of thirds, or line it up with something else in the space, or if there isn’t something in the space that you’d like the wainscoting to line up with then you can use the measurements we used as a starting point and adjust however you need to. 🙂

The height (from the floor to the top of the chair-molding) on the 1st floor was 41″ and the height on the 2nd floor was 41 1/2″.

Wainscoting Frames Install the whole space has picture frames

Figure Out The Frame Width

This was one of the biggest stumbling blocks for me when I started this project. How was I going to make all the frames the same width?

Since all the walls are different sizes it seemed impossible to make them all the same width… and well – it is.

I figured out in the end that every wainscoting frame doesn’t need to be the same width or even the same height. In fact it is impossible for them to be the same width since the wall sizes will all be different.

I didn’t want the frames to be square-shaped if I could avoid it and based on the height of the wainscoting I aimed for frames that were around 18 inches wide.

I made a tool that you can use to calculate the width of the picture frames, check it out by clicking the button below. 

The Wainscoting Dimensions

I wanted to emphasis this. The wainscoting dimensions will be different for each wall you do. The wainscoting frame dimensions on the same wall will be the same, but they will be different when on a new wall since more likely than not the new wall will be a different width.

That’s because even though the frame height stays the same, the wainscoting frame width will change based on the width of the wall and number of wainscoting frames.

The Space Around The Frames

The spacing between the frames is THE thing that needs to be consistent. Keep the spacing the same and your brain will think all the picture frames are the same size.

As long as the spacing around the frames is the same everything will flow.

For ours, we chose a spacing of 3 1/2″ all around each frame, that way we could use pieces of 2×4 as a spacers. 😉

The Wainscoting Measurements We Used

The picture has all the wainscoting measurements we used.

Because each wall has a different width, the wainscoting dimensions for each wall have to be different.

All the dimensions of the wainscoting frames on the same wall are the same.

All the measurements in the picture stay the same for every wall in the room, except for the wainscoting frame width (16 5/8″ in the picture) which will change based on the width of the wall and the number of frames used on the wall.

We knew the total height of the wainscoting was 41 1/2″ (to line up with the height of the half wall in the space) so we worked backward from that measurement.

We placed the top of the chair-molding at 41 1/2″ and placed the smaller horizontal molding below it to see what spacing between it and the chair-molding worked for us. We came up with 3″ (the thickness of our level).

Because I also knew I was going to use pieces of 2 x 4 as spacers I could now figure out the height of the wainscot frames.

Here’s how we figured out the height of the wainscot frames is:


The total height of the wainscoting 41 1/2″
Minus The chair molding thickness – 2 3/4″
Minus the space below the chair molding – 3″
Minus the second horizontal molding thickness – 1 1/4″
Minus The spacing above the frame – 3 1/2″
Minus The spacing below the frame – 3 1/2″
Minus The thickness of the baseboard – 4 1/2″
Equals The Wainscot Frame Height = 23″
Wainscoting Measurements

Figuring Out The Width Of The Wainscotting Frames

Ok, you’ve figured out the style, molding, height, spacing and the colors – now it’s time for some math!

This part may feel a little intimidating but trust me, it’s much easier to do than it seems. 

Like every other aspect of this project, there are probably a million other ways to figure this out but here’s an example of how I measured it.

 Let’s use the wall in the picture for the example, the wall measured 124 1/2″ and I ended up using 6 wainscoting frames.

Update: I decided to create a simple wainscoting calculator that you give it the wall width, the width of the spaces between the frames and the number of frames and it gives you the width of each wainscoting frame.

Click the button below and you won’t need to do the math. 

Wainscoting Box Measurements

Calculating For The 6 Frames Shown

First, I subtract the left spacing from the total, which for me is 3 1/2″ or 3.5″, take a look at the picture for more of a visual.

That gives me 121″, now divide 121″ by the number of frames you think would fit. In the pictured example I used 6.

 121″ / 6 = 20.16″

So each frame + it’s spacing on the right would equal 20.16″ in width (The red arrows).

So the frames size would be 20.16 minus the spacing on the right.

The frame size would now be 20.16 – 3.5″ = 16.6″ (The blue arrows)

Since I wanted a rectangular shape, 16.6″ worked well. Basically, I try the same formula with an additional frame or minus a frame, and figure out the one that looks best.

Wainscoting Box Measurements

Let’s Say We Calculated for 5 frames

If I tried 5, it would be 121″ / 5 = 24.2 That means each frame + the spacing on it’s right would be 24.2″. So the frame size would be 24.2″ – 3.5″ (the spacing size) which would be 20.7″

The thing to keep in mind there is no right or wrong for any of this. I wanted my frames to look more rectangular in shape than square and a width of 20.7″ would be pretty close to the height of 23″ so instead of doing 5 frames I opted for 6.

Converting Decimal to Fractions

So now you know the frames should be 16.6″… how the heck do you figure that out on a tape measure?!

Figuring out the numbers was definitely easier using a calculator but I ran into a problem of converting the decimal from the calculator back to a fraction I could use with a tape measure.

The answer at the time was a widget I came across that converts decimals to fractions that can be used with a tape measure. It wasn’t 100% because sometimes the fraction it gave me was 231/356… which doesn’t help. lol

Now, I’ve created a wainscoting calculator. Give it the measurements in fractions you’d find on a tape measure and it figures out the wainscoting frame with and gives you the width in fractions you can use on the tape measure. No more math and no more 231/356! lol

How To Handle Windows With Wainscoting

This is something I thought of afterwards. If the window goes below the height of your wainscoting then it would be best to measure that wall in sections, with the space below the window as it’s own section.

I’ve seen some wainscoting pics where they kind of use “L” shaped frames to conform around the window… I don’t think it looks that great.

I think it looks more put together if the frames under the window are a different width and height – as long as the spacing around the frames is the same as the rest of the wall it will all fit together.

I only had one window that affected my wainscoting layout, and luckily it happened to not affect things too much. Once I did it I realized it would have looked better if I divided the wall into pieces and treated each piece like a seperate wall.

Take a look a the pic below, that is the window that I’m talking about. It doesn’t look bad, but it was luck more than anything else. I was going from right to left when installing my wainscoting, got to the window realized I’d need to do something different under the window (notice the two boxes under the window are not as wide as the ones next to them), skipped it for later and resumed my picture frames on the other side of the window.

Wainscoting Picture Frames Around A Window

Instead, I should have it would have been better if I had the picture frames under the window line up with the window width and treated the spaces on each side of the window as separate walls and did calculations for each side separately.

What I should have done with wainscoting frames under windows

I edited the picture to show what it would have looked like if I had the frames under the window line up with the window’s edges. Excuse the rough editing, but I think it does give an idea of what how it would have looked better.

Again, the window luckily didn’t muck it up too much for me, but I can see where it could get really ugly if you don’t plan for the window beforehand.

The frames under the window now line up with the window edges

The Molding We Used

We used two different pieces of molding for the wainscoting, one for the chair-molding and the other for the frames and the horizontal molding between the chair-molding and frames.

We bought both of them from Home Depot. Here they are, you can click on the image if you’d like to get the same molding. 

The Chair Molding (Top Molding)

This is the chair molding. There was a poly version of this molding which is much cheaper but the features were a bit more exaggerated and we liked the look of the wood version better.

The Molding For The Frames

This is the molding we used for the frames and as the second horizontal molding (below the chair molding).

It’s a poly molding so it was really inexpensive… luckily because we bought A LOT of it. 🙂

Our Colors

For the wall colors we chose greige colors (a mix of grey and beige).

A lot of wainscoting pics we came across left the wainscoting frames white on a different colored wall.  That makes the wainscoting frame pop out more, but we chose to paint the frames the same color as the wall instead.

Painting the wainscoting the same color as the wall gives it a built-in look, which we liked.

If you’d like to use the same colors here are the two colors we used:


Bottom Paint Color

Sherwin Williams

Aesthetic White (SW7035)

Showcase

Interior Satin

Top Paint Color

Sherwin Williams

Anew Grey (SW7030)

Showcase

Interior Eggshell

wainscoting paint colors

That’s It For The Wainscoting Designing And Layout

That’s it for the designing and laying out your wainscoting diy. Now that you figured out all the nitty gritty for your wainscoting it’s time to start cutting some molding! I’ll cover that in the next post!

 Click on the button below to keep reading:

Some Pictures Of The Finished Wainscoting

Here’s some more pics of the wainscoting. I’m thinking of doing a post on the wainscoting in the stairs since that was a bit trickier. I haven’t used math like that since High school! lol

Let me know what you think, is there something you would have done different?

Share your thoughts in the comments below!

wainscoting - in the stairs
wainscoting - in the stairs from the top to the bottom
wainscoting - in the stairs on the other side the top to the bottom
wainscoting - in the stairs the bottom section
Wainscoting shapes
wainscoting - in the stairs the bottom section

Enjoy this post? Pin it and share it with others!

Easy Way To Do Wainscoting - Designing and Layout