Easy Wainscoting - The Finished Product
If you look on Pinterest for wainscoting you’ll find all kinds of different styles and versions of wainscoting, from the super simple to the incredibly ornate.
I wanted a wainscoting design that looked fancy without going over the top and I didn’t want it to be too difficult to install.
I think what we chose did just that, it added a ton of style and character and looks great. And it didn’t take a ton of time to do.
I did the wainscoting in the downstairs first, then about a year later I decided to also do wainscoting upstairs. If I added up the time between the upstairs and the downstairs it probably took a total of roughly 2 weeks for both… but keep in mind they are pretty big spaces.
The project is going to be broken down into a bunch of posts.
In this post we’ll focus on the design we chose and why we chose it, how we came up with our wainscoting sizes, and how to measure for wainscoting.
Then in future posts we’ll go over cutting the wainscoting, installing the wainscoting and I think I’ll do another one on wainscoting in the stairs, (spoiler alert, there’s more math lol).
No matter what style you choose, you’ll find tips in here to make your install go smoother.
I think the secret to installing wainscoting is using templates and spacers. Since most of the pieces of the wainscoting are the same size you can make templates to cut them faster and spacers allow a consistent spacing without having to measure every space.
Using templates and spacers with your diy wainscoting will make a huge impact on the length of your installation time.
Disclosure: Some of the links below are affiliate links. If you decide to purchase any of these products, we earn a small commission at no additional cost to you. We recommend these products only because we have experience with them and use them for our own projects. As Amazon Associates, we earn from qualifying purchases.
We looked at a lot of Pinterest pins of wainscoting to find one that fit the style we had in mind.
Honestly, if you don’t know what style you’d like, doing a search on Pinterest is a great way to find out what choices you have.
Of course if you like the wainscoting layout and moldings we used, feel free to copy what we did. 🙂
There are so many wainscotting ideas out there, and they all look great in their own way.
Take a look a the different wainscotting layouts that exist on Pinterest, do a search and you’ll find countless wainscotting designs. If you don’t find exactly what you want, come up with your own wainscoting flavor that’s a mix of one or two designs you like.
Here are a few wainscoting designs that we liked:
This is the pin that inspired our flavor of wainscoting design. We loved how it looked and loved the second horizontal molding between the boxes or frames and the chair molding.
Our flavor of wainscoting differs from the pin that inspired it in a few ways – but I think you can see the similarity.
The differences:
We looked at a lot of Pinterest pins of wainscoting to find one that fit the style we had in mind.
We liked the wainscoting frames to be more rectangular than square and taller rather than wider.
Initially, we were only going to have the chair molding on top of the frames, but after trying it we realized it needed an extra little something, so we added another horizontal molding between the chair molding and the frames.
How high do you want your wainscoting to go?
I came across a post that discusses wainscoting height in detail. Her tip was to use the rule of thirds, meaning the wainscoting shouldn’t go higher than a third of the way up the wall.
Here’s the link if you’d like to find out more.
I didn’t come across the article until I started writing this post, but even if I had come across it before, I probably still wouldn’t have followed the rule of thirds. That’s because for each floor we wanted the wainscoting height to line up with something else in the space – and that didn’t line up with a third of the wall height.
On the first floor it was the kitchen bar top and on the second floor it was the half wall in the loft space.
If you’re trying to figure out a height to use, try the rule of thirds, or line it up with something else in the space, or if there isn’t something in the space that you’d like the wainscoting to line up with then you can use the measurements we used as a starting point and adjust however you need to. 🙂
The height (from the floor to the top of the chair-molding) on the 1st floor was 41″ and the height on the 2nd floor was 41 1/2″.
This was one of the biggest stumbling blocks for me when I started this project. How was I going to make all the frames the same width?
Since all the walls are different sizes it seemed impossible to make them all the same width… and well – it is.
I figured out in the end that every wainscoting frame doesn’t need to be the same width or even the same height. In fact it is impossible for them to be the same width since the wall sizes will all be different.
I didn’t want the frames to be square-shaped if I could avoid it and based on the height of the wainscoting I aimed for frames that were around 18 inches wide.
I made a tool that you can use to calculate the width of the picture frames, check it out by clicking the button below.
I wanted to emphasis this. The wainscoting dimensions will be different for each wall you do. The wainscoting frame dimensions on the same wall will be the same, but they will be different when on a new wall since more likely than not the new wall will be a different width.
That’s because even though the frame height stays the same, the wainscoting frame width will change based on the width of the wall and number of wainscoting frames.
The spacing between the frames is THE thing that needs to be consistent. Keep the spacing the same and your brain will think all the picture frames are the same size.
As long as the spacing around the frames is the same everything will flow.
For ours, we chose a spacing of 3 1/2″ all around each frame, that way we could use pieces of 2×4 as a spacers. 😉
The picture has all the wainscoting measurements we used.
Because each wall has a different width, the wainscoting dimensions for each wall have to be different.
All the dimensions of the wainscoting frames on the same wall are the same.
All the measurements in the picture stay the same for every wall in the room, except for the wainscoting frame width (16 5/8″ in the picture) which will change based on the width of the wall and the number of frames used on the wall.
We knew the total height of the wainscoting was 41 1/2″ (to line up with the height of the half wall in the space) so we worked backward from that measurement.
We placed the top of the chair-molding at 41 1/2″ and placed the smaller horizontal molding below it to see what spacing between it and the chair-molding worked for us. We came up with 3″ (the thickness of our level).
Because I also knew I was going to use pieces of 2 x 4 as spacers I could now figure out the height of the wainscot frames.
Here’s how we figured out the height of the wainscot frames is:
| The total height of the wainscoting | 41 1/2″ |
| Minus The chair molding thickness | – 2 3/4″ |
| Minus the space below the chair molding | – 3″ |
| Minus the second horizontal molding thickness | – 1 1/4″ |
| Minus The spacing above the frame | – 3 1/2″ |
| Minus The spacing below the frame | – 3 1/2″ |
| Minus The thickness of the baseboard | – 4 1/2″ |
| Equals The Wainscot Frame Height | = 23″ |
Ok, you’ve figured out the style, molding, height, spacing and the colors – now it’s time for some math!
This part may feel a little intimidating but trust me, it’s much easier to do than it seems.
Like every other aspect of this project, there are probably a million other ways to figure this out but here’s an example of how I measured it.
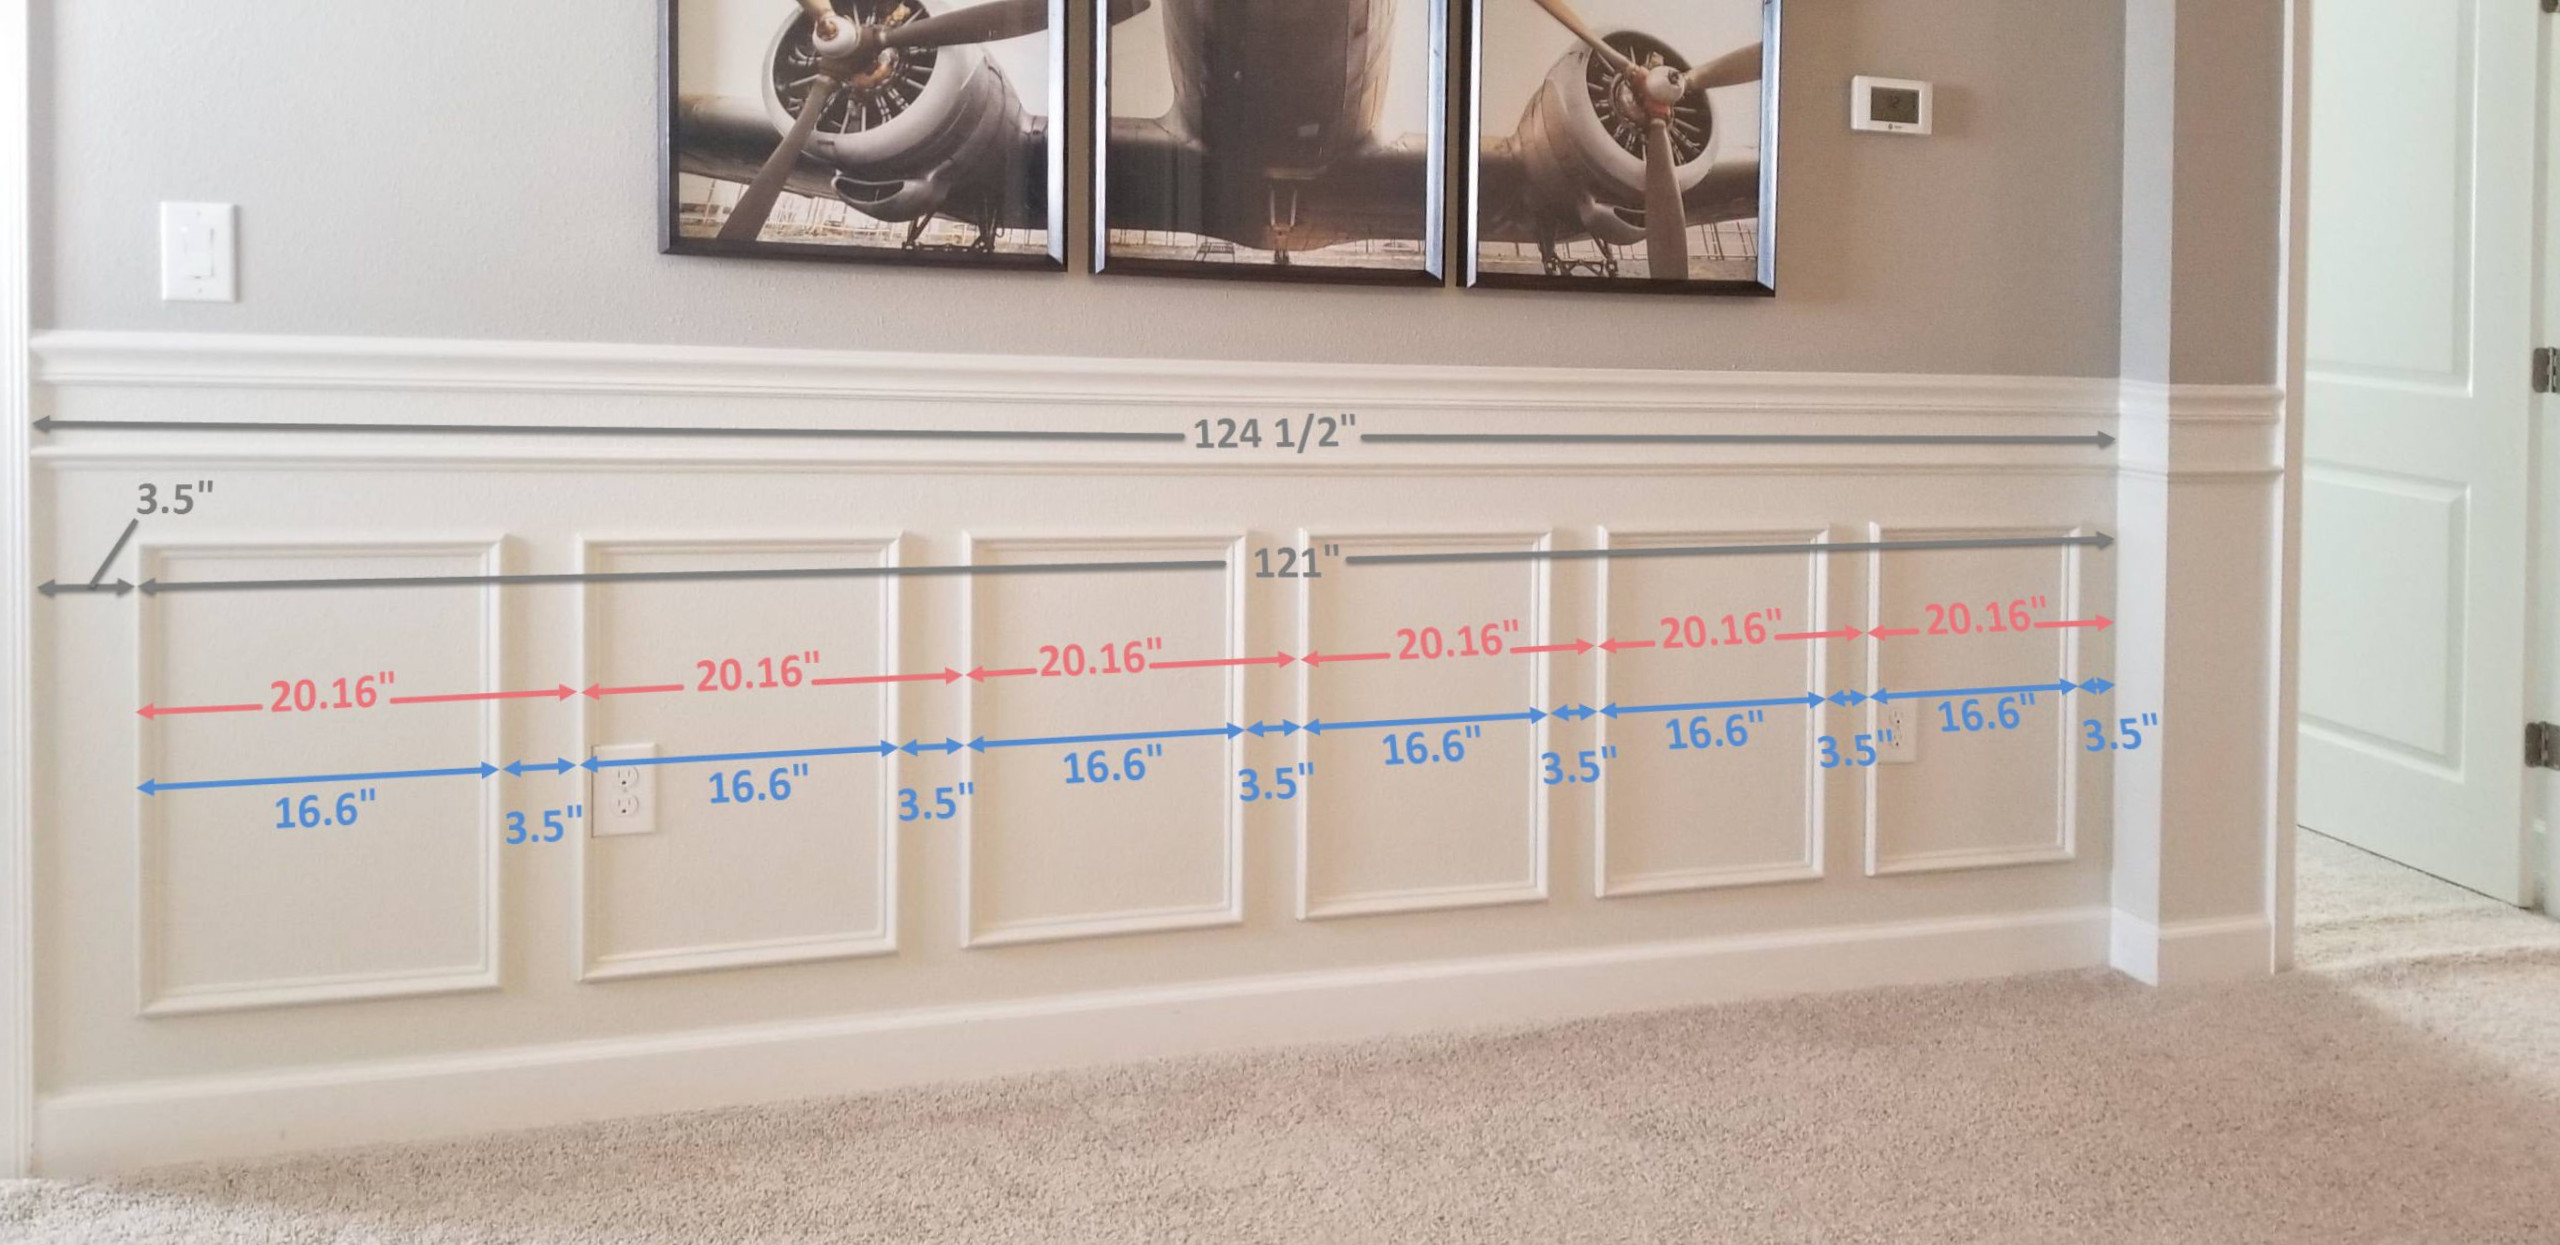
Let’s use the wall in the picture for the example, the wall measured 124 1/2″ and I ended up using 6 wainscoting frames.
Calculating For The 6 Frames Shown
First, I subtract the left spacing from the total, which for me is 3 1/2″ or 3.5″, take a look at the picture for more of a visual.
That gives me 121″, now divide 121″ by the number of frames you think would fit. In the pictured example I used 6.
121″ / 6 = 20.16″
So each frame + it’s spacing on the right would equal 20.16″ in width (The red arrows).
So the frames size would be 20.16 minus the spacing on the right.
The frame size would now be 20.16 – 3.5″ = 16.6″ (The blue arrows)
Since I wanted a rectangular shape, 16.6″ worked well. Basically, I try the same formula with an additional frame or minus a frame, and figure out the one that looks best.
Let’s Say We Calculated for 5 frames
If I tried 5, it would be 121″ / 5 = 24.2 That means each frame + the spacing on it’s right would be 24.2″. So the frame size would be 24.2″ – 3.5″ (the spacing size) which would be 20.7″
The thing to keep in mind there is no right or wrong for any of this. I wanted my frames to look more rectangular in shape than square and a width of 20.7″ would be pretty close to the height of 23″ so instead of doing 5 frames I opted for 6.
So now you know the frames should be 16.6″… how the heck do you figure that out on a tape measure?!
Figuring out the numbers was definitely easier using a calculator but I ran into a problem of converting the decimal from the calculator back to a fraction I could use with a tape measure.
The answer at the time was a widget I came across that converts decimals to fractions that can be used with a tape measure. It wasn’t 100% because sometimes the fraction it gave me was 231/356… which doesn’t help. lol
Now, I’ve created a wainscoting calculator. Give it the measurements in fractions you’d find on a tape measure and it figures out the wainscoting frame with and gives you the width in fractions you can use on the tape measure. No more math and no more 231/356! lol
This is something I thought of afterwards. If the window goes below the height of your wainscoting then it would be best to measure that wall in sections, with the space below the window as it’s own section.
I’ve seen some wainscoting pics where they kind of use “L” shaped frames to conform around the window… I don’t think it looks that great.
I think it looks more put together if the frames under the window are a different width and height – as long as the spacing around the frames is the same as the rest of the wall it will all fit together.
I only had one window that affected my wainscoting layout, and luckily it happened to not affect things too much. Once I did it I realized it would have looked better if I divided the wall into pieces and treated each piece like a seperate wall.
Take a look a the pic below, that is the window that I’m talking about. It doesn’t look bad, but it was luck more than anything else. I was going from right to left when installing my wainscoting, got to the window realized I’d need to do something different under the window (notice the two boxes under the window are not as wide as the ones next to them), skipped it for later and resumed my picture frames on the other side of the window.
Instead, I should have it would have been better if I had the picture frames under the window line up with the window width and treated the spaces on each side of the window as separate walls and did calculations for each side separately.
I edited the picture to show what it would have looked like if I had the frames under the window line up with the window’s edges. Excuse the rough editing, but I think it does give an idea of what how it would have looked better.
Again, the window luckily didn’t muck it up too much for me, but I can see where it could get really ugly if you don’t plan for the window beforehand.
We used two different pieces of molding for the wainscoting, one for the chair-molding and the other for the frames and the horizontal molding between the chair-molding and frames.
We bought both of them from Home Depot. Here they are, you can click on the image if you’d like to get the same molding.
This is the chair molding. There was a poly version of this molding which is much cheaper but the features were a bit more exaggerated and we liked the look of the wood version better.
For the wall colors we chose greige colors (a mix of grey and beige).
A lot of wainscoting pics we came across left the wainscoting frames white on a different colored wall. That makes the wainscoting frame pop out more, but we chose to paint the frames the same color as the wall instead.
Painting the wainscoting the same color as the wall gives it a built-in look, which we liked.
If you’d like to use the same colors here are the two colors we used:
Bottom Paint Color
Sherwin Williams
Aesthetic White (SW7035)
Showcase
Interior Satin
Top Paint Color
Sherwin Williams
Anew Grey (SW7030)
Showcase
Interior Eggshell
That’s it for the designing and laying out your wainscoting diy. Now that you figured out all the nitty gritty for your wainscoting it’s time to start cutting some molding! I’ll cover that in the next post!
Click on the button below to keep reading:
Here’s some more pics of the wainscoting. I’m thinking of doing a post on the wainscoting in the stairs since that was a bit trickier. I haven’t used math like that since High school! lol
Let me know what you think, is there something you would have done different?
Share your thoughts in the comments below!
[et_bloom_inline optin_id=”optin_7″]
The Amazon affiliate tracking id replacer tool updates the tracking id in your Amazon Affiliate…
There are already wainscoting calculators out there but they're too complicated. This wainscoting calculator uses…
In this post we’ll go over how to paint laminate cabinets. We did this project…
Let me first say that converting a box spring into a platform bed is not…
View Comments
I like this idea and detailed process. One question. As for the texture on the walls, is there a texture or are the walls smooth? If there is a texture was there anything done to smooth out the wainscoting area of the wall for a smooth finish while the upper part of the wall was textured?
Hi John,
You can put a skim coat over the parts where you'll do the wainscoting, I did think about doing that on my project originally. I'm really glad I didn't. I don't even notice the textured wall behind the wainscoting.
I came across your site on Pinterest.
I would love to know where the 3 frame airplane picture came from! My husband is an airplane mechanic and always asks about plane decor. But this picture would actually match my aesthetic lol.
Thanks in advance!
Hi Brianna,
We bought it in Home Goods. The frame was originally gold colored, we painted it a dark brown to go with the leather section in the loft.
It probably doesn't help too much since Home Goods doesn't always have the same stuff. I did a picture search on google and it looks like Kirkland used to have them also. The Kirkland site says it was currently unavailable. :(
I know that doesn't help very much... but I tried. lol
I love the ideas shared in this post! The design tips for wainscoting layouts are super helpful. I can’t wait to try incorporating some of these elements into my own home project. Looking forward to Part 2!
Hi Jaya,
Part 2 is up, take a look at it when you get a chance. :)
I loved this post! The design ideas for wainscoting are really inspiring and got me excited to start my own project. The layout tips were especially helpful for visualizing how it will look in my hallway. Can't wait for Part 2!
I'm thrilled you're found the post inspirational. Here are the Part 2 and Part 3 posts:
https://ourprojectideas.com/diy-wainscoting-part-2-cutting-the-frames/
https://ourprojectideas.com/diy-wainscoting-part-3-installing-the-molding/
And here are calculators for the wainscoting measurements:
https://ourprojectideas.com/wainscoting-calculator-super-simple/
https://ourprojectideas.com/a-simple-metric-wainscoting-calculator/
Great post! I love how you broke down the design and layout process for wainscoting. Your tips are super helpful and have given me some great ideas for my own home. Can't wait to see Part 2!
I loved this post! The design tips and layout suggestions for wainscoting are incredibly helpful. It's so inspiring to see how you visualized the space. Can't wait for Part 2 to see the execution!
I love the design ideas you've shared for the wainscoting project! The tips on layout are especially helpful for visualizing how it will look in my own space. Can't wait to see Part 2!
I love this DIY wainscoting design! The layout ideas are so inspiring, and I can't wait to try some of these techniques in my own home. Thanks for sharing the detailed process!
I loved your insights on the design and layout of wainscoting! The tips about measuring and planning made the process feel so much more manageable. Can't wait to see how the project unfolds in the next parts!