Wainscoting Frames Working around outlets cutting the piece
In this post I’m going to go over installing the wainscoting frames and the tips and tricks I found while installing them.
Okay, so you’ve figured out the measurements of your wainscoting frames, and you know how to cut the pieces of the frame.
Well here we’re going to go over how to install the wainscoting frames.
Installing the wainscoting molding is a pretty repetitive task, but with the right tools and these tips and tricks you’ll get through it in no time.
Disclosure: Some of the links below are affiliate links. If you decide to purchase any of these products, we earn a small commission at no additional cost to you. We recommend these products only because we have experience with them and use them for our own projects. As Amazon Associates, we earn from qualifying purchases.
The last thing you want is to cut all your pieces, then find out you cut the pieces too short!
This is what I did to give me some piece of mind.
Once I have the bottom pieces cut, I bring them to the wall they’re going to go on and lay them out on the floor along that wall spaced out the way they’ll be spaced out once they’re installed.
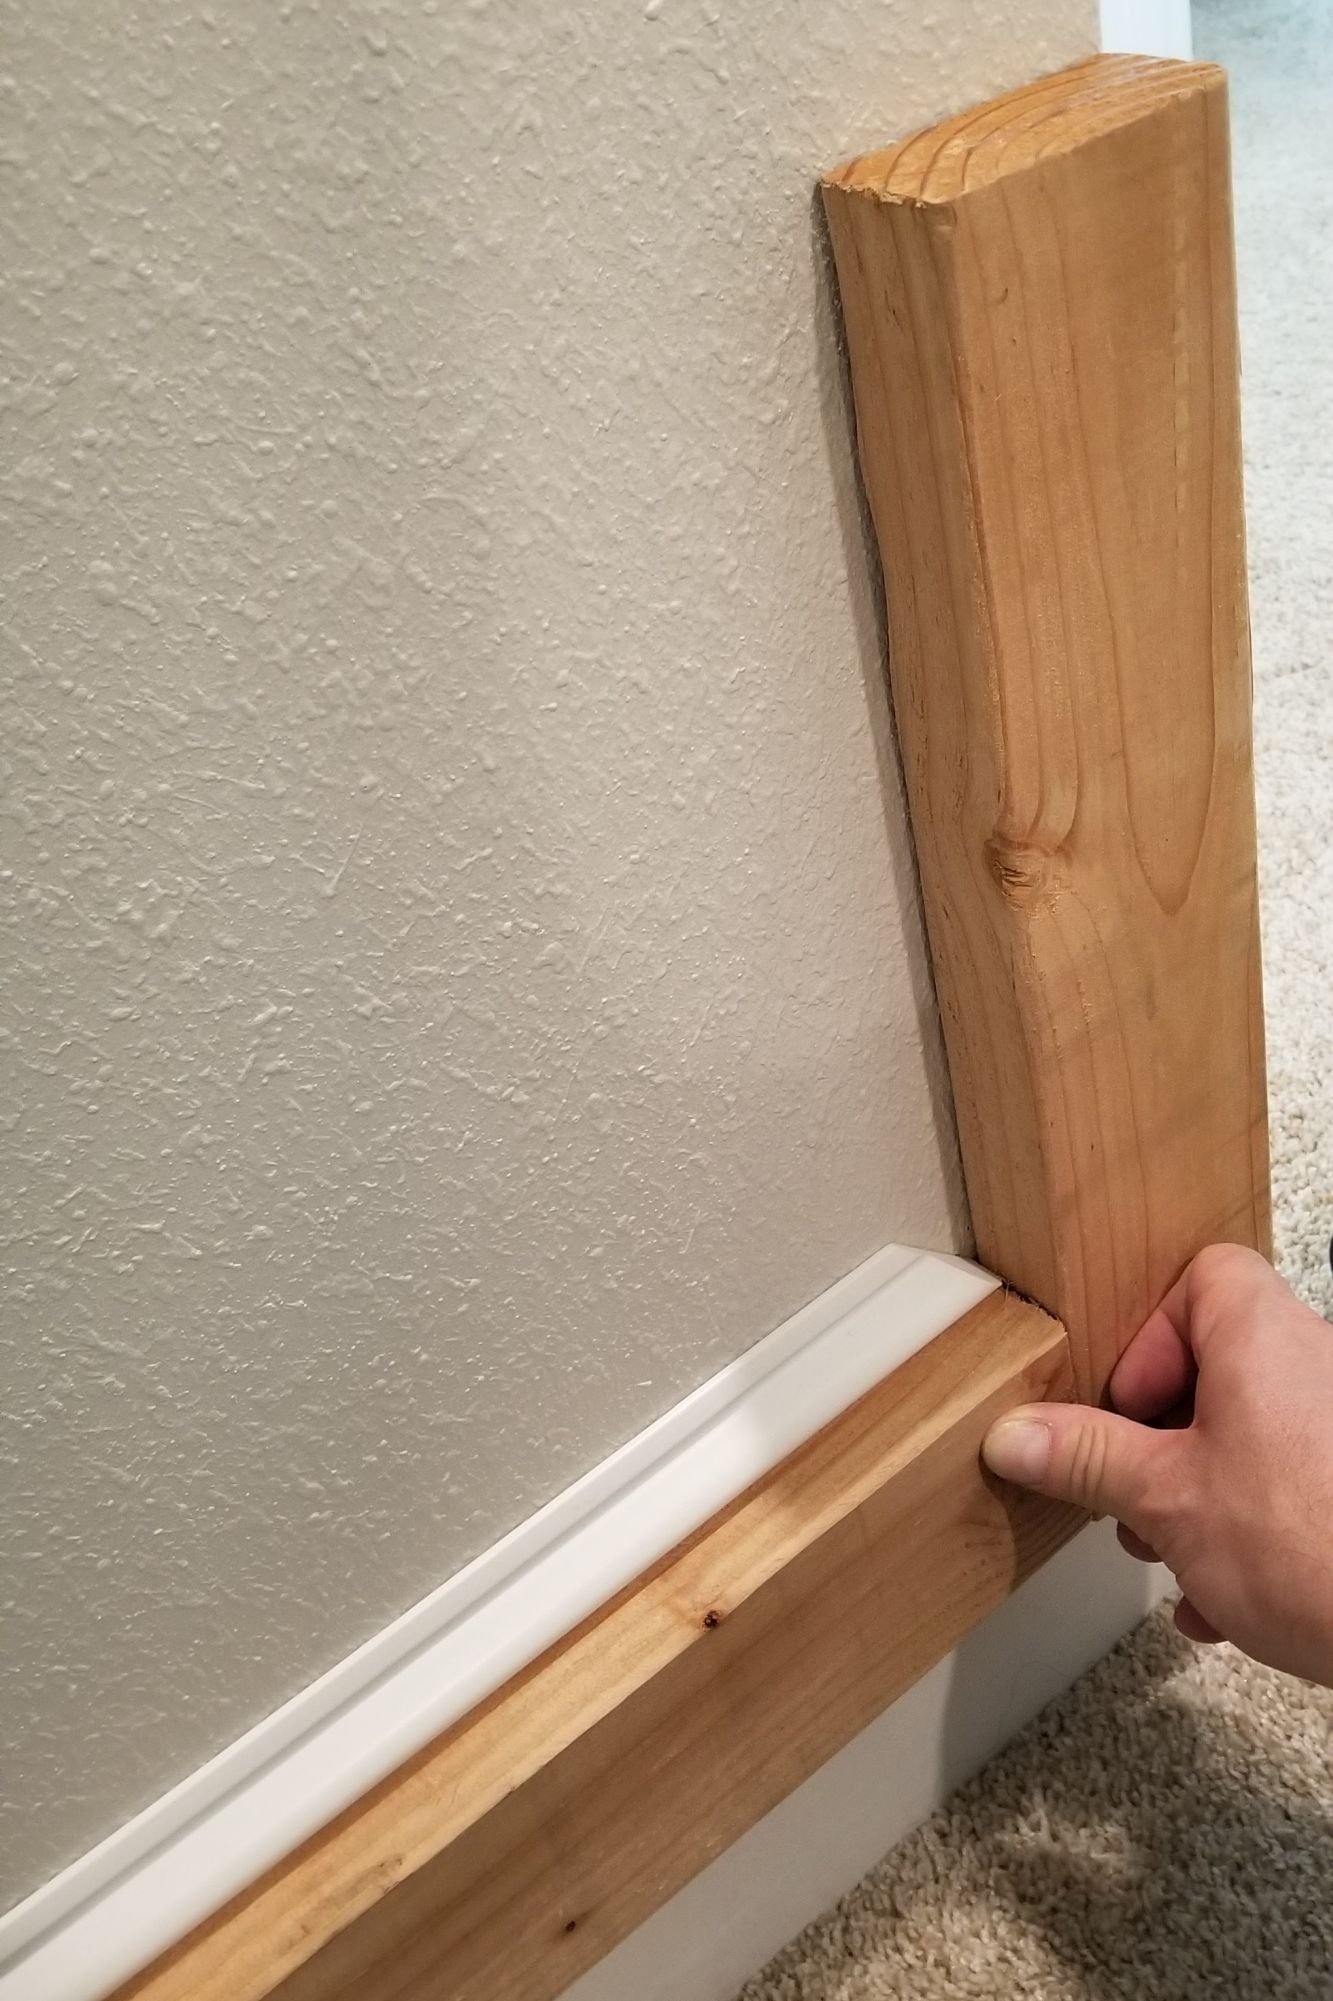
I wanted to make sure my measurements for the wainscoting frames were spot right. With my Wainscoting frames I decided to use 3 1/2″ spaces between the each frame. I did that because it looked nice, but it’s also the width of a regular 2 x 4, so it was easy to find a spacer. If you look in the picture below, I used a 2 x 4 to space the bottom pieces out on the floor.
If you want to use a different spacing you can just cut a piece of 1×4 or 1×6 to the right width and use that as your spacer.
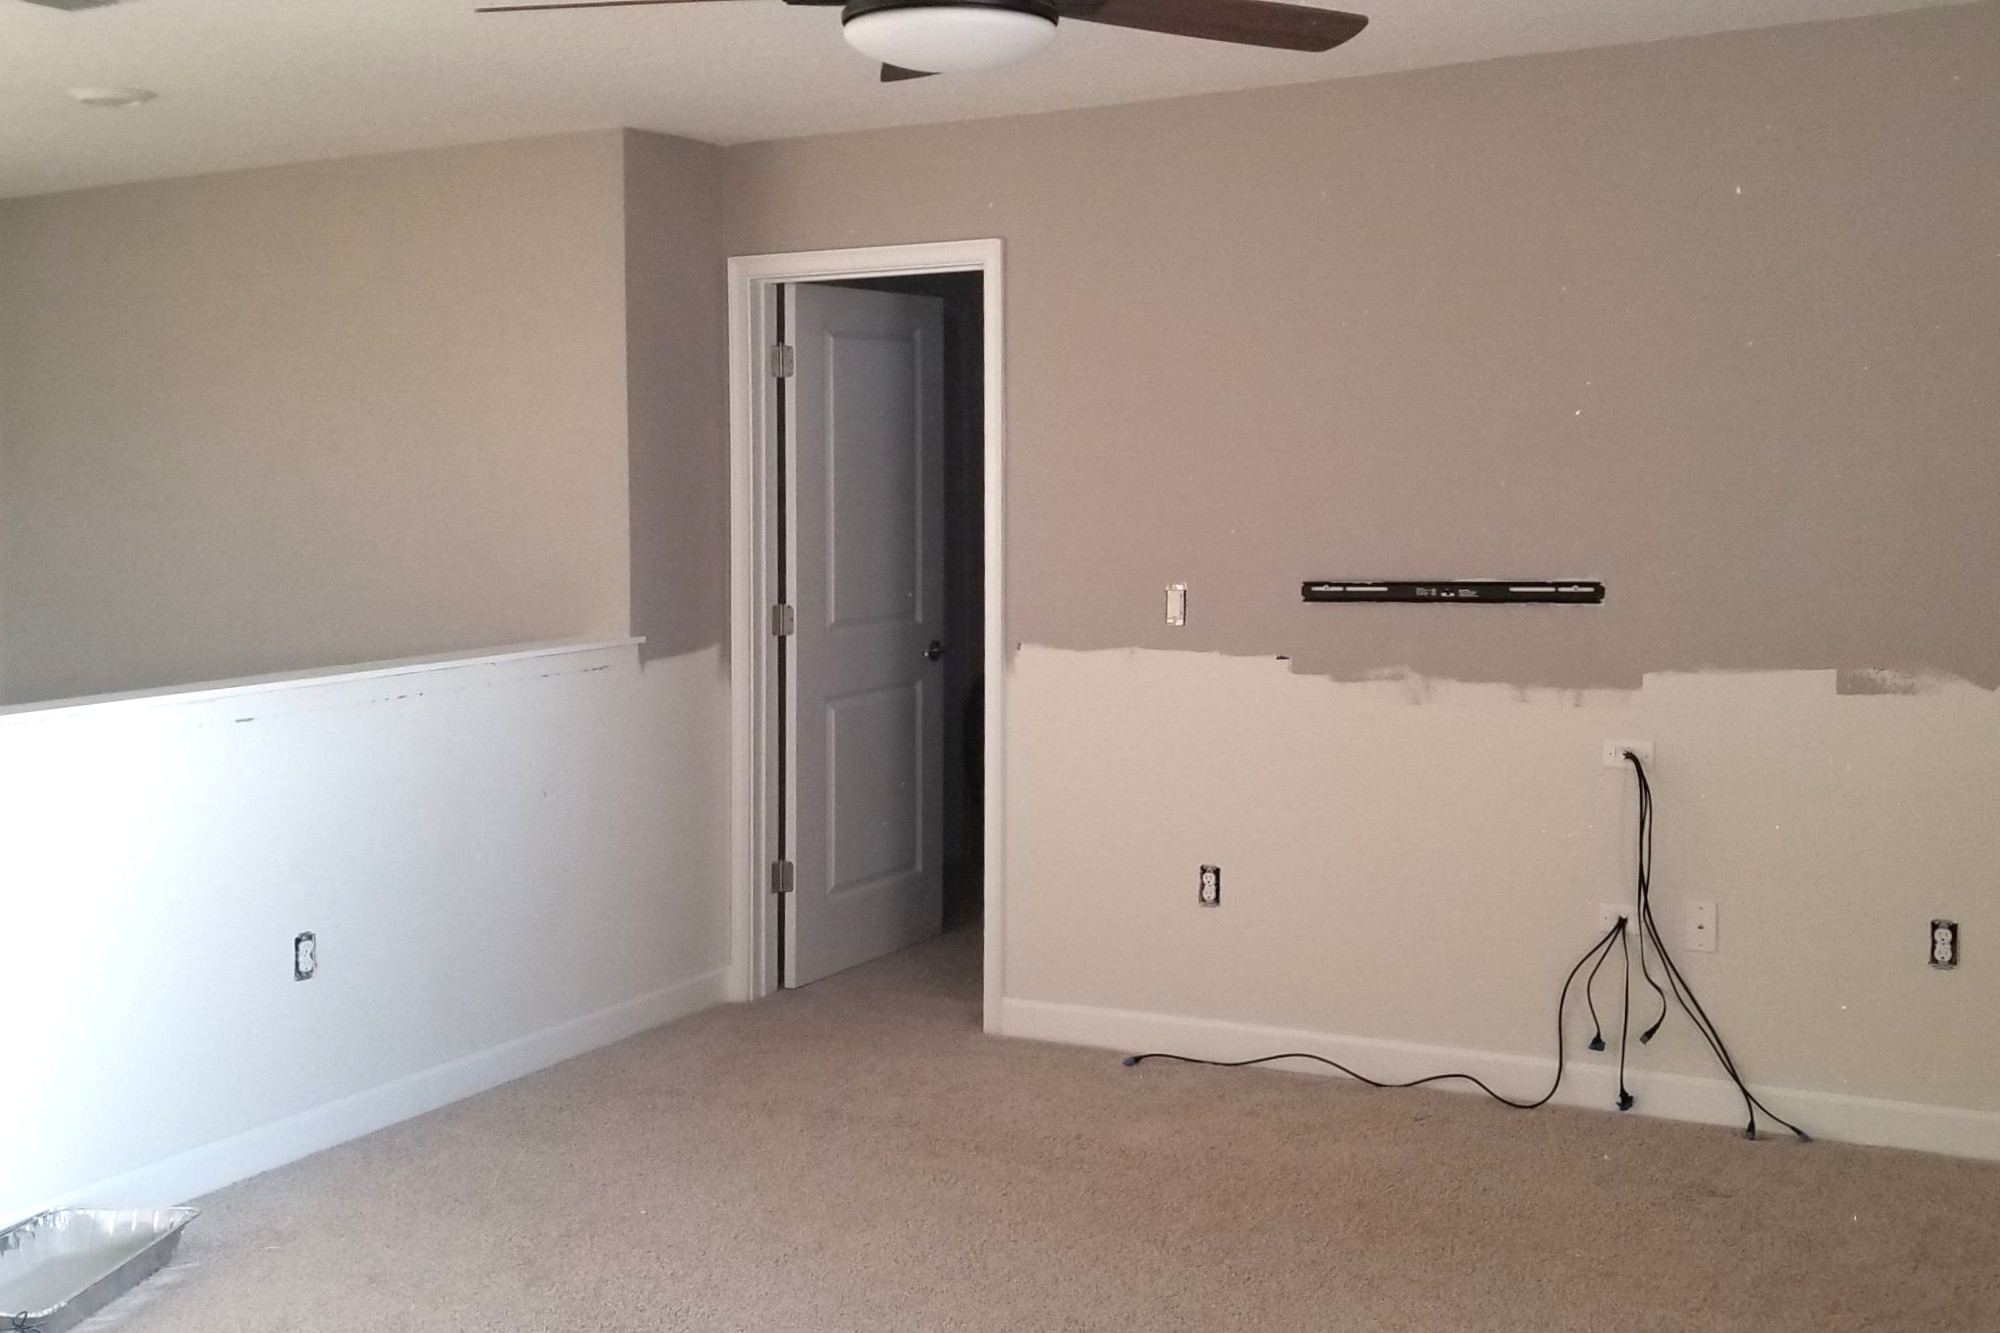
I don’t think the order matters too much. We painted the walls first then we installed the frames. We felt like we needed to paint the walls first because we were dying to see what the colors would look like on the walls.
As you can see from the pics, we didn’t paint it anywhere near perfect. We knew full well we were going to have to paint for real afterwards, but we did a rough single coat of paint to get an idea of the colors.
My first attempt at wainscoting was a few years ago on the ground floor of this house.
When I did the wainscoting on the ground floor I started with the chair molding that goes along the top, then I did the horizontal molding underneath it and I then filled in the space below it with the wainscoting frames.
When I did it this time around, I decided to install it from the bottom up.
Ultimately, I think it’s really just a matter of preference, but installing wainscoting from the bottom up is much easier.
The biggest difference between the two is that I can do most of the installation just by using the spacer, when starting from the bottom. Put the spacer on top of the baseboard, install the bottom of the wainscoting frame. Then build up the box, put the spacer on the top of the frame and install the top horizontal molding, and finally put the spacer on top of the horizontal molding and install the chair molding at the very top.
When I started from the top there was a lot more measuring and leveling and measuring and leveling to get that chair molding just right.
It’s really much easier than you would think. The key is using the spacers, they allow you to get everything done without too much measuring.
The one thing I’d like to also mention is everything does not have to be perfect, perfect. You don’t need to make sure every single piece is absolutely level.
Let’s just say this. When you do your very first wainscoting frame you are going to measure and level 1000 times more than you will the 500th frame. 🙂
If you start from the bottom and work your way up and use your spacer to keep the space around each frame consistent, the only pieces that you need to really check for level are the very top horizontal pieces.
The wainscoting in the stairs was a whole other animal!! The wainscoting in the stairs deserves it’s own post but when you are doing the wainscoting on a regular wall, the actual install goes pretty smoothly.
Tip: Two things – First You NEED to use a nail gun to do this project. I can’t imagine doing this with a hammer.
Second I used nails to keep the frames in place but I also used a painters caulk on the back of the molding to help them be a bit more secure. It helps when doing the second vertical piece and the top piece.
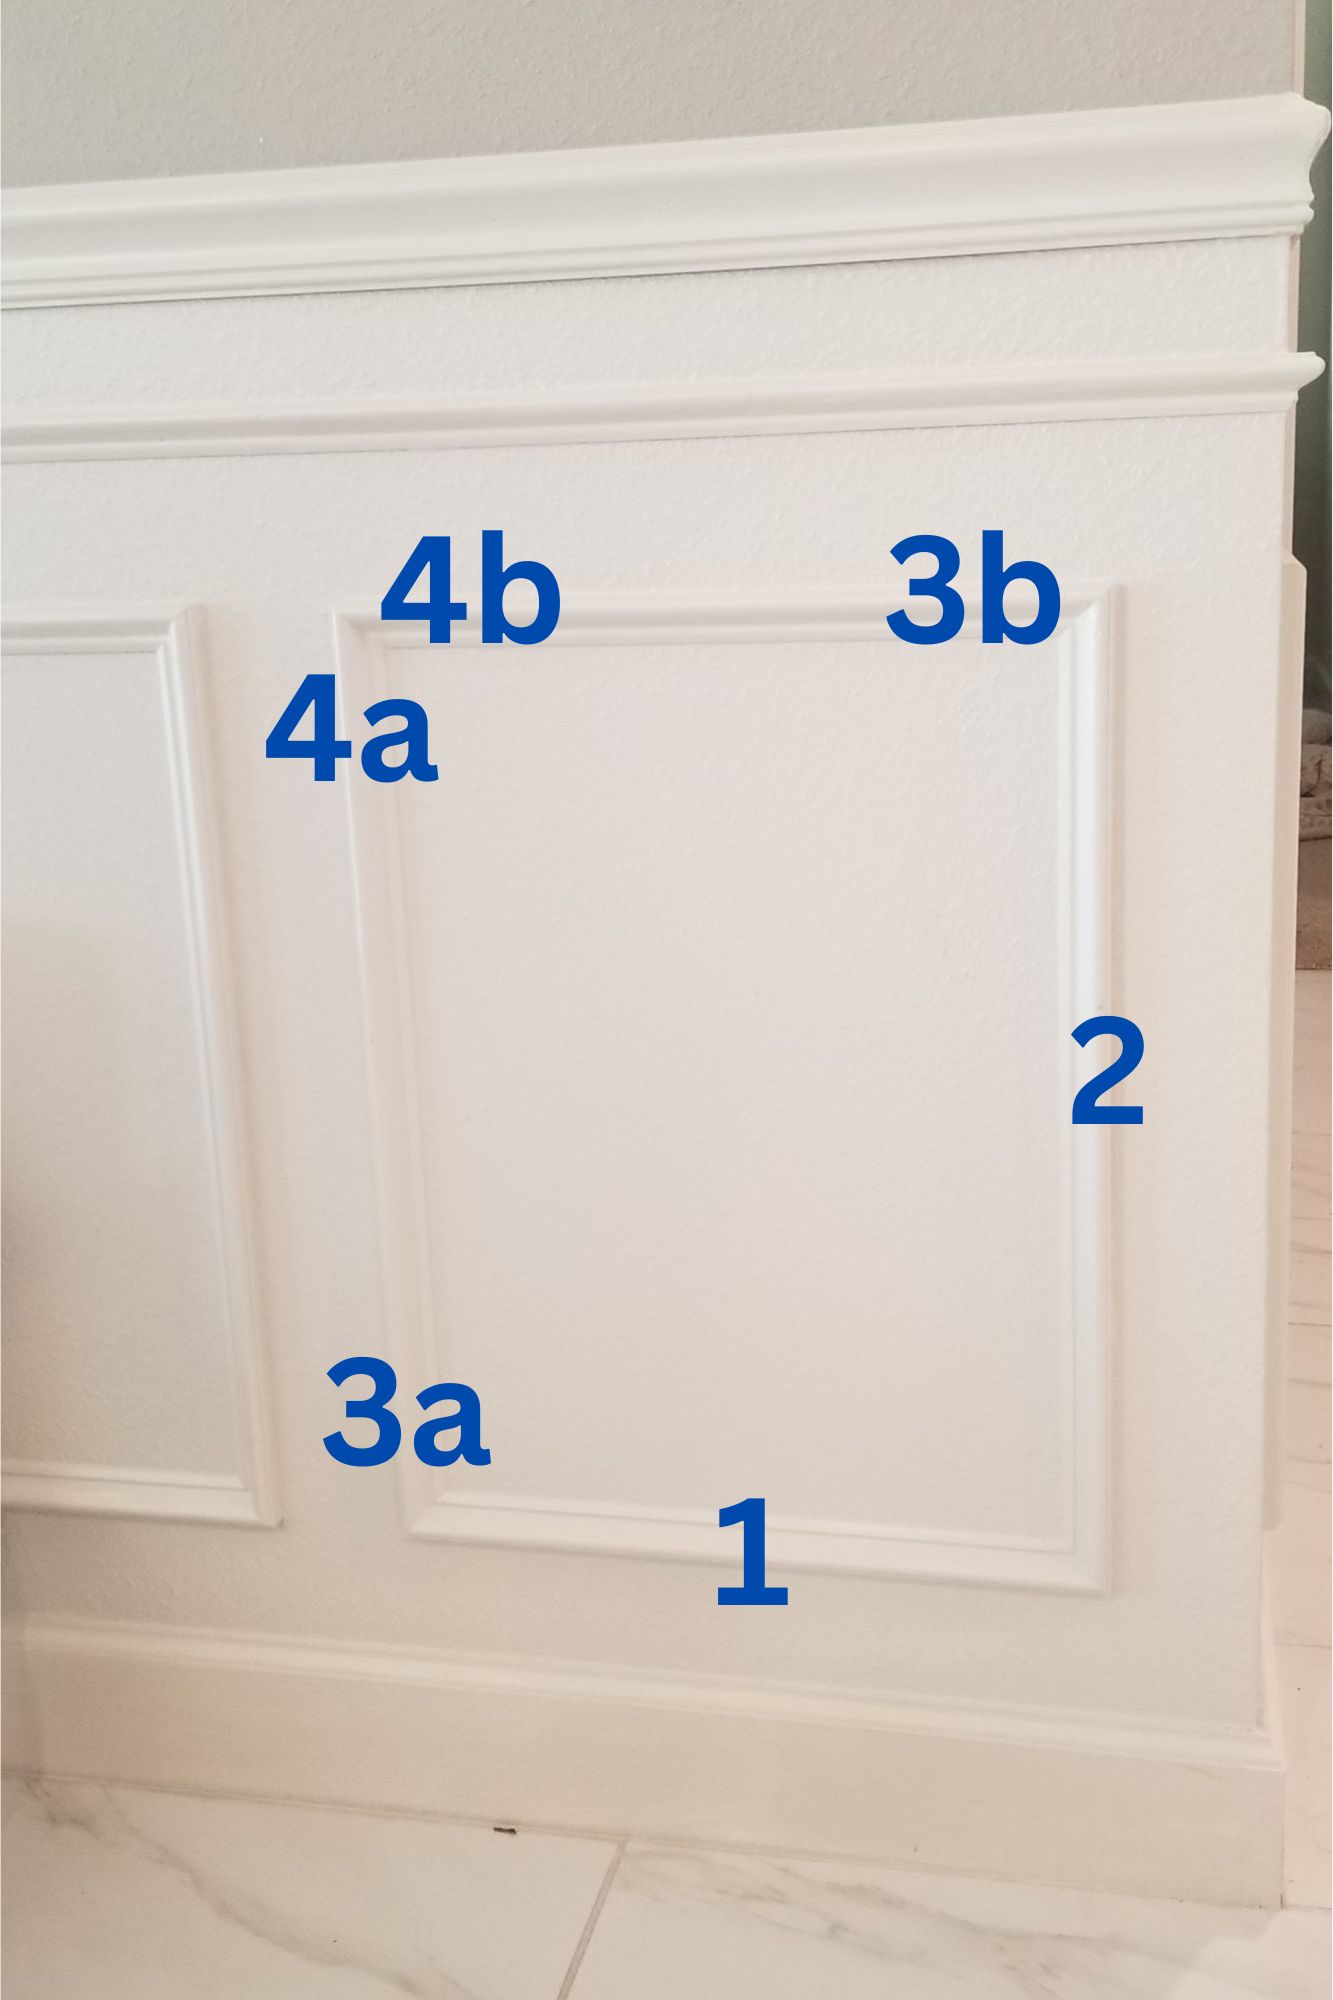
This is the installation order when installing your wainscoting frame:
1– Install the bottom leg by putting caulk on the back of the leg, then nailing both ends of that leg to the wall.
2– Add caulk to the back of the right leg then nail both ends of that leg to the wall. I also like to add a little caulk in the miter joint before putting the pieces together.
3a– Caulk the back of the left leg and nail in the bottom of that leg
3b– Caulk the back of the top leg and nail in the right side of that leg
4a and 4b– Line up the top of the left leg and the left of the top leg so they are nice and tight together, then nail in both
That’s pretty much it! Rinse and repeat… a lot and you’re done. 🙂
Below are the details for each installing each of the legs.
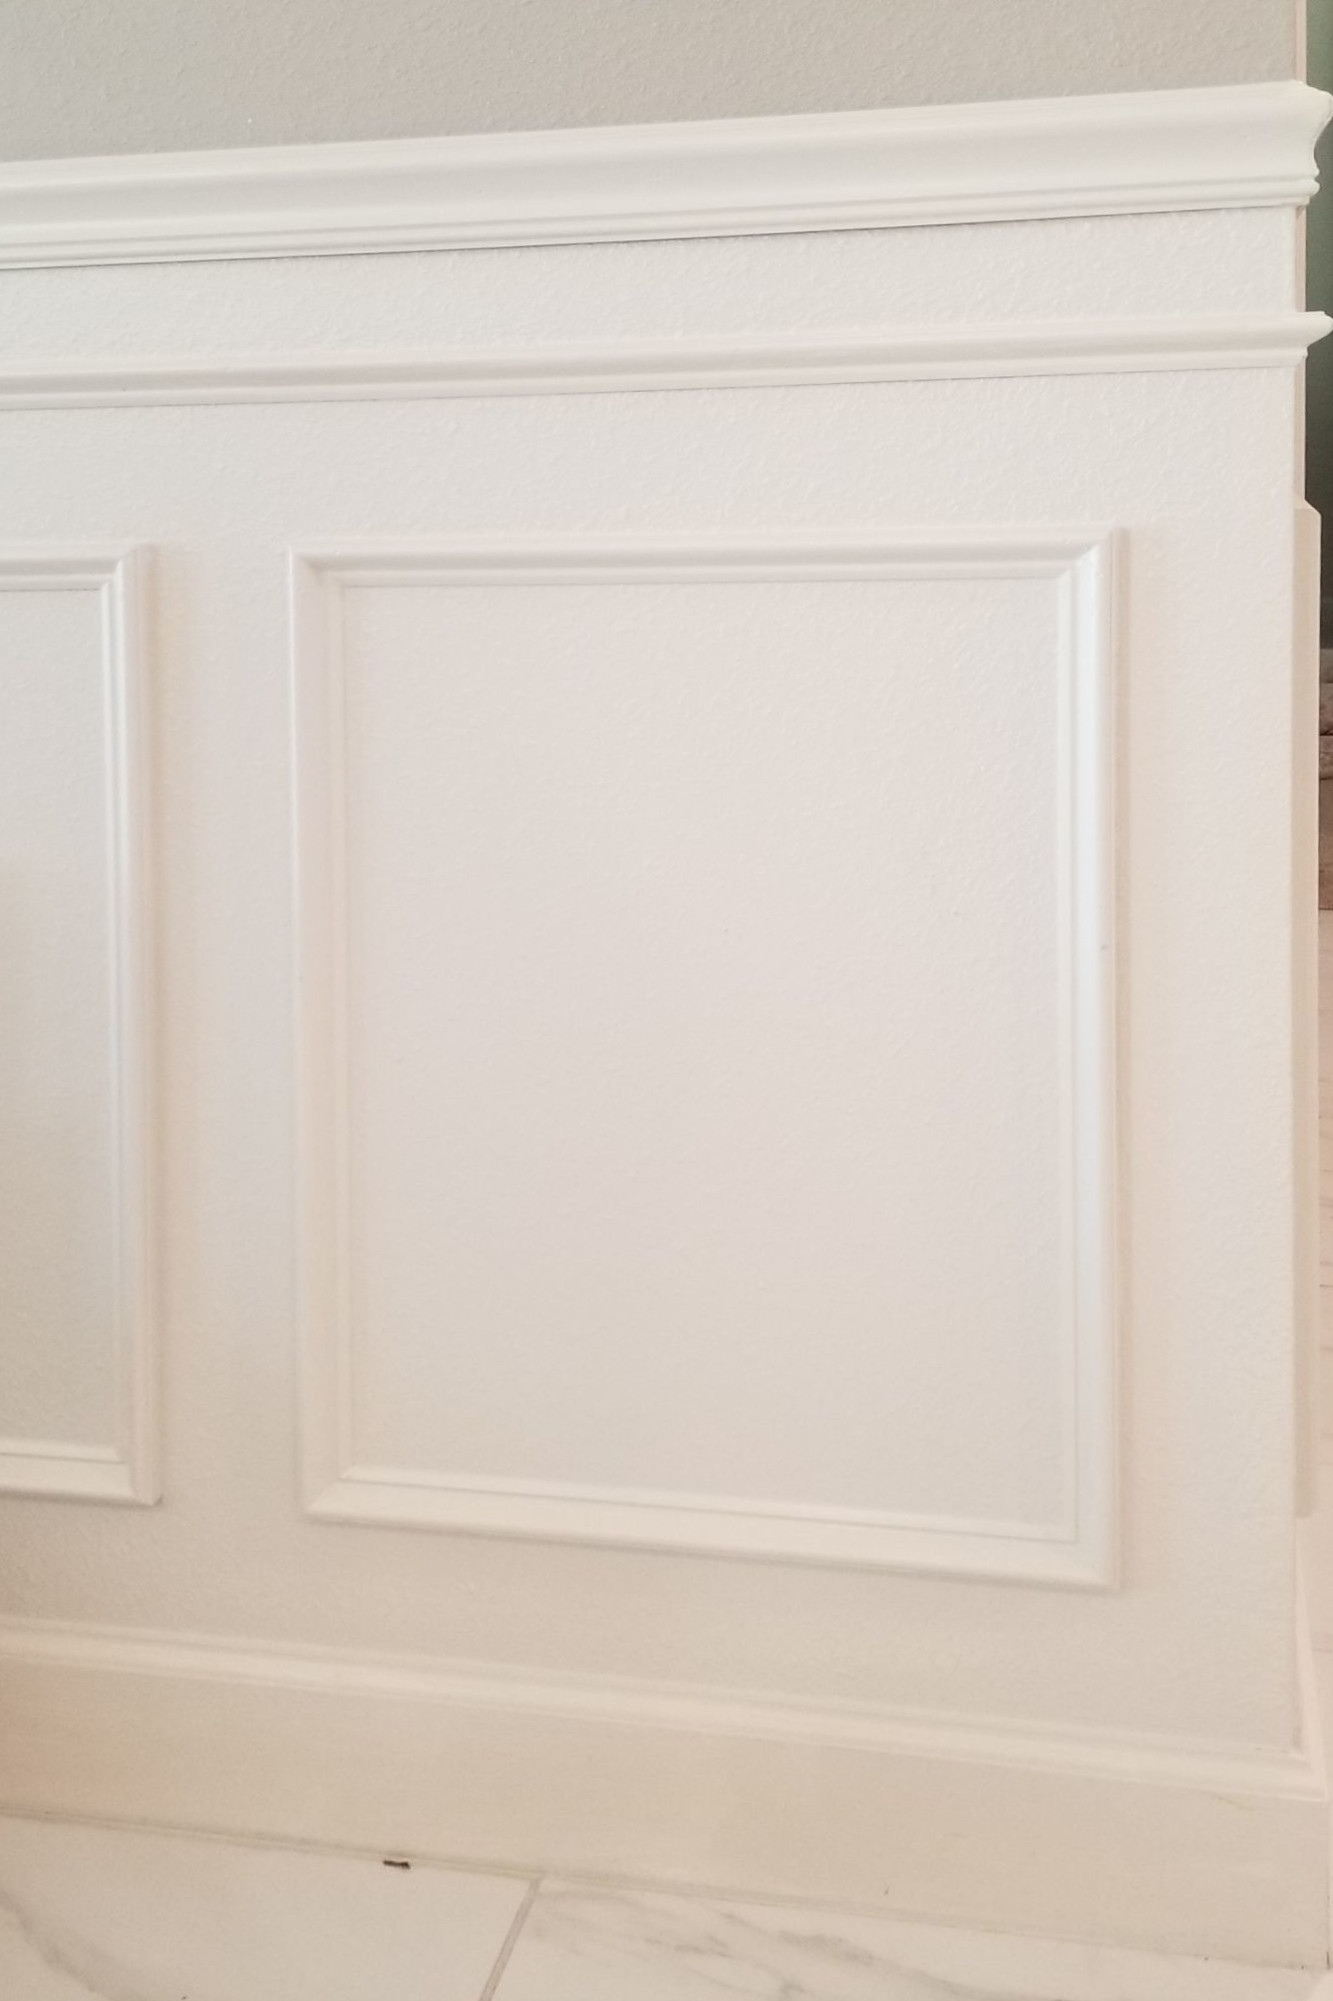
Okay, here we go, we are installing the picture frame for your wainscoting!
Of course, you want to start at one of the ends of the wall. If there’s a doorway on one end, that is where I started.
Place a spacer vertically AND horizontally, giving you the right spacing on the bottom and the side. Once you have it nice and snug use your nail gun to nail in the piece.
Woohoo! You installed your first wainscoting piece! That wasn’t so hard right? It’s basically a lot of that. 🙂
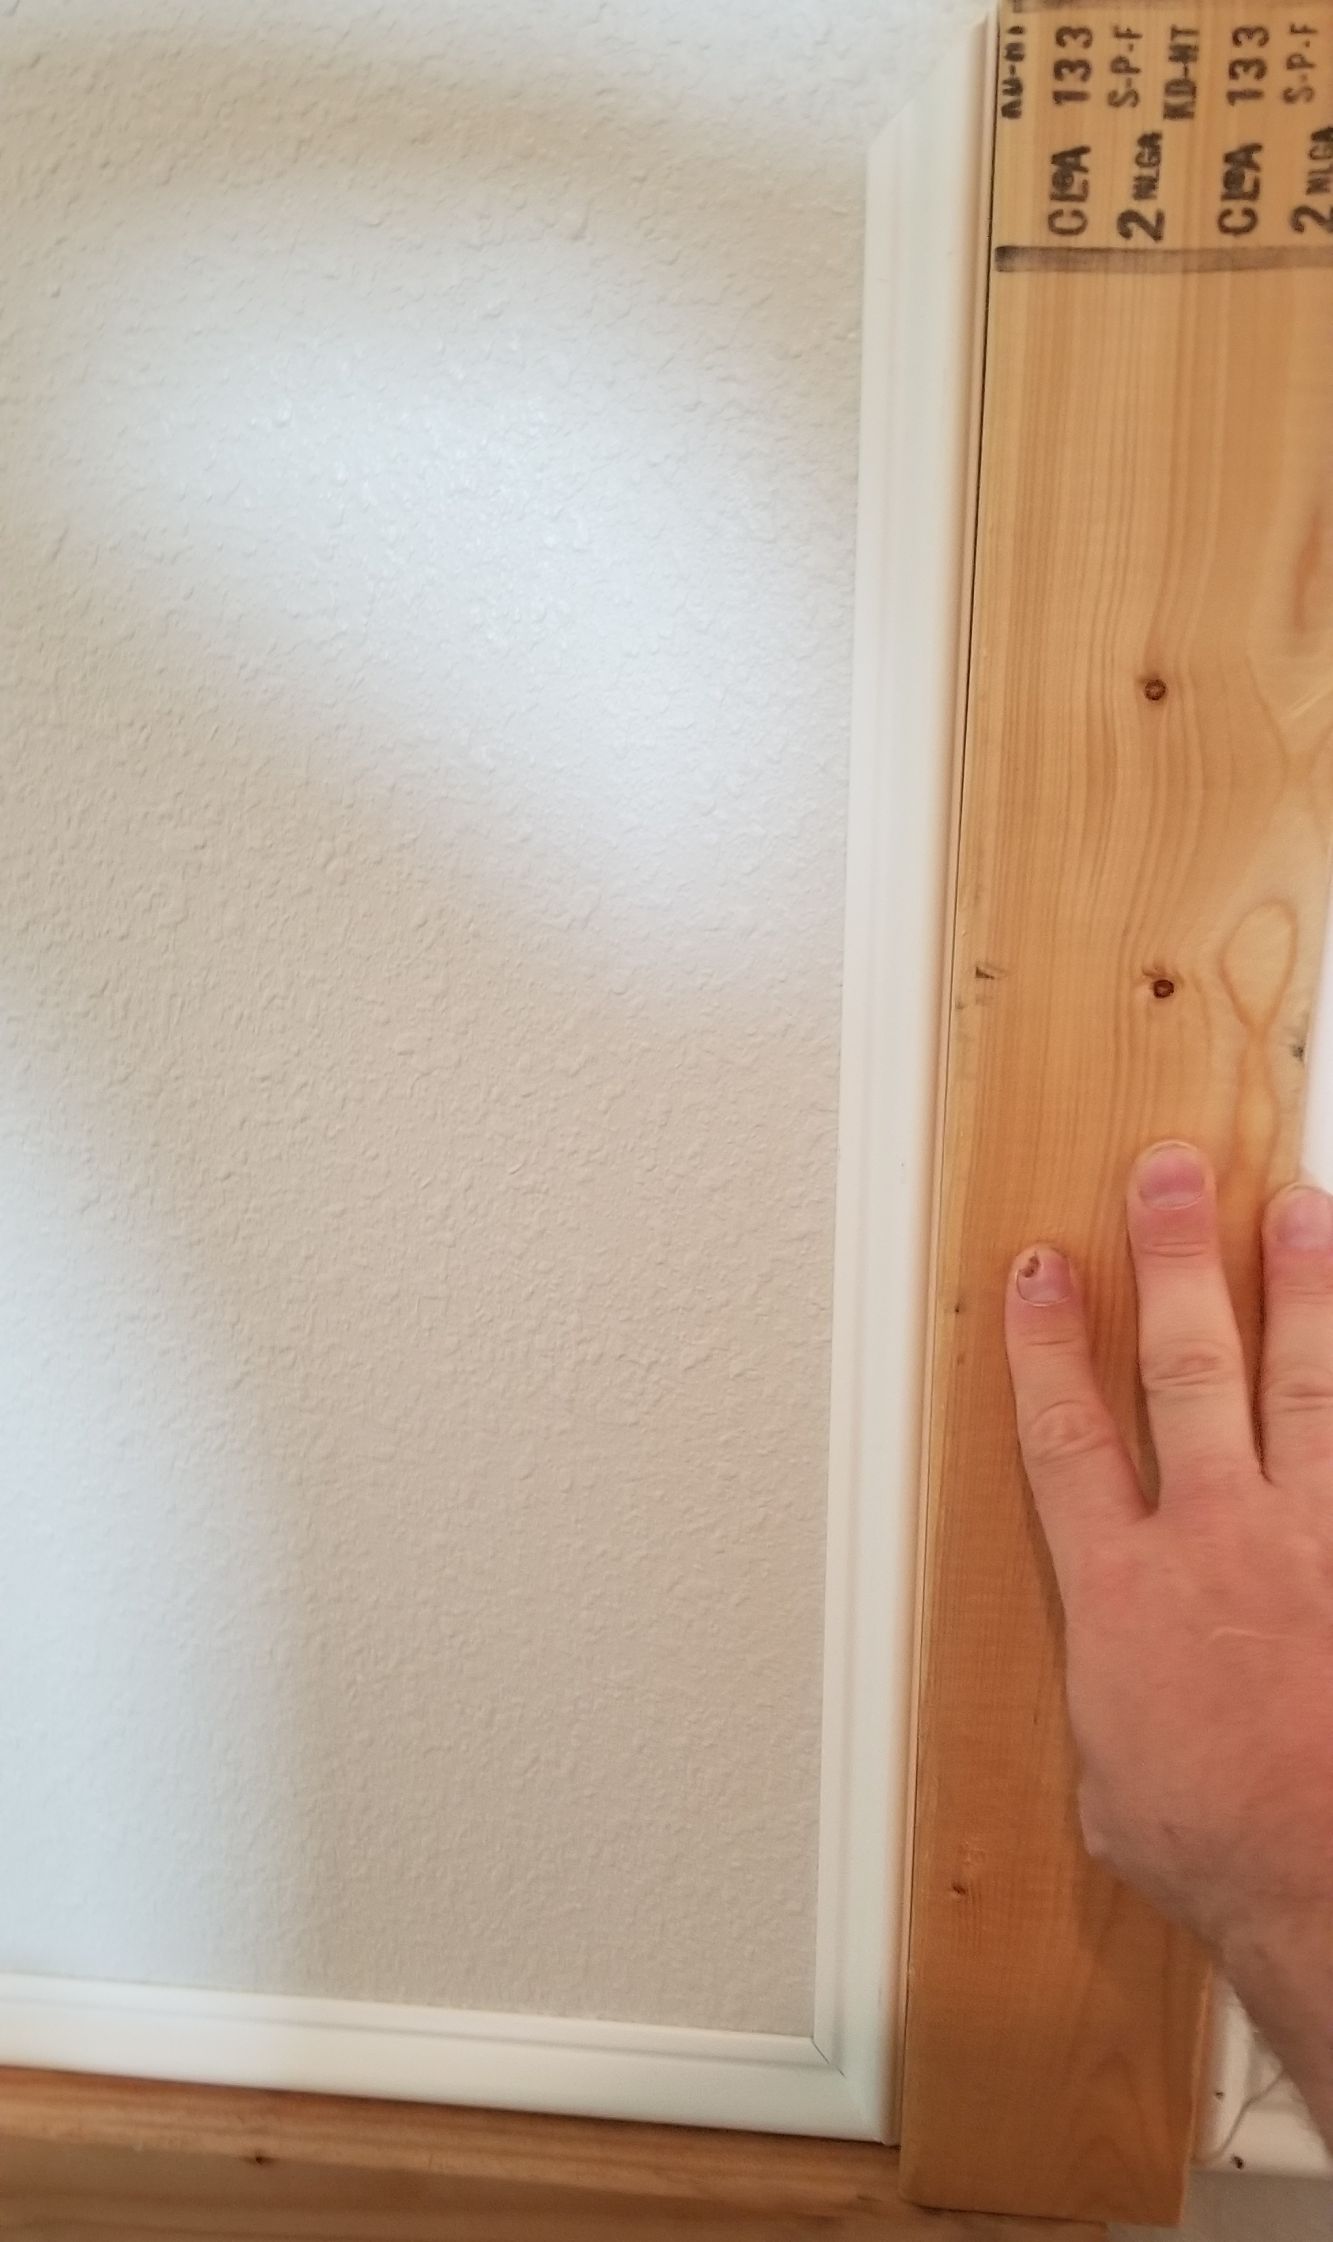
This is going to be the vertical piece that is either against the wall, the doorway, or the last frame you just finished.
Place your spacer against the wall, doorway or last frame you just finished, place the molding against the spacer and snug against the corner from the bottom piece and nail it into place.
I say “-ish” because I don’t completely install this piece in. Installing this piece a bit more complicated than the first two pieces.
Since there isn’t anything to put a spacer against, you’ll need to use the level to nail in this piece.
Place the second vertical piece in place and the level vertical against it. Now adjust its position left and right until it looks level. Once it’s pretty level, nail in the bottom of the molding.
Leave the top of the piece unnailed so it can be adjusted when we put in the next piece.
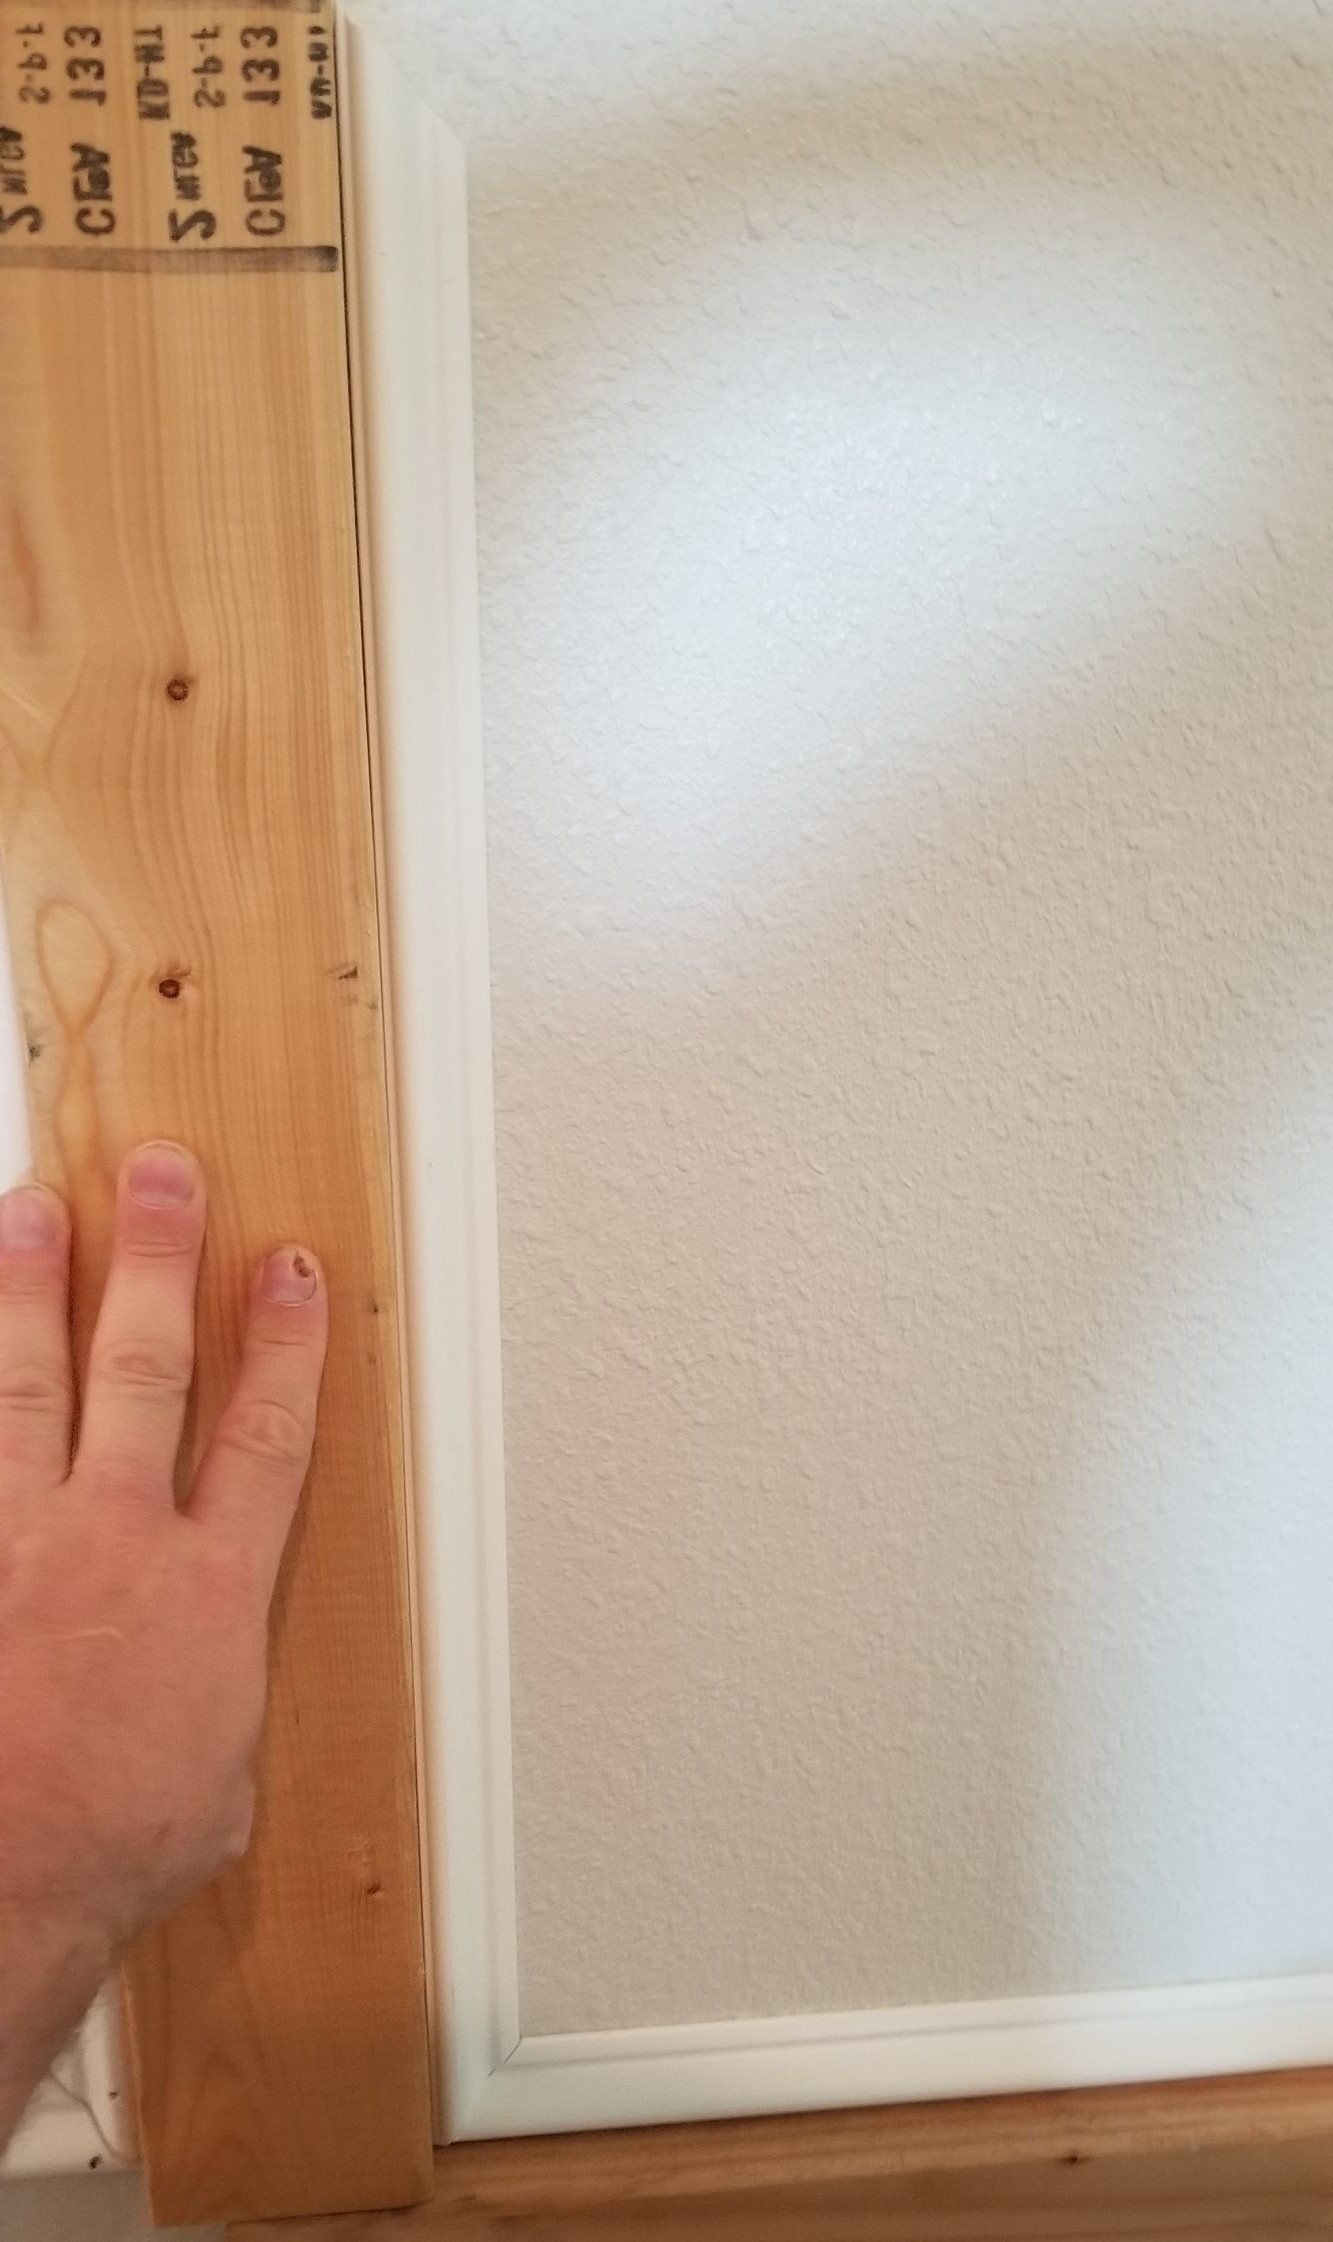
Full disclosure – This picture is the previous one I flipped vertically. I took so many pictures – yet I missed taking a pic of the right piece getting installed! 🙁
On to the next step!
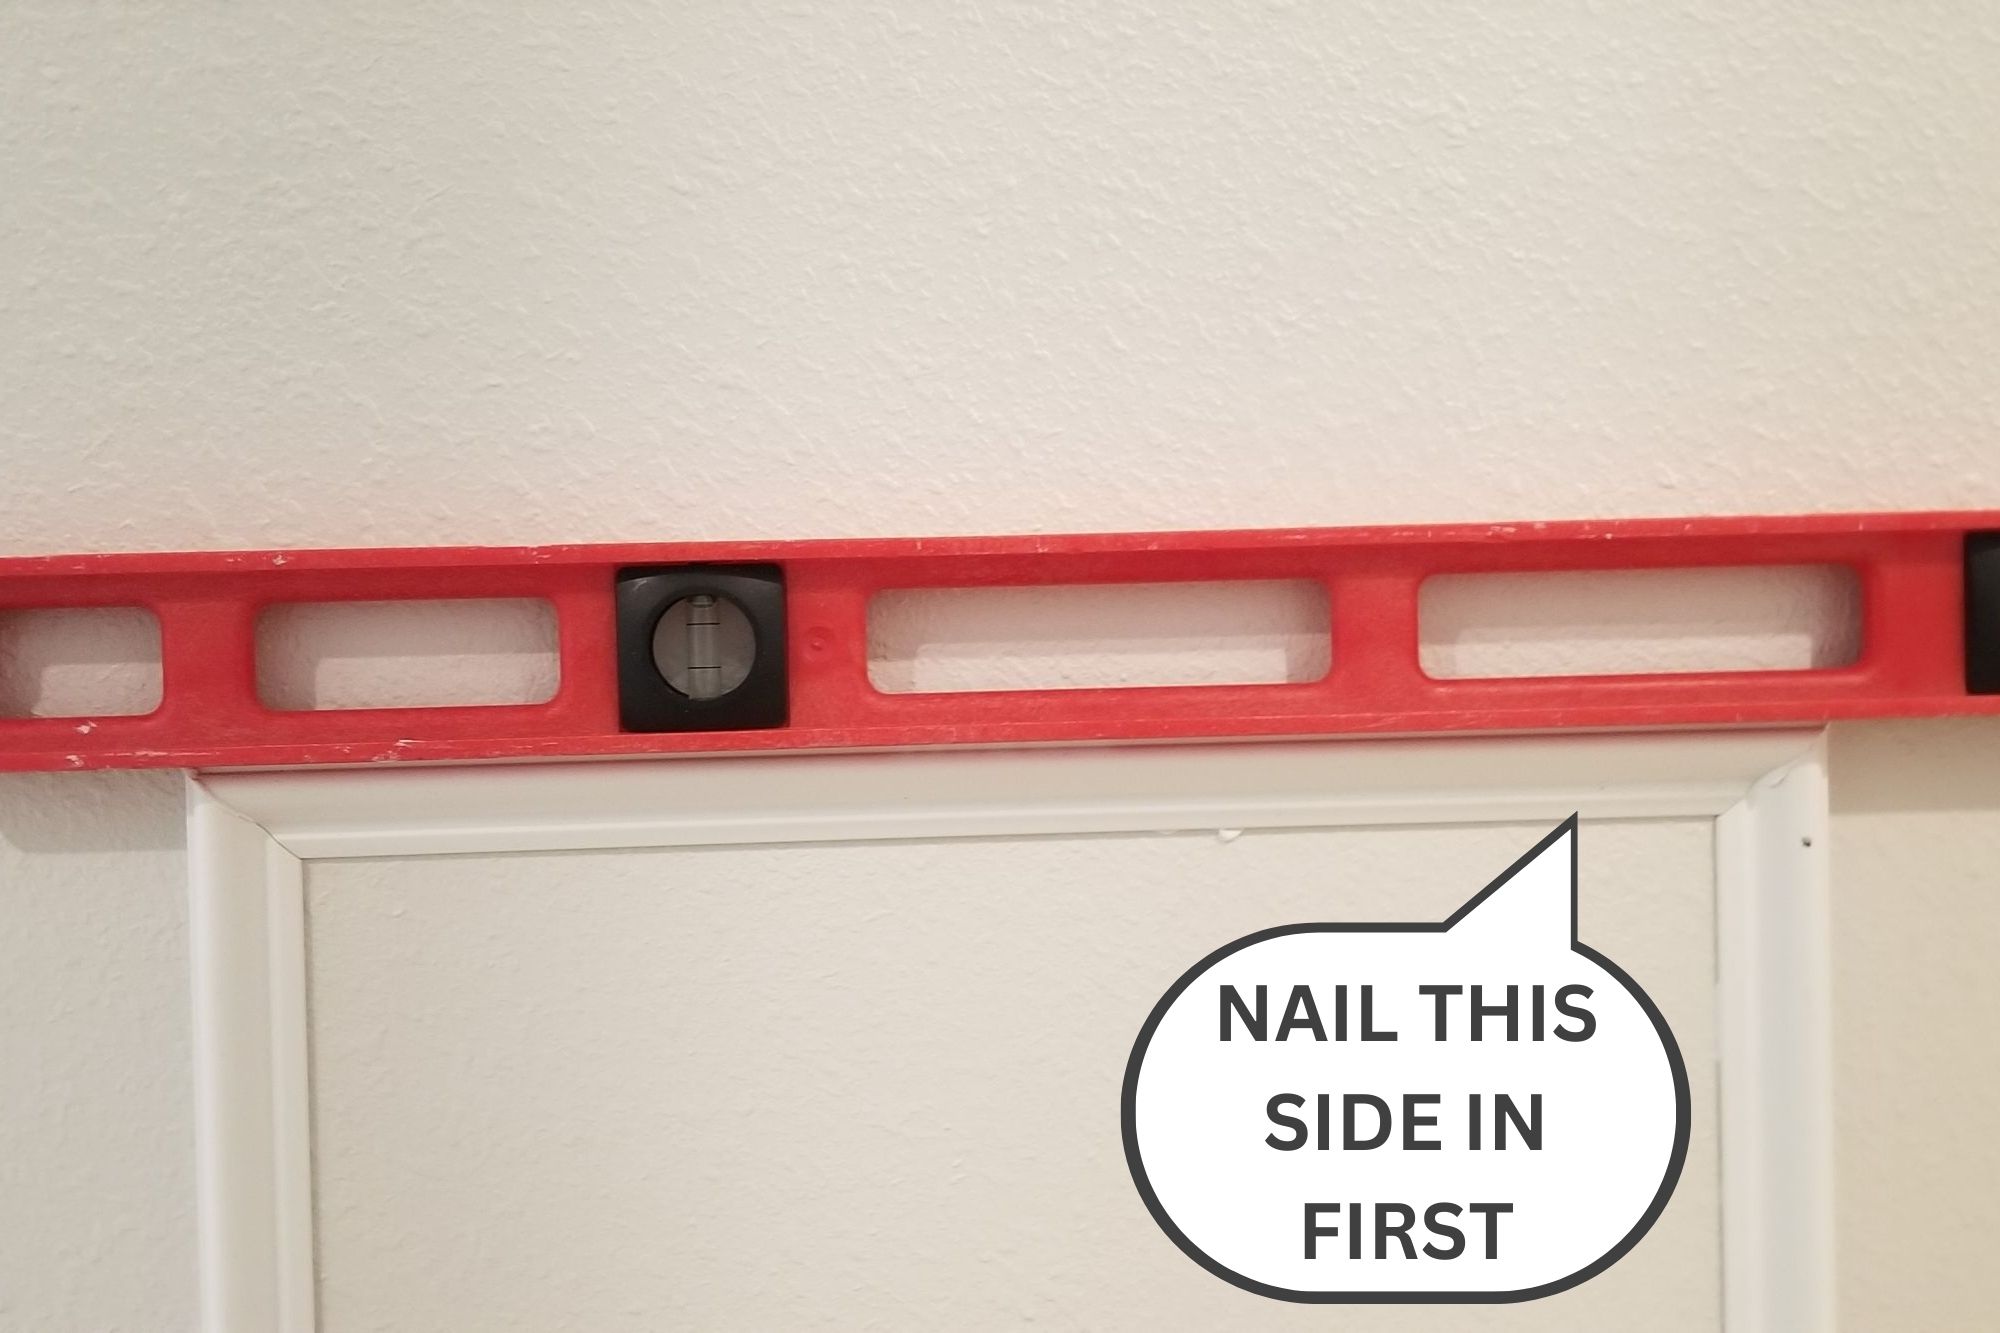
Now we install the top piece. Put the piece in place, snug on the top corner of the vertical molding that is nailed completely and loosely on top of the piece on the other side.
Use the level to make sure things aren’t completely off, again if it’s off a little it is not going to ruin it. This is just to make sure you’re in the right ballpark.
Once it looks pretty level, nail in the piece on the end that’s touching the vertical piece that is completely nailed in.
You’re almost there, the last part of the frame is coming up.
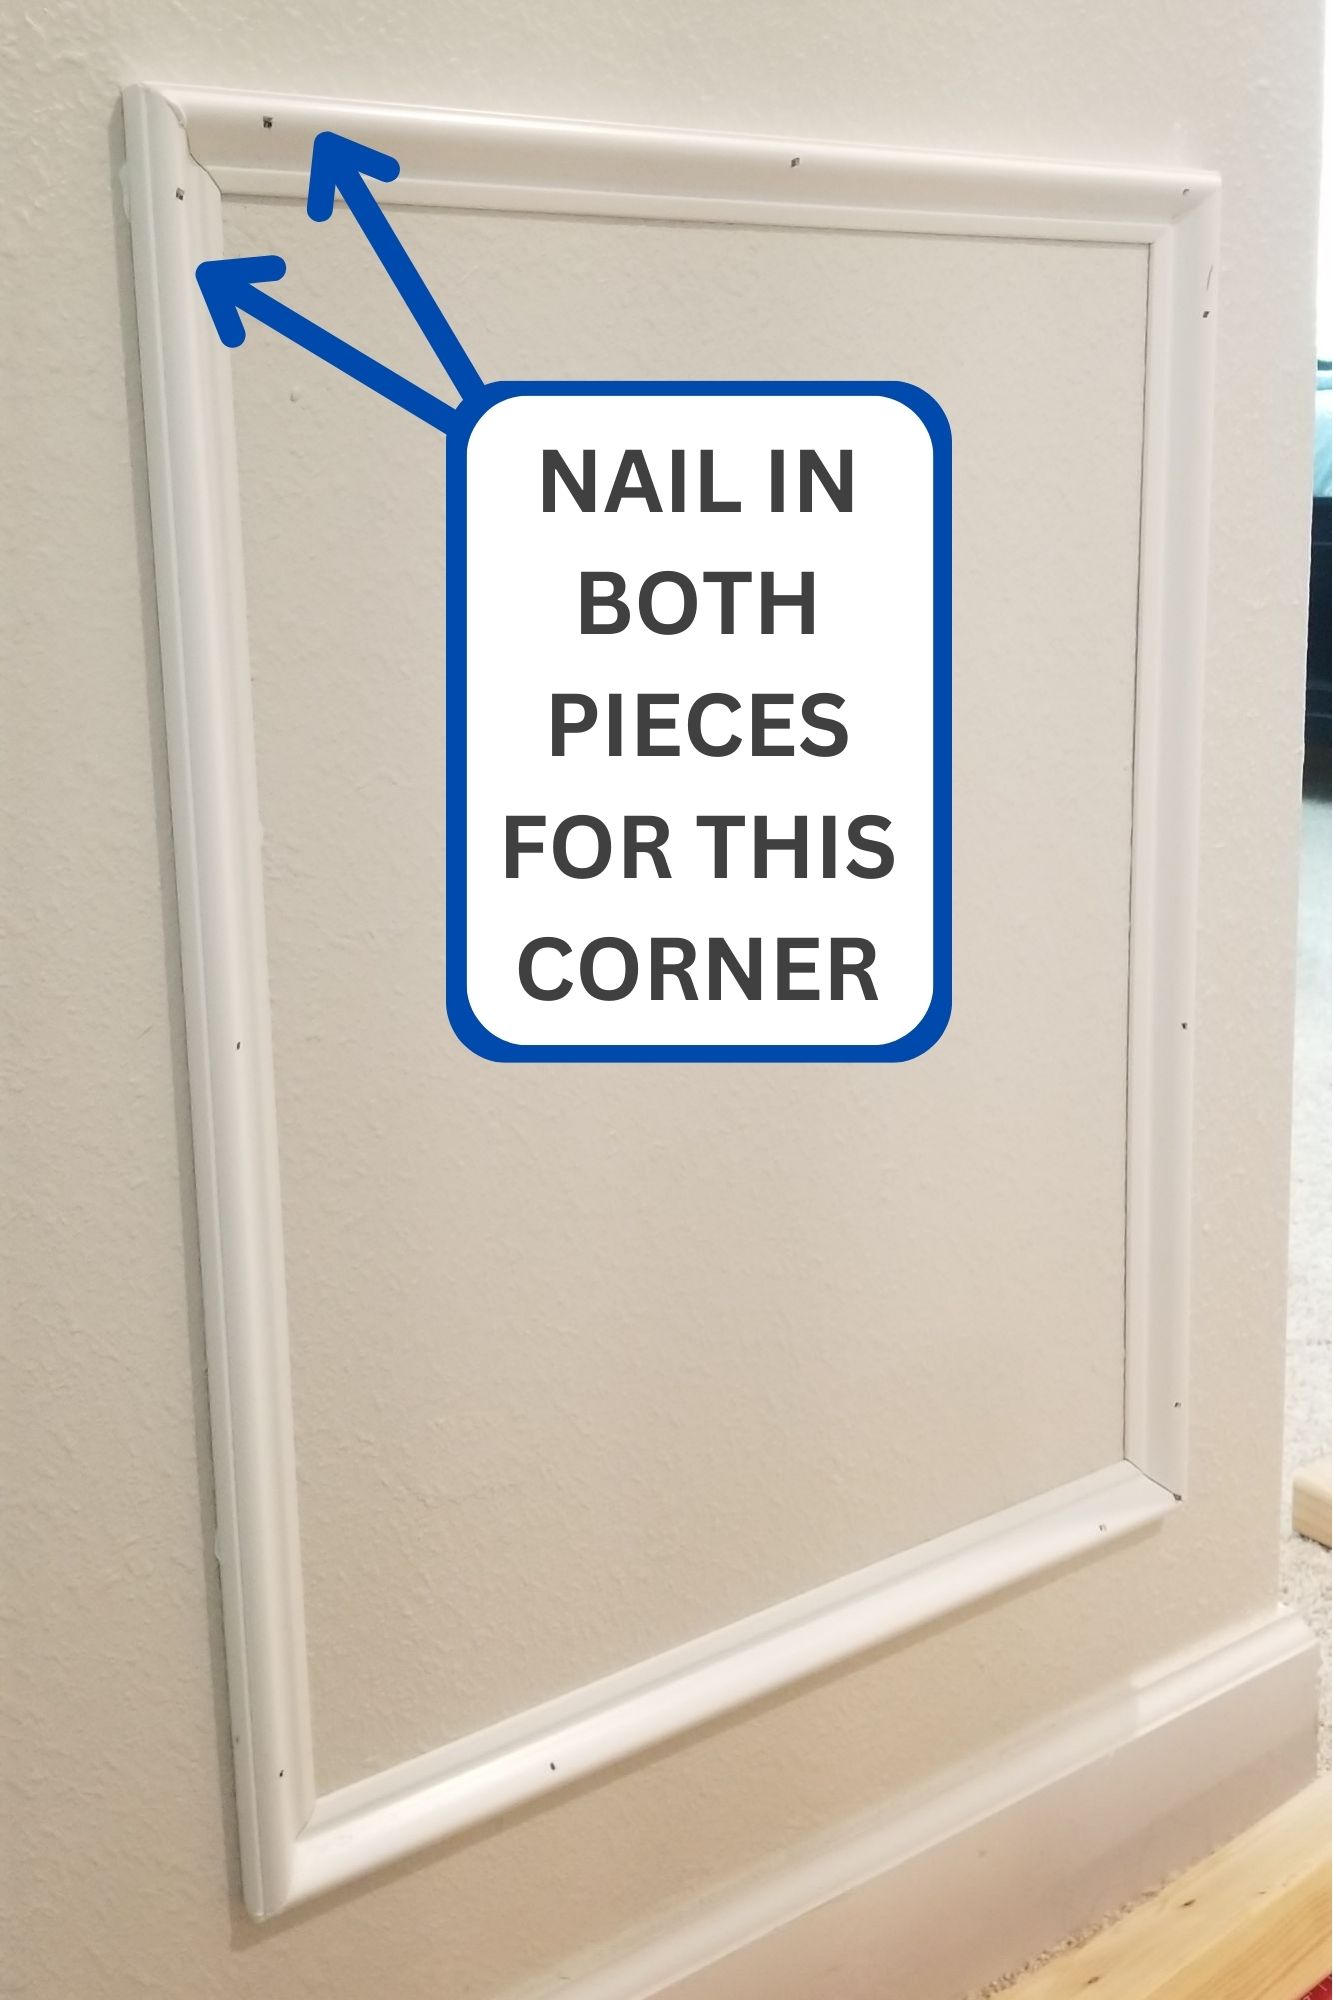
It’s now looking like a picture frame, the only thing left is to nail in that last top corner.
Here you can micro-adjust so the last corner looks tight, the the top piece is level-ish and the second vertical piece is plum-ish.
Once it looks pretty good, finish nailing in the two pieces that make that corner.
Woohoo! You did it! That is your first wainscoting frame.
Now it’s just a matter of repeating it over and over again. 🙂
The space above the wainscoting picture frames and the middle molding in my layout was 3 1/2″, the same as the space between the picture frames, so I used the same 2×4 spacer for this spacing too.
To install the middle molding, I laid the 2×4 on top of the picture frame, put the middle molding on top of it and nailed it in. Before nailing it in I added painters caulk on the back of it.
The space between the middle molding and the top, chair molding is 3″, so I took a piece of 1×4 and cut it to 3″ wide and used that as the spacer.
To install the chair molding, I put the spacer on top of the middle molding, then nailed in the chair molding. Again, similar to the middle molding I put caulk on the back. It gives it more support and helps keep the molding in place while I nail it in.
When you’re installing your wainscotting you’ll come across obstacles on the wall that will sometimes force you to customize the wainscoting picture frames. Outlets are one of those obstacles.
Sometimes you’ll get lucky and the outlet will fall outside the path of your picture frame install, but more often than not they’ll be smack dab in the middle of your way.
When I was dealing with the outlets there were a couple of ways I did it.
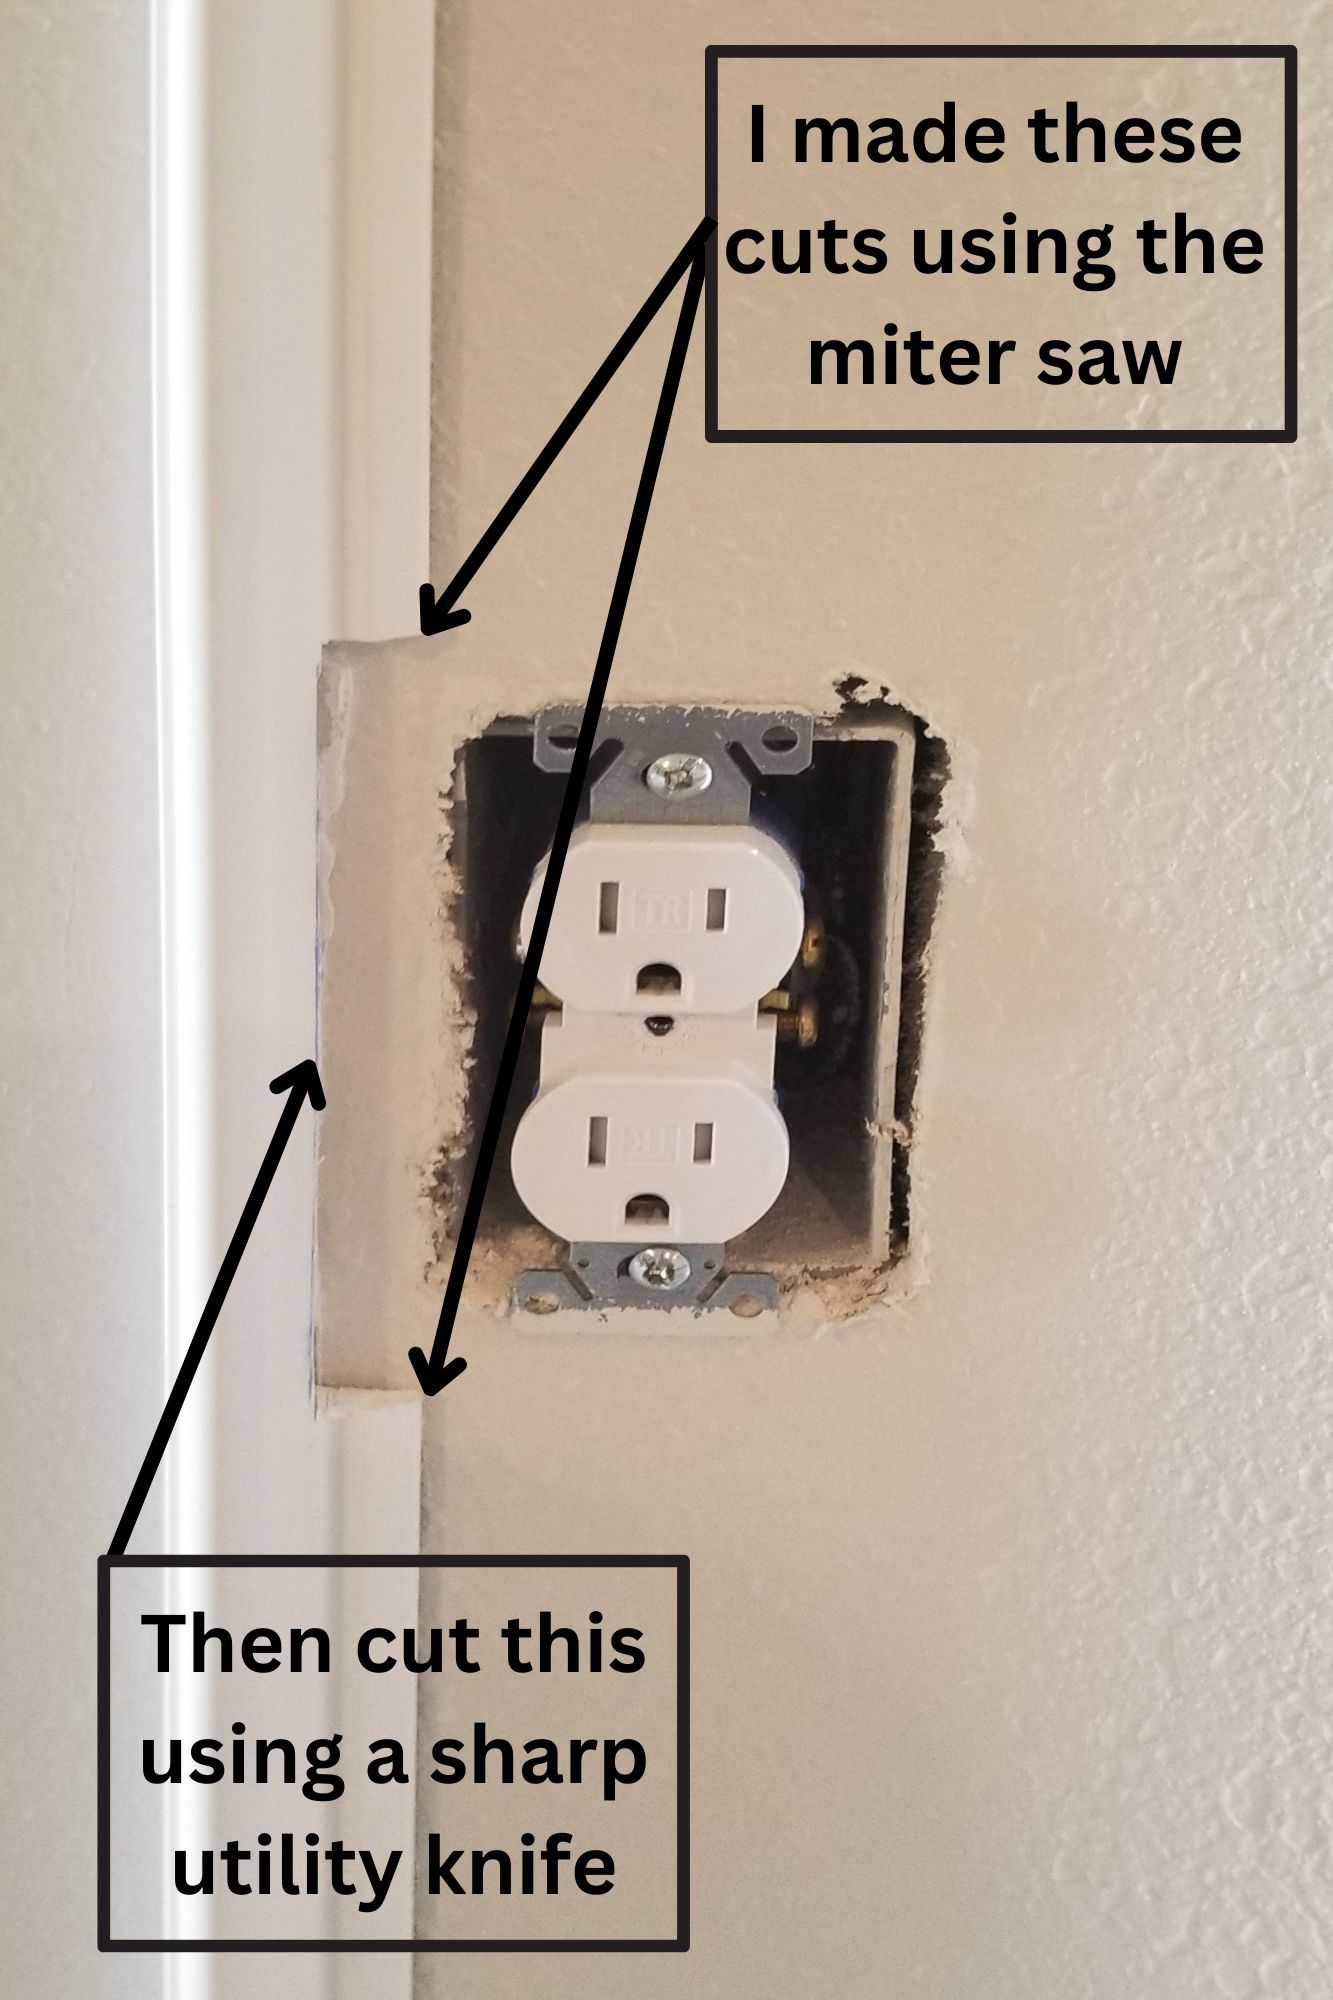
You can notch out the picture frame piece to fix the outlet and the cover that will go over it. Notching is only an option when the outet/cover are only partially in the way of the picture frame.
If the outet/cover is more than a little in the way, I think it looks better if you do the next option, cut it in two.
When cutting the notch out I used the miter saw to cut the top and bottom parts of the notch, then used a utility knife to cut from the top cut to the bottom. Since the molding is PVC it’s pretty easy to cut into.
You can cut the picture frame piece in two. If the outlet or it’s cover is completely in the way of your wainscoting frame, then you’ll have no choice but to cut the wainscotting piece into two pieces.
When cutting the piece in two I call then end at a 45 degree angle so it looks more finished and eases the transition from the wainscoting frame to the outlet and back again. If it were a 90 degree cut I think it wouldn’t look as finished.
[et_bloom_inline optin_id=”optin_7″]
Let me know what you think. Did you find it helpful? Was there something you wanted to know that I left out?
Share your thoughts in the comments below!
The Amazon affiliate tracking id replacer tool updates the tracking id in your Amazon Affiliate…
There are already wainscoting calculators out there but they're too complicated. This wainscoting calculator uses…
In this post we’ll go over how to paint laminate cabinets. We did this project…
Let me first say that converting a box spring into a platform bed is not…
The cutting is one of the two areas where you can save TONS of time……