DIY Ferme rustique monolame contreplaqué Parquet - a closeup of the distressing and Knots This is a fantastic plywood flooring idea The finished plywood floor was made using a gel stain and finishing it with an oil-modified polyurethane Here's a step by step tutorial on installing plywood flooring
Comme on pouvait s'y attendre, DIY Rustic Wide Plank Plywood Flooring takes much longer to finish than just installing pre-made planks.
This project was the truest sense of DIY. Everything from cutting the plywood into wide plank boards, pour le ponçage, tachant, finishing and installing the plywood planks down… all of it DIY.
Tout bien considéré, l'ensemble du projet, du début à la fin n'a pas pris cette longue.
De couper les planches en contreplaqué, to finally installing the floors in both the dining room and kitchen – took about a week.
Si vous êtes prêt à mettre dans le temps et la sueur, il est absolument la peine!
Les sols look superbe (les photos ne font pas justice) and you really would not know that they are stained plywood floors.
Lisez la suite pour voir ce qu'il a fallu pour faire et installer nos rustique larges planchers de contreplaqué de planches et comment vous pouvez installer votre propre plancher de contreplaqué unique,.
Divulgation: Certains des liens ci-dessous sont des liens d'affiliation. Si vous décidez d'acheter un de ces produits, nous gagnons une petite commission sans frais supplémentaires pour vous. Nous recommandons ces produits parce que nous avons de l'expérience avec eux et de les utiliser pour nos propres projets. En tant qu'Amazon Associates, nous gagnons des achats éligibles.
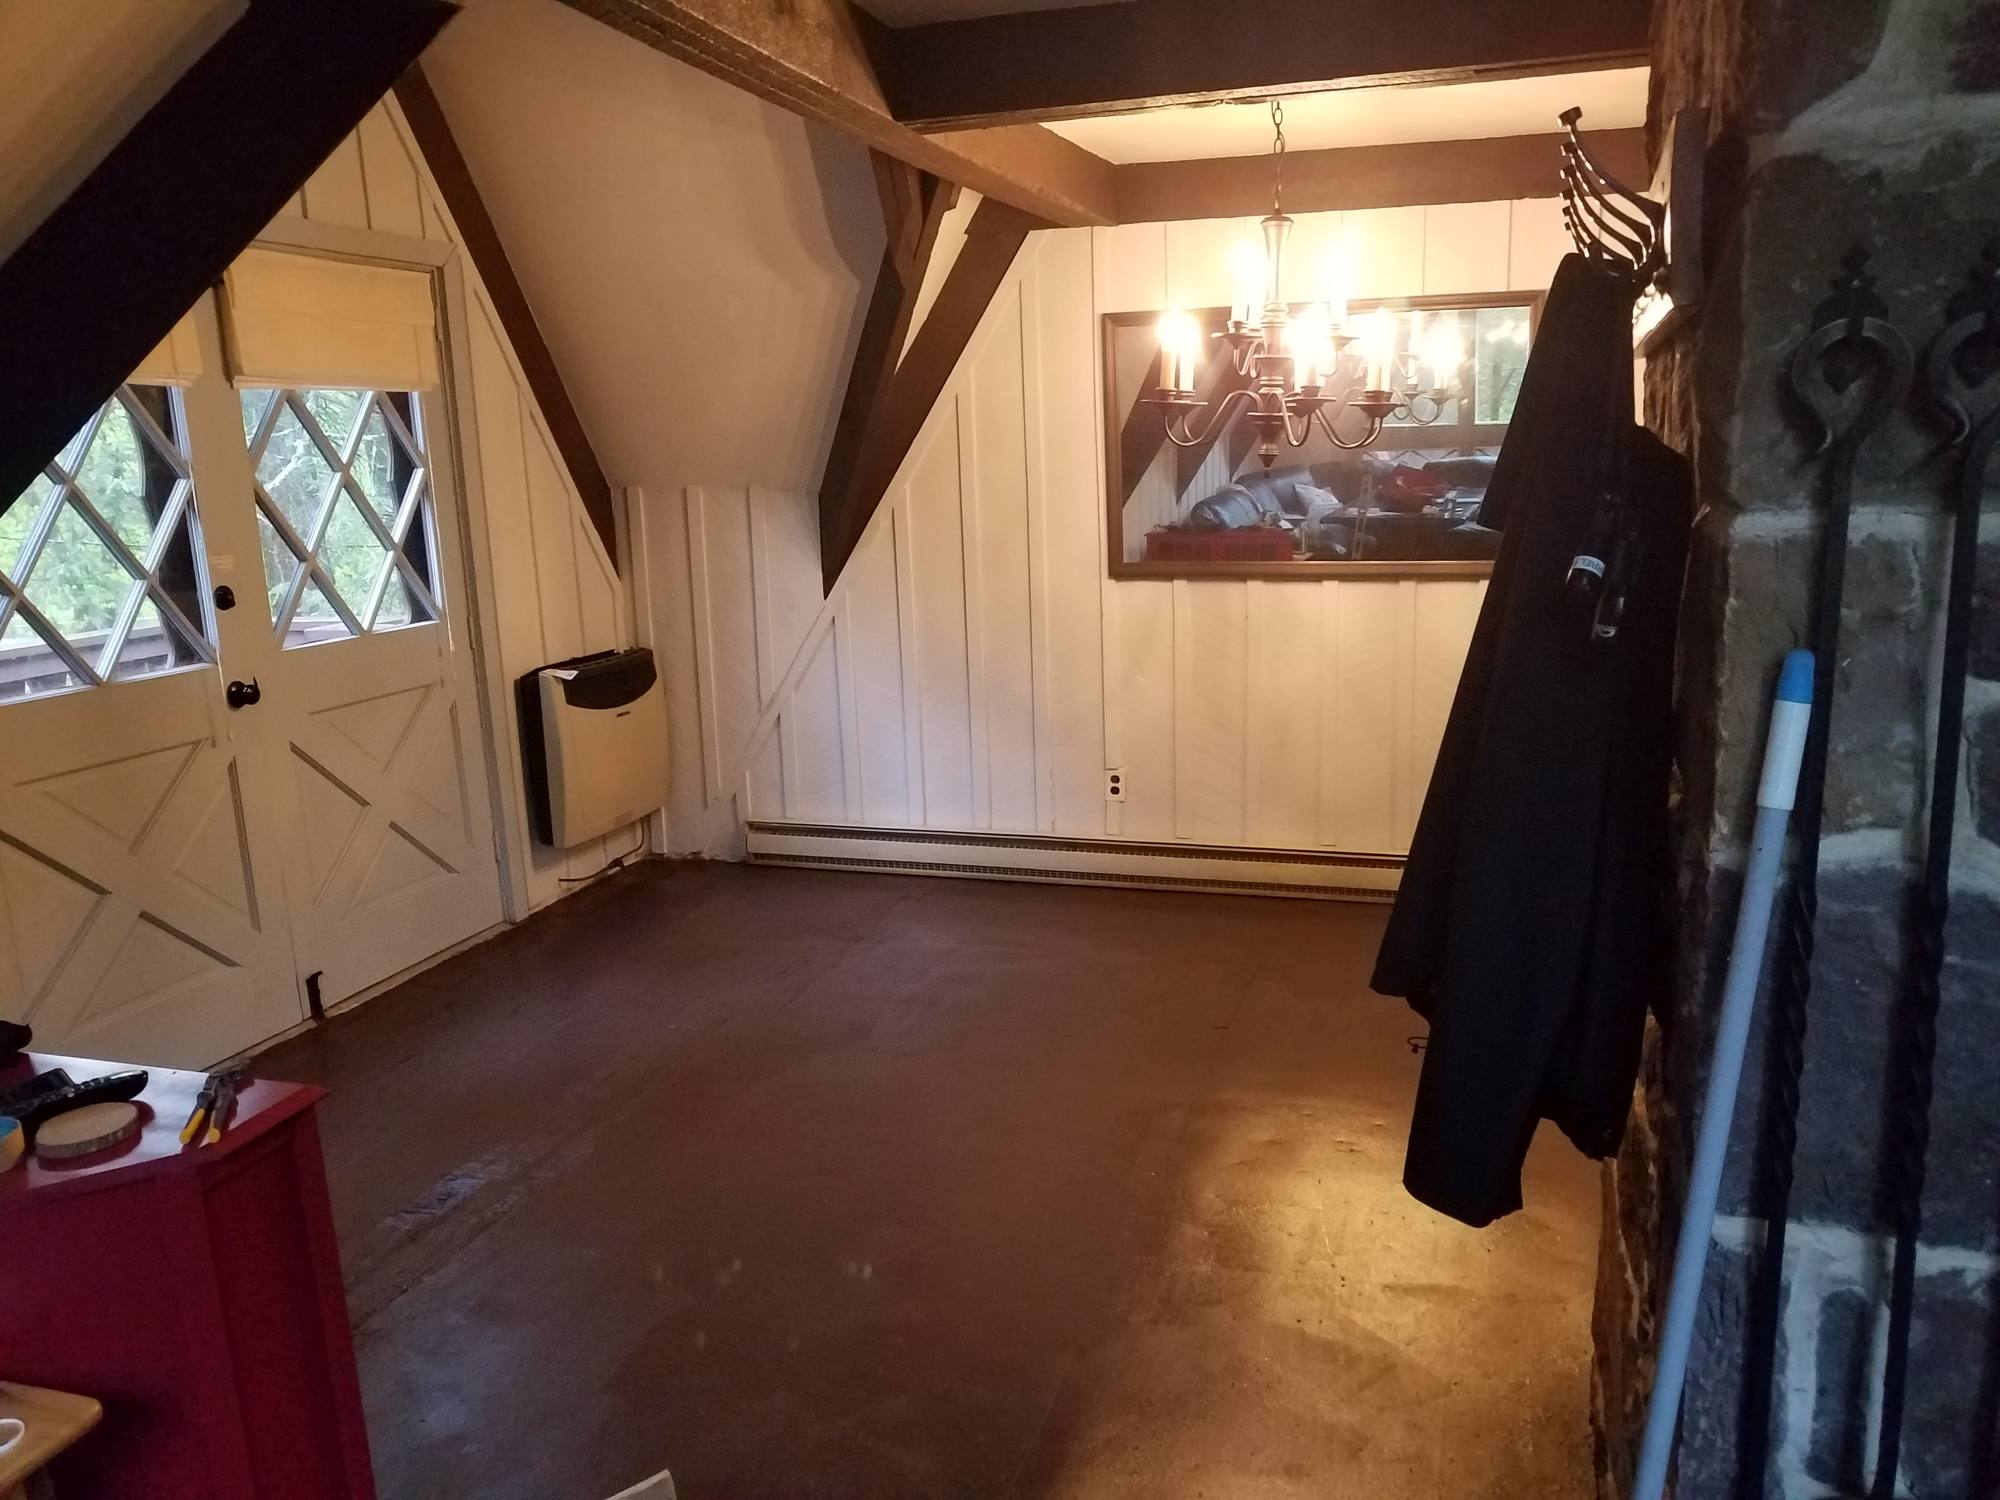
Some of the flooring in our Poconos vacation rental needed replacing. Namely, le plancher de bois franc flottant dans la salle à manger et la cuisine et le tapis dans le salon.
Notre objectif était d'avoir de nouveaux planchers qui ont l'air vieux, warm, and worn – like they had always been there. Fondamentalement, plus il ressemblait à un sol ferme ou en bois de grange mieux ce fut pour nous.
Nous avons examiné la tuile, stone, and hardwood floors. The problem with all of them was that they all needed a level sub-floor and ours was uneven… like really uneven.
Depuis la maison entière est en chêne brut coupé, le revêtement de sol est même pas proche de niveau étant.
Cela rend la tuile, pierre et même planchers de bois franc très difficile à installer. La difficulté supplémentaire se traduit également par des coûts d'installation très coûteux.
Il était temps de faire preuve de créativité, planchers de bricolage étaient dans notre avenir. Pour obtenir plus d'idées de sol nous avons tourné à Pinterest. Après beaucoup de défilement, nous avons rencontré ferme rustique monolame plancher en contreplaqué!
On Pinterest, there was a gazillion (well maybe not quite that many) plywood flooring ideas, but the one that was the best fit for us was the wide plank flooring.
The pictures of the wide plank plywood flooring projects others had posted were incredible – this was it! Ce fut le revêtement de sol idéal pour les sols irréguliers.
Nous avons été vendus sur l'idée.
Il y a un concept que je suis tombé sur Pinterest qui a joué un rôle dans mon choix de contre-plaqué sur les autres types de sol.
Il est appelé Wabi-sabi.
Il est une tradition japonaise qui est l'art de faire des choses brisées mieux que tout nouveau.
L'idée est de les imperfections salut-lumière - les rendre parfaitement imparfait.
Avec cette nouvelle perspective, I was looking for imperfections to show off – instead of avoiding them.
Si (ou lorsque) les étages obtenir une nouvelle marque ou éraflure zéro, il ajoutera au caractère du plancher. Il est un concept très libérateur que je suis vraiment content que je suis tombé sur.
Cliquez sur l'image pour voir la broche Pinterest qui m'a inspiré, J'espère que cela fait la même chose pour vous.
Most people decide to install plywood plank flooring because of it’s affordability.
Il est beaucoup moins cher d'installer un plancher de contreplaqué de bois dur traditionnel ou même un stratifié, diable, il est encore moins cher que de faire vinyle.
Pour nos planchers ferme en contreplaqué, le coût n'a pas été beaucoup d'un facteur dans notre processus de prise de décision.
Ne vous méprenez pas, it’s always nice to save some dough… it was just lower on our list.
Plus haut sur notre liste a été un plancher qui était solide, ressemblait il a toujours été là, fit with the style of the house and would be easy to install on an uneven floor.
Between the option of making wider planks and the spacing between each one – wide plank plywood flooring was a perfect fit for this house.
L'espacement entre chaque panneau rend plus indulgent dans des scénarios comme le nôtre, où le sol est pas au niveau.
En plus de cela, le concept japonais, je suis tombé m'a aidé à réaliser que les imperfections du sol gagnera en vieillissant que ajouteront à la beauté du plancher.
Donc, il n'a pas besoin d'être aussi solide que le bois dur, we’ll just embrace the imperfections that come along with it! 🙂
Another huge benefit to plywood floor planks is the design versatility.
I love how my plywood plank floors turned out. There really is nothing I would change, but one thing that’s great about plywood planks is that there is no limit to what you can do.
I LOVE the way the rustic plywood floor planks came out, but the plywood planks could have looked just as good with a modern look.
Take a look at plywood floor planks on Pinterest. You’ll see there is no limit to the style, Couleur, shape, size, or texture. It’s all just a matter of preference – how cool is that?
We knew that we saved quite a bit of money by choosing plywood faux plank flooring but we didn’t realize how much until someone asked for a breakdown in the comments.
We saved a ton!!
Bien sûr, what you save in dollars you lose in time. We didn’t look at it as a lose of time though, it saw it as a great way to get our creative juices flowing and gave us a flooring that is completely unique – and it saved us a bunch of money to boot! Win – win – win!
Coût total
22 feuilles de contreplaqué à 32 $/feuille = 704 $
17 quarts of stain @16.30/quart = $276
5 gallons of Poly @ $12/gallon = $60
TOTAL = $1040
Pieds carrés
22 Sheets * 32 sq. ft./sheet = 704 sq. pi.
1040$ / 704 pi². pi. = $1.47 per sq. pi.
The only negative I saw with plywood floor planks was the durability. Ce n'est pas un bois il grattait plus facile qu'un parquet en chêne serait.
Now with my new wabi-sabi perspective, Je suis à la recherche avec impatience les rayures et les bosses.
Les taches ne fera qu'ajouter à la beauté du plancher. S'il y a une égratignure qui est vraiment laid, Je peux ajouter quelque chose de créatif pour lui donner la beauté.
Parfaitement imparfait.
Voici une liste des outils que nous avons utilisés sur ce projet.
Affilié liens ci-dessous peuvent être à des éléments similaires lorsque les éléments exacts ne peuvent pas être trouvés en ligne.
Batterie supplémentaire pour cloueuse de finition
Protection auditive oreille Muffs
Ce sont les fournitures utilisées sur ce projet.
Affilié liens ci-dessous peuvent être à des éléments similaires lorsque les éléments exacts ne peuvent pas être trouvés en ligne.
Varathane Cherrywood Gel Stain – we used about 7 quarts
Poluyrathane modifié à l'huile à base d'eau – we used 2 gallons
3″ Natural Bristle brush – 6 brushes to apply the stain
4″ Polyester Synthetic Brush – 4 brushes to apply the poly
papier Masking – We used the masking paper to protect the deck when applying the stain and poly
The plywood plank flooring thickness we used is 1/2″ thick. If our floors weren’t so uneven we could have used 3/4″, but the flexibility that a 1/2″ plywood has was perfect to conform to our uneven sub-floor’s contours.
I think an added benefit to the 1/2″ plywood is that the spaces in between the planks doesn’t hold dirt as easily.
It may sound like that’s a bit of a stretch but I think if it was 3/4″ plywood, the extra 1/4″ of plywood thickness may make it harder for a vacuum to suck out things that get stuck in the spaces.
We weren’t sure how the spaces were going to fair with dust and things falling in them but so far so good – nothing a good vacuuming can’t fix. 🙂
Other than things possibly getting stuck in the spaces between the planks, I don’t see any reason you can’t use 3/4″ thick plywood for your plank flooring. Cela étant dit, I also don’t really see a benefit to using it over 1/2″ plywood.
Nous voulions que le genre de regard ferme ou pays, donc une grande planche est ce que nous y sommes allés avec.
Nous voulions aussi réduire la quantité de contreplaqué gaspillée, so the width we came up with was 5 7/8″ for each board. That gives us 8 planks per sheet and a tiny strip leftover at the end.
We’ve seen other plywood floors where they went for 8 inch or even 12 inch boards. We didn’t want to make them cette wide because we felt it made it obvious that it was a plywood floor.
And a wide board would have shown the dreaded plywood zebra pattern that I don’t care for (plus sur le motif zébré de contreplaqué plus tard).
There were a couple of questions in the comments about the type of plywood that was used for the plywood planks.
The plywood is regular 3-ply, cheapy weepy, plain Jane, rough finished 1/2″ pine plywood.
The exact name from Lowes is:
Plytanium 15/32″ CAT PS1-09 Square Structural Plywood Pine
Fondamentalement, the cheapest plywood we could get.
Since we wanted a rustic look the knots and imperfections weren’t a problem.
Voici quelques-unes avant les photos de l'espace avec le plancher d'origine.
Nous avons adoré la couleur des sols d'origine, mais le plancher jamais vraiment allé avec le style de la maison. It was a 3/8″ floating floor and the wood strips were fairly thin. Parce qu'il nageait et un plancher assez mince, il semblait toujours un peu creux lorsque vous marchiez dessus.
The real problem with the old flooring was buckling in some spots, probablement à cause de la façon dont il a été installé.
Ce flambage a été l'une des raisons pour lesquelles nous avons ressenti le large plancher de planches en contreplaqué serait parfait pour cet espace.
Le large plancher de planches a un espacement autour de chaque planche, that spacing would prevent the new floor from buckling.
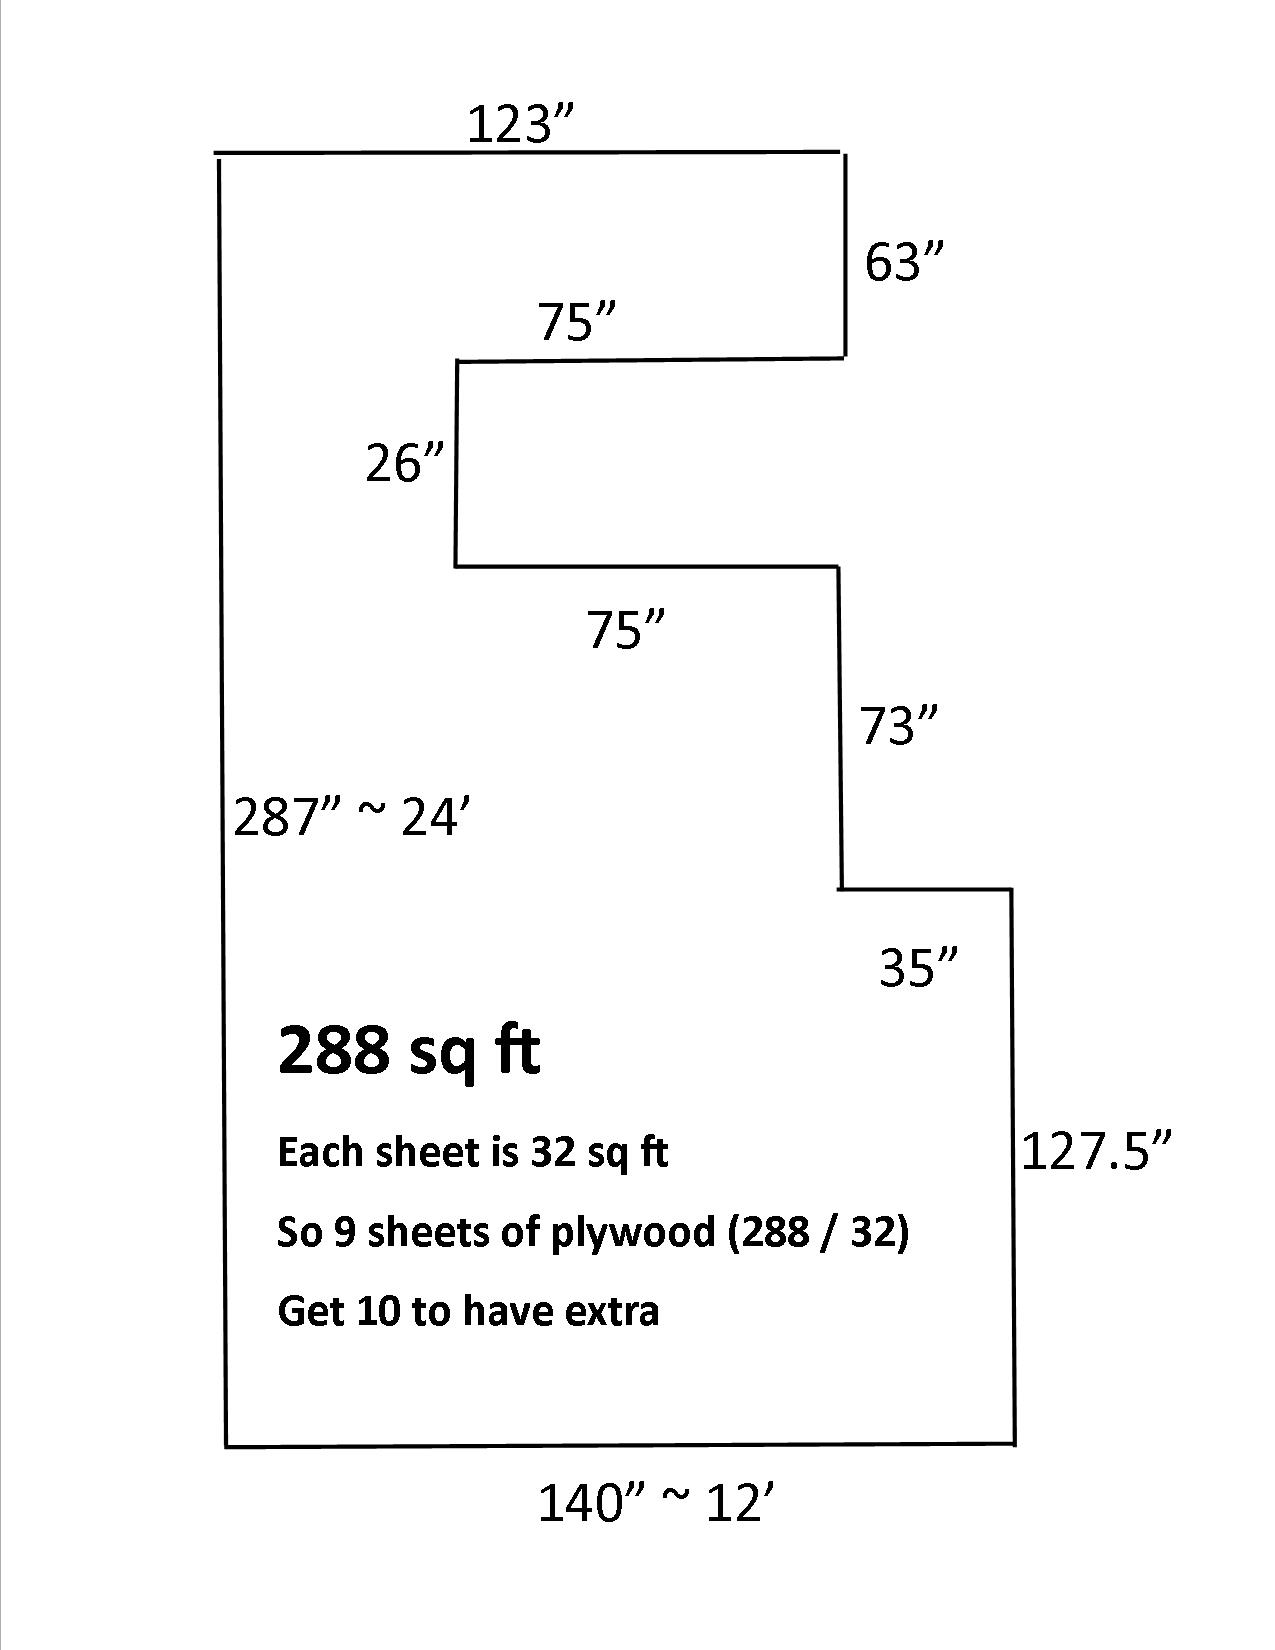
The measurements don’t need to be super precise. Rounding up the measurements and adding an extra plywood sheet to the total should give you enough wiggle room.
Pour notre espace, Je l'ai traité comme un grand rectangle. La longueur était 287 " (arrondi à 24 ') et la largeur était de 140 " (arrondi à 12 ').
24 x 12 is 288 sq feet.
Each sheet of plywood is 4′ x 8′ so that gives you 32 square feet per sheet.
Quand je partageais les pieds carrés au total (288) par les pieds carrés par feuille (32) it told me I needed 9 sheets of plywood.
Ensuite, j'ai ajouté une feuille supplémentaire comme un tampon.
We bought 10 sheets of 1/2″ plywood for our project and once completed, we had about 1 sheet left over.
Temps total: 2 people about 2 hours
The original floor was a 3/8″ hardwood floor that was installed with a lot of staples…. like a lot of staples.
En premier, it felt like the staple removal was taking FOREVER.
Une fois que nous sommes entrés dans un rythme si vraiment seulement pris quelques heures pour nous d'obtenir à peu près tous sur.
Le sous-plancher que nous avions était contreplaqué non peint.
If we installed the wide plank plywood flooring without first painting the lighter colored subfloor, it would have shown through the spaces in between the planks.
To prevent that from happening, we painted the subfloor a very dark brown color, avec de la peinture que nous avions déjà.
Any dark paint color would do the job – just stick to a paint that is an eggshell or satin.
Vous ne voulez pas un sous-plancher brillante montrant à travers les espaces entre les planches.
Temps total: With the right blade this would take less than 2 hours for 10 sheets
I keep calling them planks or boards but basically, this step is where I took the sheets of plywood and cut them into long strips.
Beaucoup de messages Pinterest je suis tombé sur ont dit qu'ils avaient une personne de Lowes ou Accueil Dépôt couper les feuilles pour les.
Il est certainement une option. Je l'ai utilisé leurs services de coupe dans le passé lorsque les coupures ne doivent pas nécessairement être très précis.
Dans ce cas, Je voulais des coupes plus précises, donc je choisi de le faire moi-même.
It takes A LOT longer but I thought having consistently sized plywood planks was worth the extra time.
De cette façon, J'étais sûr que chaque morceau allait être environ la même largeur.
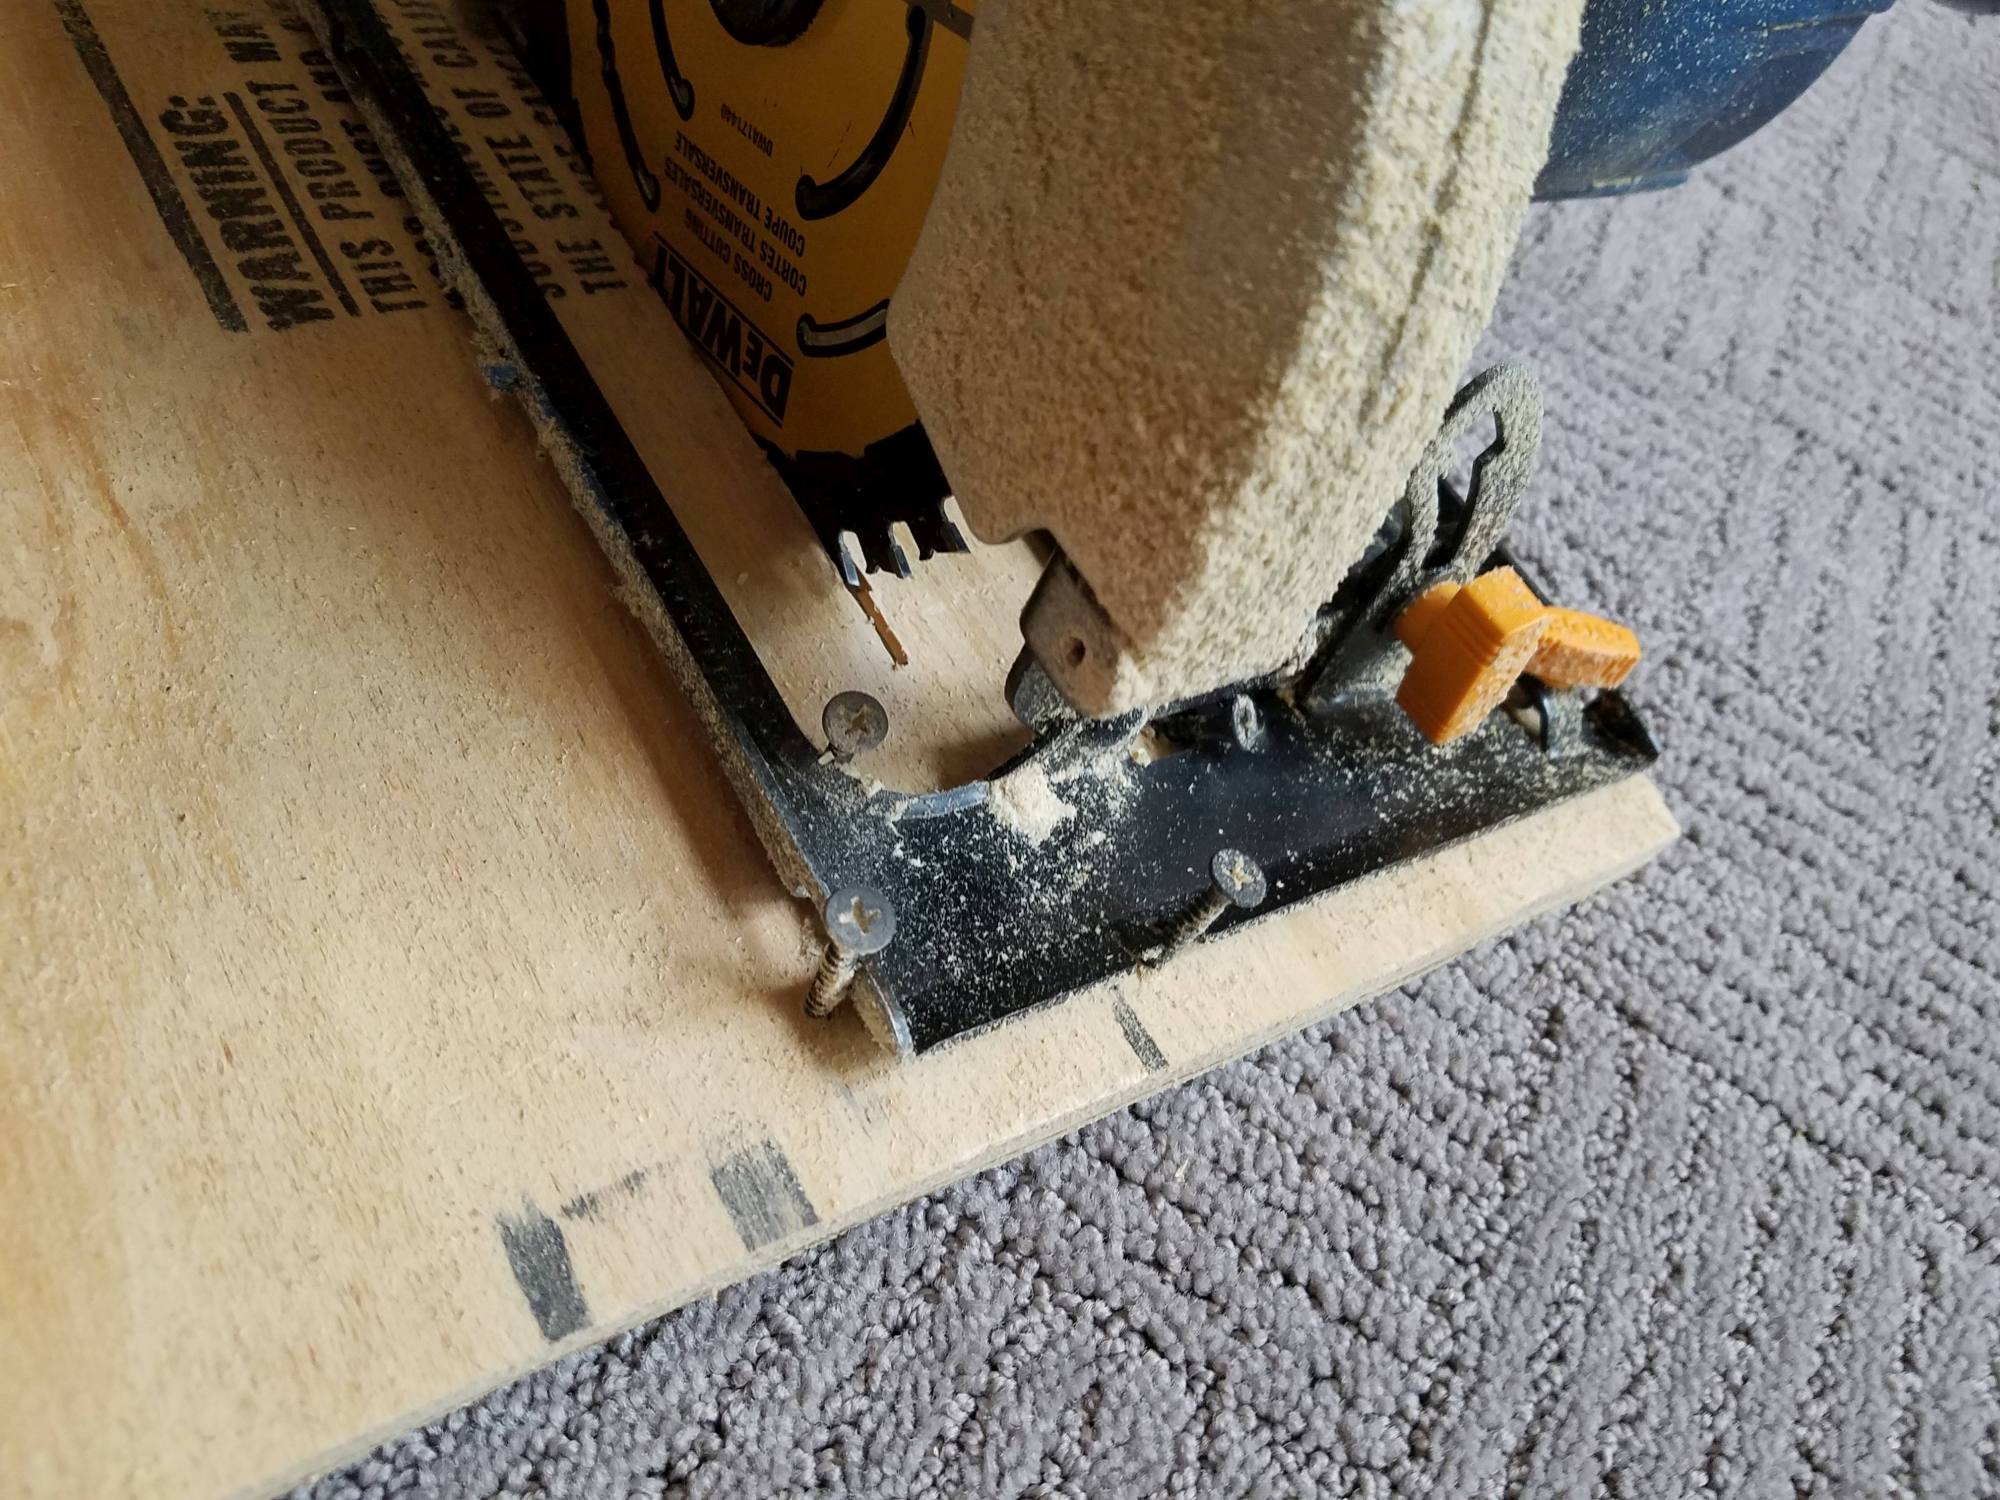
Pour couper les morceaux beaucoup plus facile et de les garder la même largeur Je fis un gabarit.
They say hind site is 20/20, well looking back on it I would still cut the plywood strips for flooring myself.
I recently used the cutting services for another project where I didn’t care about the width they cut it an man o man, I don’t think there were two cuts that were the same width.
We had 10 sheets of plywood to cut into wide plywood planks. Je me suis dit qu'une lame de contreplaqué serait le meilleur. Je pensais que tout ce qui laisserait un avantage vraiment rugueux sur le bois.
bien, I was very, very wrong.
Do Not Use A Plywood Blade – Use a Cross Cut Blade instead
La lame de contreplaqué n'a pas duré très longtemps et a pris beaucoup d'efforts pour passer par le contre-plaqué. Il a commencé à fumer et d'avoir beaucoup plus de difficulté à couper à peine à mi-chemin dans la seconde feuille de contreplaqué.
J'ai fini par sortir et acheter une autre lame. Cette fois, j'ai essayé une lame de coupe croisée, OMG quelle différence.
La lame de coupe croix a traversé le contreplaqué comme le beurre et a laissé une coupe encore mieux que la lame de contreplaqué a. J'ai pu faire le reste du contreplaqué en utilisant seulement qu'une lame de coupe croisée.
If you want to get the same cross cut blade I used, just click the picture below.
Un gabarit est de fantaisie parler d'un modèle. Il a vraiment fait une tâche fastidieuse et chronophage super facile.
It was basically a 1/2″ piece of scrap plywood I had with a scrap piece of 1 x 4 screwed to it.
The space between the saw blade and the piece of 1 x 4 was 5 7/8″, l'épaisseur Nous voulions que nos planches plancher contreplaqué être.
Pour le gabarit, je mets la lame de la scie sur toute la hauteur, la scie fixée à la contreplaque au moyen de vis tout autour de la scie, calant en place.
Then I slowly lowered the saw into the plywood and measured 5 7/8″ from the inside of the plunge cut and that’s where I screwed in the 1 x 4.
For more info on the jig and some extra tips on cutting the planks check out this post, 3 Gain de temps Conseils pour le bricolage Plank contreplaqué planchers.
Pointe: If you’re cutting your own boards vous devez faire un gabarit. When making your jig, extend the 1 x 4 way in front and way behind the saw, comme il est dans les images.
Cela vous permet de aligner le chemin de la scie avant que la lame entre en contact avec le contre-plaqué. Il donne également une plus grande stabilité, de se retrouver avec une coupe plus droite.
Temps total: 2 people about a day and a half
Cette partie a pris un certain temps, mais il est important de mettre le temps en elle.
Nous poncé la surface du contreplaqué pour enlever les éclats et le texte qui est parfois estampillé sur le contreplaqué.
Nous avons également utilisé la ponceuse pour arrondir les bords tout autour du visage de chaque planche.
Le bord arrondi lui donne un look très agréable fini et aide dans des cas comme le nôtre, où les sols ne sont pas très niveau.
Rounded edges give a soft transition between two planks when they don’t quite line up.
Ceci est également où vous choisissez de quel côté du contreplaqué sera le visage, le côté joli ou du mauvais côté.
Quand nous avions choisi les côtés, I’d say we chose the ugly side 80% of the time.
Il allait à l'encontre de ce que je normalement faire, mais maintenant je veux un peu, je suis allé avec le côté laid plus.
Nous avons utilisé une ponceuse à bande pour faire la plupart du ponçage. Vous pouvez utiliser une ponceuse de palme si vous n'êtes pas en faire trop plancher, mais dans notre cas, la ponceuse à bande était beaucoup plus rapide.
The sandpaper we used was 120 grit, il était parfait pour la ceinture ponceuse.
Au cours de cette partie du projet, vous avez des doutes sur l'utilisation de la partie noueux du contreplaqué.
BUT TRUST ME – once you put the stain on the plywood you will be blown away at how good it looks.
À la fin, les plus belles planches étaient ceux avec des imperfections.
Pointe:
Si une planche a un nœud ou une fissure dans ce, ne mettez pas sur le côté ou l'utiliser dans une zone que vous ne pouvez pas voir.
Au lieu, rendre plus visible. Dig dans le noeud ou fissure avec la ponceuse à l'accent de la fissure ou noeud plus. Il va aider à éliminer les éclats qui sont autour du nœud ou fissure et aussi ajouter du caractère.
Temps total: Nous l'avons fait en même temps que le ponçage il est inclus dans la journée et demi passé ponçage
This is the distressing part of the distressed plywood floors.
Il y avait trois armes de choix pour appliquer le caractère du contreplaqué (alias. pénible), un marteau, une grosse paire de pinces et une torche au propane.
Sur les trois je la pince le plus et le marteau le moins.
En utilisant des pinces, Je frappé à plusieurs reprises la face du contre-plaqué avec le coin arrière de la pince.
Avec le marteau, J'ai utilisé du côté du marteau, et la griffe pour faire des empreintes dans le contreplaqué.
Si vous regardez le sol juste au-dessus du marteau dans l'image que vous verrez les entailles à l'arrière de la pince gauche.
J'ai aussi utilisé un couteau pour ouvrir des fissures dans le bois, pour les rendre plus prononcée.
I did it by putting the knife at an angle and cutting along the crack, opening up the crack, semblable à ce qui se fait de fissures dans le béton quand vous voulez remplir une fissure.
The distressing (a.k.a character building) is a key step for distressed rustic plywood floors.
The where and tear makes the planks look authentic, the more distressing the better.
The propane torch was by far my favorite character builder – and it wasn’t because it spoke to my inner pyro…. bien peut-être un peu à cause de mon pyro intérieur lol.
Brûler le contreplaqué donne un instant incroyable aspect vieilli.
Ceci est une autre partie du processus où je hésitais beaucoup.
But once the stain goes on, the plywood planks instantly transform into a beautifully aged floorboard!
Jetez un oeil à l'avant et après l'image de la planche de contreplaqué brûlé.
When burning the wood there are definitely thoughts of Oh My God! This is too much!
Mais, as soon as the stain goes on, it blends the darkness of the burn the the rest of the plywood colors beautifully.
Whenever we came across a plank that looked a little boring, we burned some character into it to liven things up. 🙂
Jetez un oeil sur les flèches dans l'image, chacun de ces marques sombres est le travail de la torche au propane.
Pointe: When burning the plywood, the lighter parts of the wood burn much easier than the darker parts.
Depuis que j'évitais que motif zébré de contre-plaqué, Je ne l'ai pas brûler le bois où il y avait un modèle lourd.
Burning that area would only emphasize the pattern – and I didn’t want that.
Si la partie du bois était soit seulement sombre ou que la lumière alors il était admissible à brûler.
Voici une vidéo de la façon dont nous avons brûlé le plancher de contreplaqué large planche rustique.
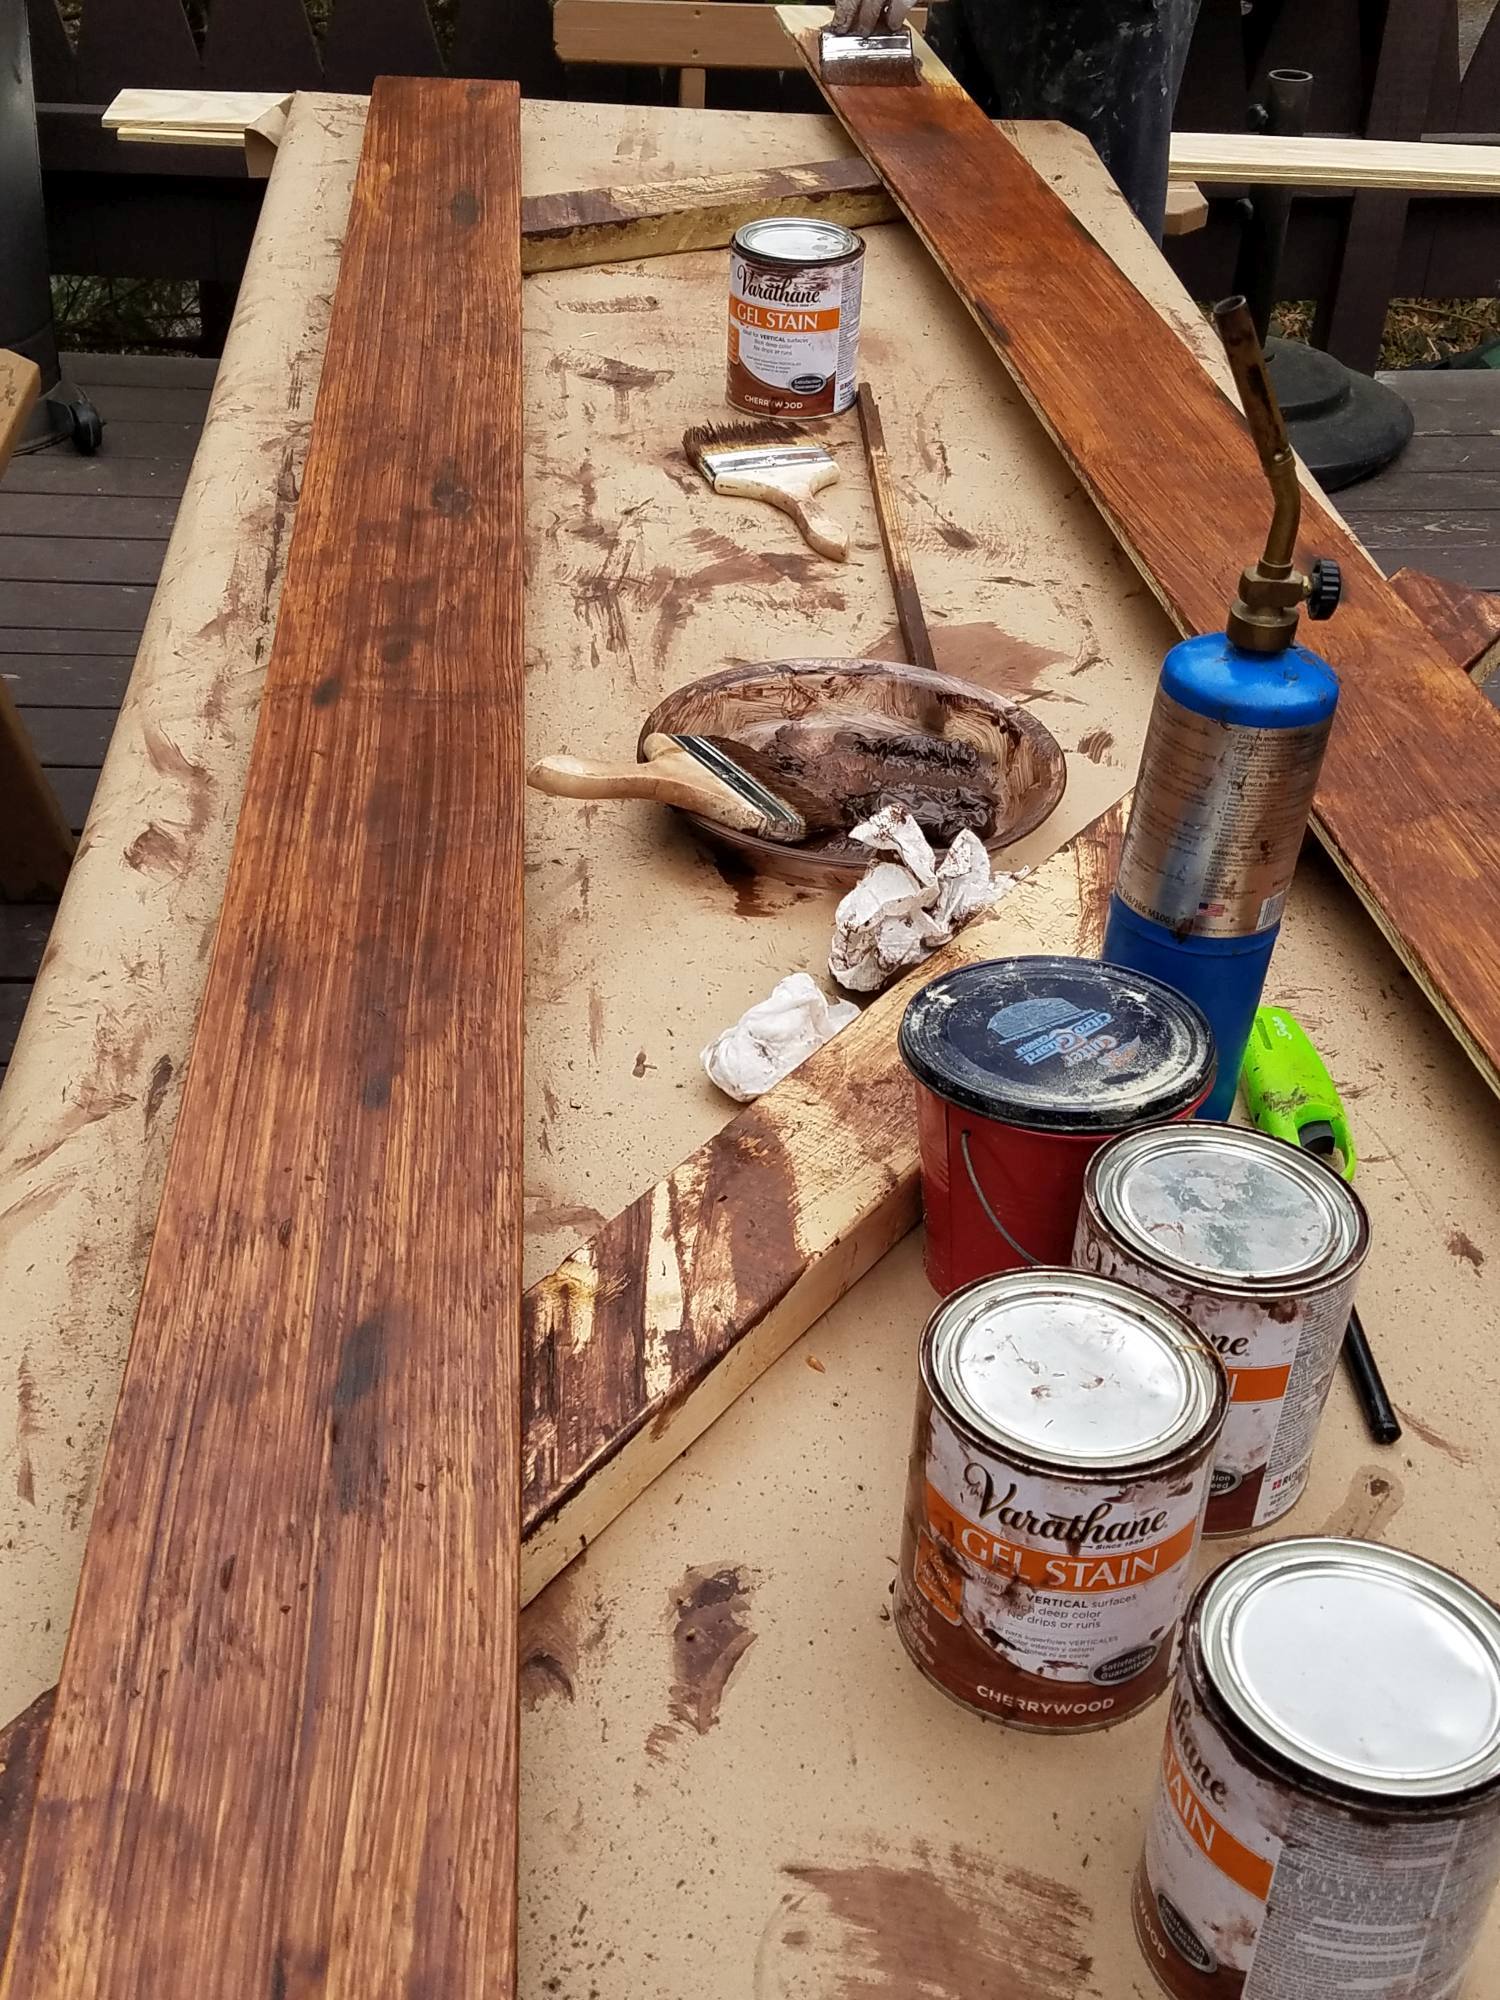
The process started with trying out a bunch of different stains on scrap pieces of plywood first, et ce fut de loin notre préféré!
Nous y sommes allés avec une tache de gel au lieu d'une tache régulière parce qu'il fait un très bon travail de couvrir ce motif zébré de contreplaqué que nous ne voulions pas que.
Il est tout à fait une préférence personnelle, but I don’t like the pattern you get from regular stain on plywood floors.
Jetez un oeil à cette image que je copié de Pinterest, pour un exemple de ce que je parle.
tache régulière est plus liquide et est absorbé par le contreplaqué à des rythmes différents. parties molles du bois absorbent la tache plus rapidement que les parties les plus denses du bois.
Une solution serait également d'utiliser un conditionneur de bois avant d'appliquer la tache régulière.
Au lieu, nous avons utilisé la tache de gel.
Because we used the gel, we were able to skip the wood conditioner.
Plus, la tache de gel a ajouté un bon motif de grain de bois sur la surface de la carte, making it look less like plywood….BONUS!
La tache de gel nous avons utilisé avait une couleur sombre et créé une tache plus claire sur le bois. Le résultat est un bois de couleur cerise avec un motif de grain foncé sur le dessus, Exactement ce que nous cherchions.
Le plus épais que vous avez appliqué la tache la plus sombre de la carte serait.
Également, plus vous attendu avant le brossage la tache plus sombre excès de la planche sera.
Si une planche avait un motif zébré lourd dessus, nous avons mis la tache sur épais et attendu un peu plus avant le brossage à sec.
Cela a fait un très bon travail de minimiser le motif zébré.
La brosse nous avons utilisé pour la tache était un grand pas cher (environ 4 ") réelle Brosse à poils.
La tache a une odeur de polyuréthane solide qui lui, de sorte que nous avons la coloration sur le pont et également laisser les panneaux sécher là.
Si vous allez faire la même chose, assurez-vous d'abord vérifier les prévisions météo!
We used about 7 quarts of stain to do our project.
Temps total: 2 people about a day
When we stained the plywood floors, we did one coat of stain using the dry brush technique.
Fondamentalement, first we applied the stain with the wet brush, then used a dry brush to brush off the excess stain.
Avec chaque passage de la brosse sèche, nous essuyer la brosse à sécher sur une serviette en papier pour enlever la majorité de la tache de celui-ci.
Nous avons choisi la méthode de brosse sèche, car elle laisse un joli modèle en bois foncé.
Lors de l'application de la tache et le brossage à sec, we were able to play with the texture that the stain leaves on the plywood.
Mixing it up and using wavy brush strokes to simulate a grain or brushing around a knot in the wood added uniqueness to each board.
Rappelles toi, the longer the stain is left on and the longer it dries before using the dry brush, le plus sombre de la carte sera.
Nous généralement appliqué la tache et attendu quelques minutes avant d'utiliser le pinceau sec.
If we came across a board with lot of that zebra pattern on it we applied a thicker coat and let it sit a little longer.
La couche plus épaisse et plus le temps d'attente a fait un meilleur travail de masquer le motif zébré.
Once the stain was applied we waited 24 hours before applying the polyurathane.
Temps total: 2 people about a day and a half
Pour la finition, nous avons utilisé un satin clair, à base d'eau, polyuréthane modifié par une huile.
This product was perfect for our project because it didn’t change the color of the stain, dried quickly and best of all – il de inodore!
If you’ve ever done any sort of polyurethane project. you know that the smell from polyurathane is no joke… and it lingers for days and days. This has no smell at all!
Nous y sommes allés avec un fini satiné parce que nous voulions un aspect vieilli et un plancher brillant serait le contraire de ce.
Trois couches minces de poly ont été appliqués sur toutes les planches, y compris les côtés des panneaux. Entre chaque couche, we waited about 2 hours before applying the next coat.
We then waited 24 hours after the last coat before installing the boards.
We didn’t sand between the first and second coats but did do a light hand sanding with 120 grit sandpaper before applying the final coat.
The brush we used for the poly was a cheap wide (about 6″) synthetic brush.
We used 2 gallons of polyurethane for our project.
Pointe: When applying any polyurethane, bubbles are something you want to avoid.
That’s because the bubbles don’t pop. Au lieu, they dry into poly… and that’s not a good look. lol
To prevent bubbles, mix the poly using a mixing stick using smooth circular motions.
No shaking the can here!
Mise à jour: When we originally did the dining room floor we did a light sanding before the final coat of poly.
Recently we did the living room floor and for that flooring, we skipped the sanding before the poly.
We figured not sanding would give the planks a bit more texture and save us a boatload of time.
It worked out really well! From now on, we won’t be sanding before the final poly coat.
The spaces between each plank were perfect for the style we were looking for.
The spacing would give it more of that farmhouse feel and prevent the buckling that the previous floor suffered from.
A few of the posts on Pinterest mentioned using quarters as spacers, so that’s what we used.
Our plancher de contreplaqué large planche has small variations in the spacing, mostly because of the uneven floors – but that’s ok – wabi-sabi. 😉
J'ai utilisé une astuce que je suis tombé sur l'un des postes Pinterest, commence du côté de la pièce où le sol est le plus visible.
Pour notre espace la plus grande partie visible du sol était par la porte d'entrée afin que ce où nous avons commencé.
Quand nous sommes arrivés à l'extrémité opposée de l'espace nous avons fini avec la dernière rangée de planches devant être déchiré en deux.
Each plank was 8 feet long and the room was a little over 12 feet wide, donc il n'y avait pas trop de coutures à travailler avec.
La règle de base est de ne pas avoir deux rangées consécutives avec semble moins d'un pied à l'écart les uns des autres.
I used a miter saw to cut the boards to length. Pretty straight forward. One tip is to make sure the blade reaches full speed before you start cutting into the plywood. That’ll give you a clean, smooth cut.
Pointe: Every once and a while making a cut would create a thin line of bare wood at the very edge of the cut. When that happened I used a dark colored sharpie to color that bare wood and that blended it right in.
I used a black sharpie but a brown sharpie would work just as well.
I actually used the sharpie a lot with the length-wise cuts.
Pointe: Si vous finissez par acheter le même cloueuse je vous recommande d'acheter également une batterie supplémentaire. Il vient déjà avec une batterie, l'achat de la batterie supplémentaire aidera à garder votre projet se déplaçant le long.
Le contreplaqué plancher que nous installons est de 1/2 "d'épaisseur et le plancher précédent était de 3/8" d'épaisseur.
The 1/8″ difference meant any spaces where the previous flooring used to fit – the new flooring no longer did.
Cette différence signifiait beaucoup de sous-cotation. Non seulement les moulures de portes mais toutes les bandes entartrage qui couvrent les coutures des panneaux de chêne sur les murs.
Je aurais pu le faire avec une scie à queue d'aronde, mais depuis que j'avais assez peu de coupes à faire, Je l'ai acheté un outil oscillant. Il a parfaitement fonctionné!
L'outil est livré avec un tas de différentes pièces jointes. I haven’t used it for anything else yet but I can think of a few different uses for it in the future.
Donc, all told, it took roughly a week to do the plywood plank floors – from complete start to complete finish. Including the old floor removal, subfloor painted, 10 sheets of plywood cut into strips, sablé, affligé, stained, polyied and installed.
This was a good sized project with a lot of effort put into it, but it was well worth it. Nous avons maintenant un plancher tout à fait unique qui correspond parfaitement à la maison, et semble fantastique!!
En automne, nous allons installer le même plancher rustique contreplaqué large planche dans le salon, et je suis vraiment impatient d'y être.
We’re also going to do a unique transition between the living room and dining room floors… can’t wait.
Mise à jour: bien, nous les étages refait vie récemment et nous avons également installé le plancher d'accent tranche de bois. Tout est avéré parfait!
Nous avons écrit au sujet de ces expériences aussi, check out those posts here:
[et_bloom_inline optin_id=”optin_7″]
Here’s some more pics of the work in progress and the finished plywood plank flooring.
Laissez-moi savoir ce que vous pensez, Y at-il quelque chose que vous auriez fait différent?
Partagez votre opinion dans les commentaires ci-dessous!
The Amazon affiliate tracking id replacer tool updates the tracking id in your Amazon Affiliate…
There are already wainscoting calculators out there but they're too complicated. This wainscoting calculator uses…
Dans cet article, nous verrons comment peindre des armoires en stratifié. We did this project…
Let me first say that converting a box spring into a platform bed is not…
View Comments
Well finally here is the best plywood plank flooring tutorial I have found. Thank you so much for sharing this. I to have been bothered by the zebra effect that you get when staining plywood. And you've given me the solution, I'd almost given up on plywood flooring. Fingers crossed I'm off to Home Depot. Merci encore
Salut mon Dieu! Thanks for the feedback, glad the post helped. Best of luck with your plywood project! Feel free to reach out if you have a question along the way. :)
The main question we have is about how you keep dirt out of the spaces between the boards. Did you put a finish coat of poly on the entire floor after it was done? How do you keep it clean?
salut David!
That's a great question! The 3 coats of poly were applied to each board individually, before putting them down.
We figured it was more important to have a good coating of poly on the sides of each board, to make them a bit more resistant to moisture (especially in the kitchen).
The dining room/kitchen floor is about 9 months old, and so far everything has cleaned up very nicely.
We were a little worried about having little bits of food falling in the cracks in the kitchen, but vacuuming seems to pick up everything that's in the cracks pretty easily.
Maybe it's because the floors are only 1/2" épais? It's possible a thicker flooring (like 3/4" flooring) would make it harder for the vacuum to get debris out of the cracks.
J'espère que cela pourra aider!
What kind of plywood did you use? My dad keeps telling me he thinks it’s an oak plywood.
Hi Brook!
I just used regular 15/32 in. (1/2") 3-Ply RTD Sheathing plywood, like this https://www.homedepot.com/p/15-32-in-x-4-ft-x-8-ft-3-Ply-RTD-Sheathing-132411/100067329
The oak plywood is usually a lot more expensive and is usually finished plywood. I was looking for a rustic look, so the regular plywood was a perfect fit... not to mention a lot cheaper!
J'espère que ça aide!
What kind of plywood did you use? Was it oak plywood?
Hi Brook,
I added a blurb to the article about the type of plywood since that was unclear before.
Thanks for the feedback!
Thanks for your time and effort putting this together. Your systematic, step by step explanation of the process is a real confidence booster and the result is beautiful. I agree that the typical plywood zebra pattern is not desirable. Am I understanding correctly that the gel stain and dry brush technique is used to CREATE a more pleasing wood grain pattern? In a sense "painting" on a wood grain look?
Hi Dan,
Merci beaucoup pour ces mots gentils, I'm glad it's been helpful to you. :)
That's exactly right! This stain is the same stuff that's used to create a wood pattern on surfaces like steel doors.
The grain you see in the close-ups is, for the most part, a pattern created by the stain.
What type of plywood did you use? I can’t seem to find that anywhere.
Hi Courtney,
The plywood is regular 15/32 in. (1/2″) 3-Ply RTD Sheathing plywood. You’re the second person to ask what the type of plywood it is so I’ll make sure to add that info to the article.
Thanks for your comment!
Salut Steve, this is great. Loved your ideas! My question is about moisture - with the cracks between the planks and the sub floor underneath, could you put a top coat of sealer to fill the cracks or possibly seal the sub floor? Any ideas? We have kids and are considering doing this in our main living area which includes the dining room. I am pretty confident it will subject to moisture sometimes. Merci!
Hi Jeremiah,
Merci beaucoup!!!
Hmmm, our plywood flooring is on the second floor so we didn’t have to worry about moisture coming from underneath.
If the moisture your concerned about is coming from above – as in kids will be dropping water on top of the flooring, that shouldn’t be a problem.
By finishing each board individually, you’ll be able to apply “poly” all around the plank, making it more resilient to water being dropped on it. That’s why we chose to finish each plank individually, instead of finishing the whole floor at once.
We did add a couple of coats of dark paint on the subfloor to give it a layer of protection from moisture from above.
If you’re really concerned about the subfloor getting moisture (which sounds more and more like what you’re concerned about as I go through the process of answering your question) then you can definitely apply a sealer to the subfloor before installing the plywood flooring.
Comme alternative, you can apply a coat of the “poly” on the subfloor. If that’s the path I was taking, I’d paint the subfloor a dark color first, then apply the “poly”. I’d use a flat finish poly on the subfloor, that way the cracks won’t be shiny.
Oh one more thing, you mentioned filling the cracks with sealer. I’d avoid doing that. We face-nailed the planks to the subfloor and kept spacing between each plank to allow for expansion. If the cracks were filled, the plywood wouldn’t have the space to expand and that may lead to problems.
J'espère que cela pourra aider!
Best of luck!
A great, step-by-step , comprehensive explanation of how to go from start to finish with the plywood floors! Excited to try. Thank you for taking the time to share.
Grateful,
Sallye
Thank you so much Sallye! Best of luck with your flooring!
Hi great article. Merci. I would like to use this technique of flooring in an outdoor patio. It is screened in but occasionally rain is blown in and the floor becomes wet. Do you think I could put a sealer on top? Or do you have advice for outdoor use of plywood?
Hi Patz,
Merci! I'm glad you enjoyed it. Wow that's a tough one. The obvious question is how much rain gets blown in? If the existing flooring (or subflooring) is plywood and is holding up, then I can see this working well.
In the kitchen, the flooring does get its fair share of "accidents" and it has held up perfectly... but my occasional accidents are no measure to what mama nature can throw at the floors.
If I were thinking of doing this project in an area that is partially exposed to the elements, I'd probably lean toward using pressure-treated plywood. Its pricier but it would be worth the additional cost.
It would be horrible to finish a project like this and love the way your floors look, only to have the floor ruined by unusually heavy rain.
Ouais, my suggestion would be to use pressure-treated plywood. The stain will cover up the yellow tint of pressure-treated plywood, so it would basically look the same and you wouldn't have to worry about the rain.
J'espère que ça aide.
Steve
This is absolutely beautiful. Thank you so much for putting together such a detailed tutorial. This is exactly what we're looking for in our new home. We haven't moved in yet, but I will be taking the next few weeks to make all of the plywood boards for when we do move in! Did you finish all the sides of the plywood planks including the underside? And then when you made cuts to length and had unfinished wood, did you do anything to finish it before installing?
Hi Eric! Merci beaucoup, and congrats on the new home!
At the start of our project the plan was to finish the boards on every side. But once we started we realized that was a lot of extra work and changed our minds.
If the floor was going in an area that had a lot of moisture then I would have definitely added a coat of the polycrylic to the underside. Since this was on a second floor there would be less chance of moisture entering the wood from underneath.
With the cuts to length, that cut goes toward the wall, so we didn’t need to add any finish to it. Since the cuts from the compound miter saw were so clean (no splintering) none of the bare wood was visible.
Oh, there is something I never mentioned in the post, for cuts that went length-wise, like around kitchen cabinets, the cuts were not nearly as clean. With those cuts I used a dark-colored sharpy (brown or black) to color in the cut so that it wouldn’t show.
I used the sharpie to color in any part of the wood that we had somehow missed when applying the stain. There weren’t many but there were more than one spot that needed some coloring. Mostly around the holes and once in a while there was an edge that didn’t quite get enough stain. The sharpie covered it up perfectly.
I hope that answers your questions. Best of luck with your project!!
Steve