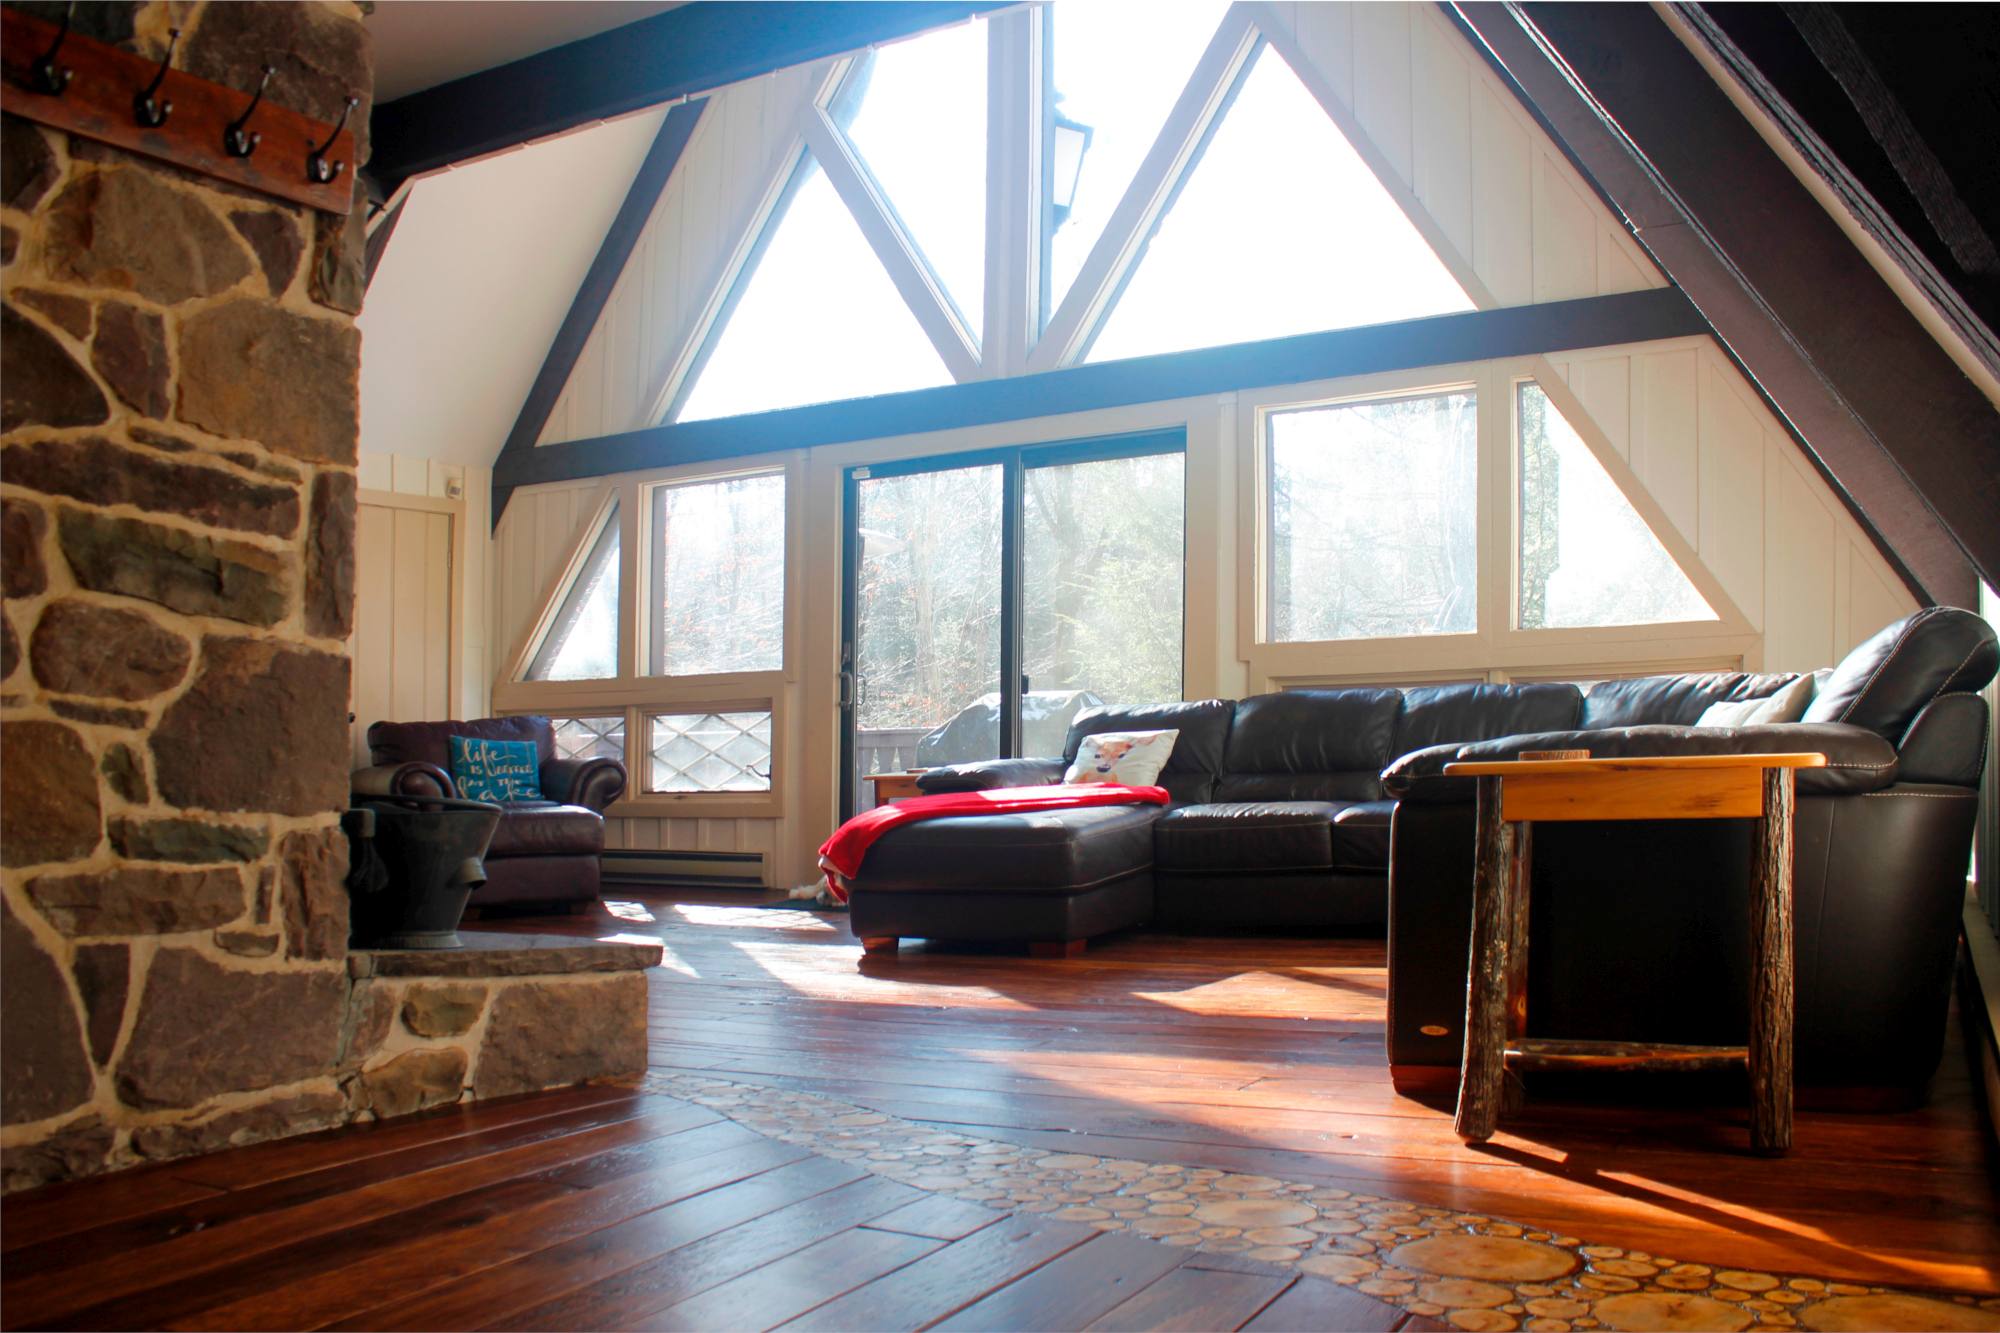
Installieren eines End Grain Flooring Inlay - Fertig - Gesehen vom Esszimmer
Ich freute mich schon seit Monaten darauf, ein Endkornboden-Inlay zu erstellen. We installed plywood wide plank flooring in the dining room and kitchen earlier this year and the living room was next on the list. Here’s a post with details on what we did with the living room floor.
The flooring in the dining room and living room were going to be laid in different directions and a regular threshold separating the two spaces was going to be – well pretty boring.
Während dabei zunächst meine Pinterest Forschung auf dem Fußboden, Ich kam über Stifte mit unterschiedlicher Bodengestaltung mit Holz Scheiben erstellt.
Das gab mir die Idee, ein Ende Kornboden als Einlage zu tun. Es war die perfekte Lösung!
Ich konnte dieses Projekt nicht warten, um zu versuchen,.
Bekanntgabe: Einige der Links unten sind Affiliate-Links. Wenn Sie sich entscheiden, eines dieser Produkte zu kaufen, Wir verdienen eine kleine Provision ohne zusätzliche Kosten für Sie. Wir empfehlen diese Produkte nur, weil wir haben Erfahrung mit ihnen und sie für unsere eigenen Projekte. Als Amazon Associates, Wir verdienen mit qualifizierten Einkäufen.
Hier ist eine Liste der Werkzeuge, die wir für dieses Projekt verwendet.
Affiliate-Links unten auf ähnliche Elemente sein kann, wenn genaue Einzelteile nicht online gefunden werden können.
Dies sind die Vorräte an diesem Projekt verwendet.
Affiliate-Links unten auf ähnliche Elemente sein kann, wenn genaue Einzelteile nicht online gefunden werden können.
Ölmodifiziertes Polyurethan auf Wasserbasis – we used 1 gallon
4″ Polyester Synthetic Brush – 4 brushes to apply the poly
flüssige Nägel
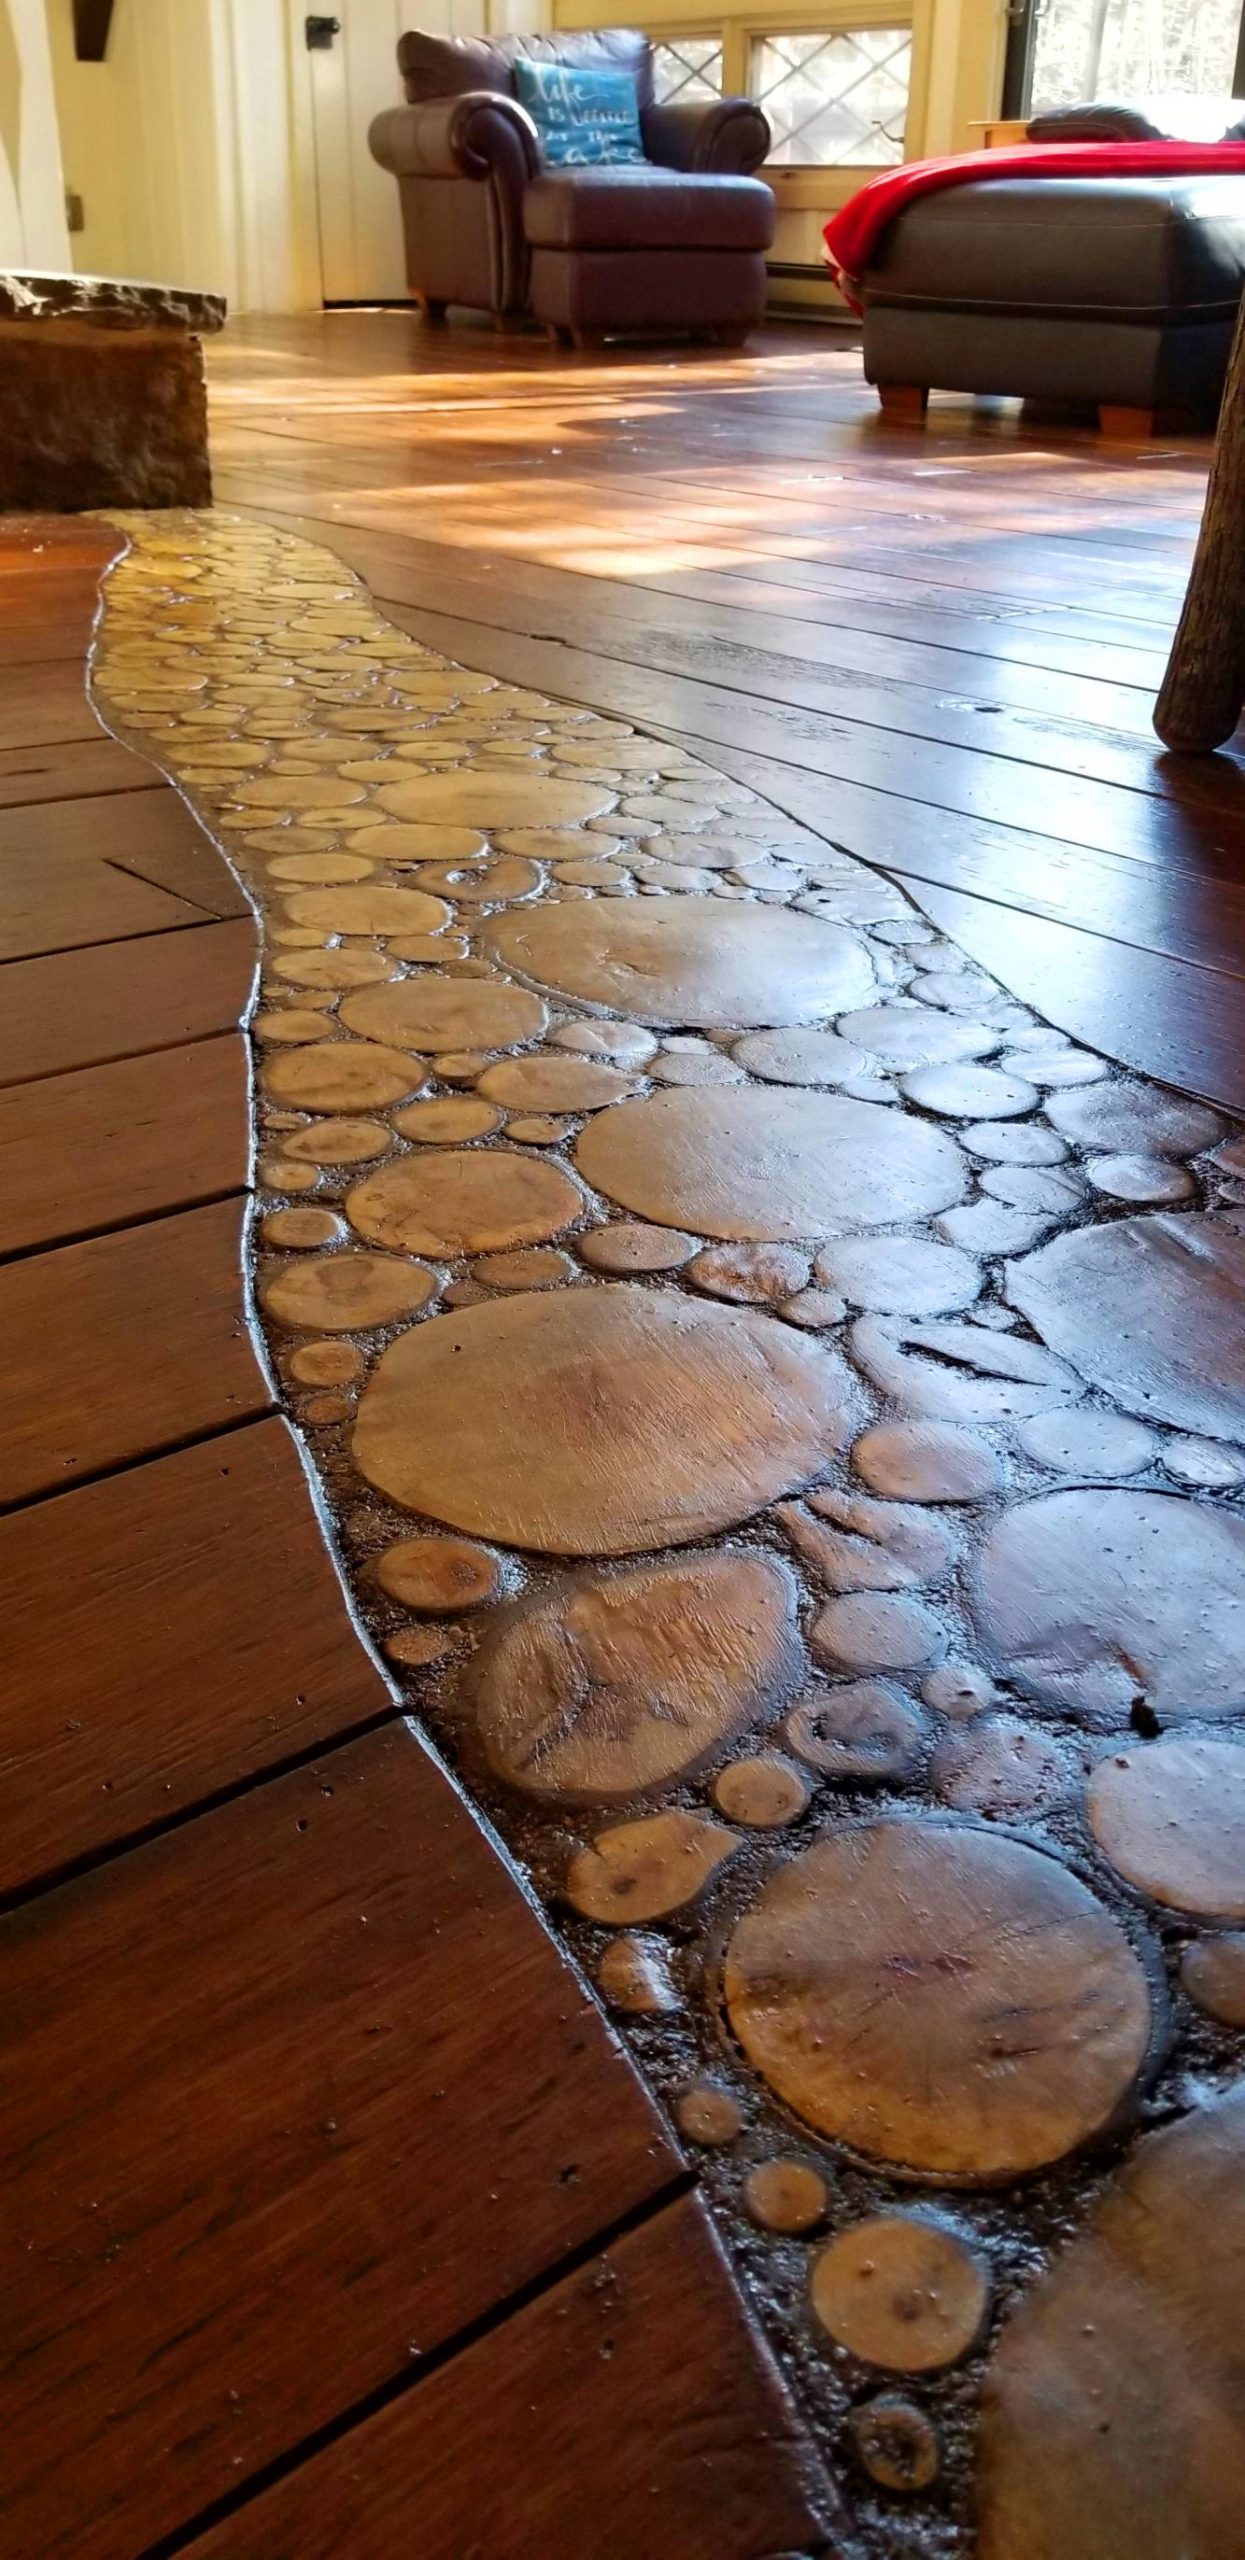
End grain flooring is basically branches and logs cut into slices, then placed in a pattern, in our case, it’s the shape of a river. The slices are glued into place and grout is applied to fill in the spaces between the slices. Then a protective finish is applied and you have yourself an end grain floor!
I call it a wood river, but I’ve seen it called a bunch of different names. Wood slice flooring, Ende Kornboden, log end flooring, cordwood floor and even cross-cut tree slice flooring to name a few.
The beauty of doing a floor inlay is that there is no limit to the design you make. Es kann so einfach oder verzierten sein, wie Sie wollen.
Da unser Haus in der Poconos, in einer Wildnis, wir dachten, ein aus Holz Fluss mit dem Haus und seiner umgebenden Natur gehen.
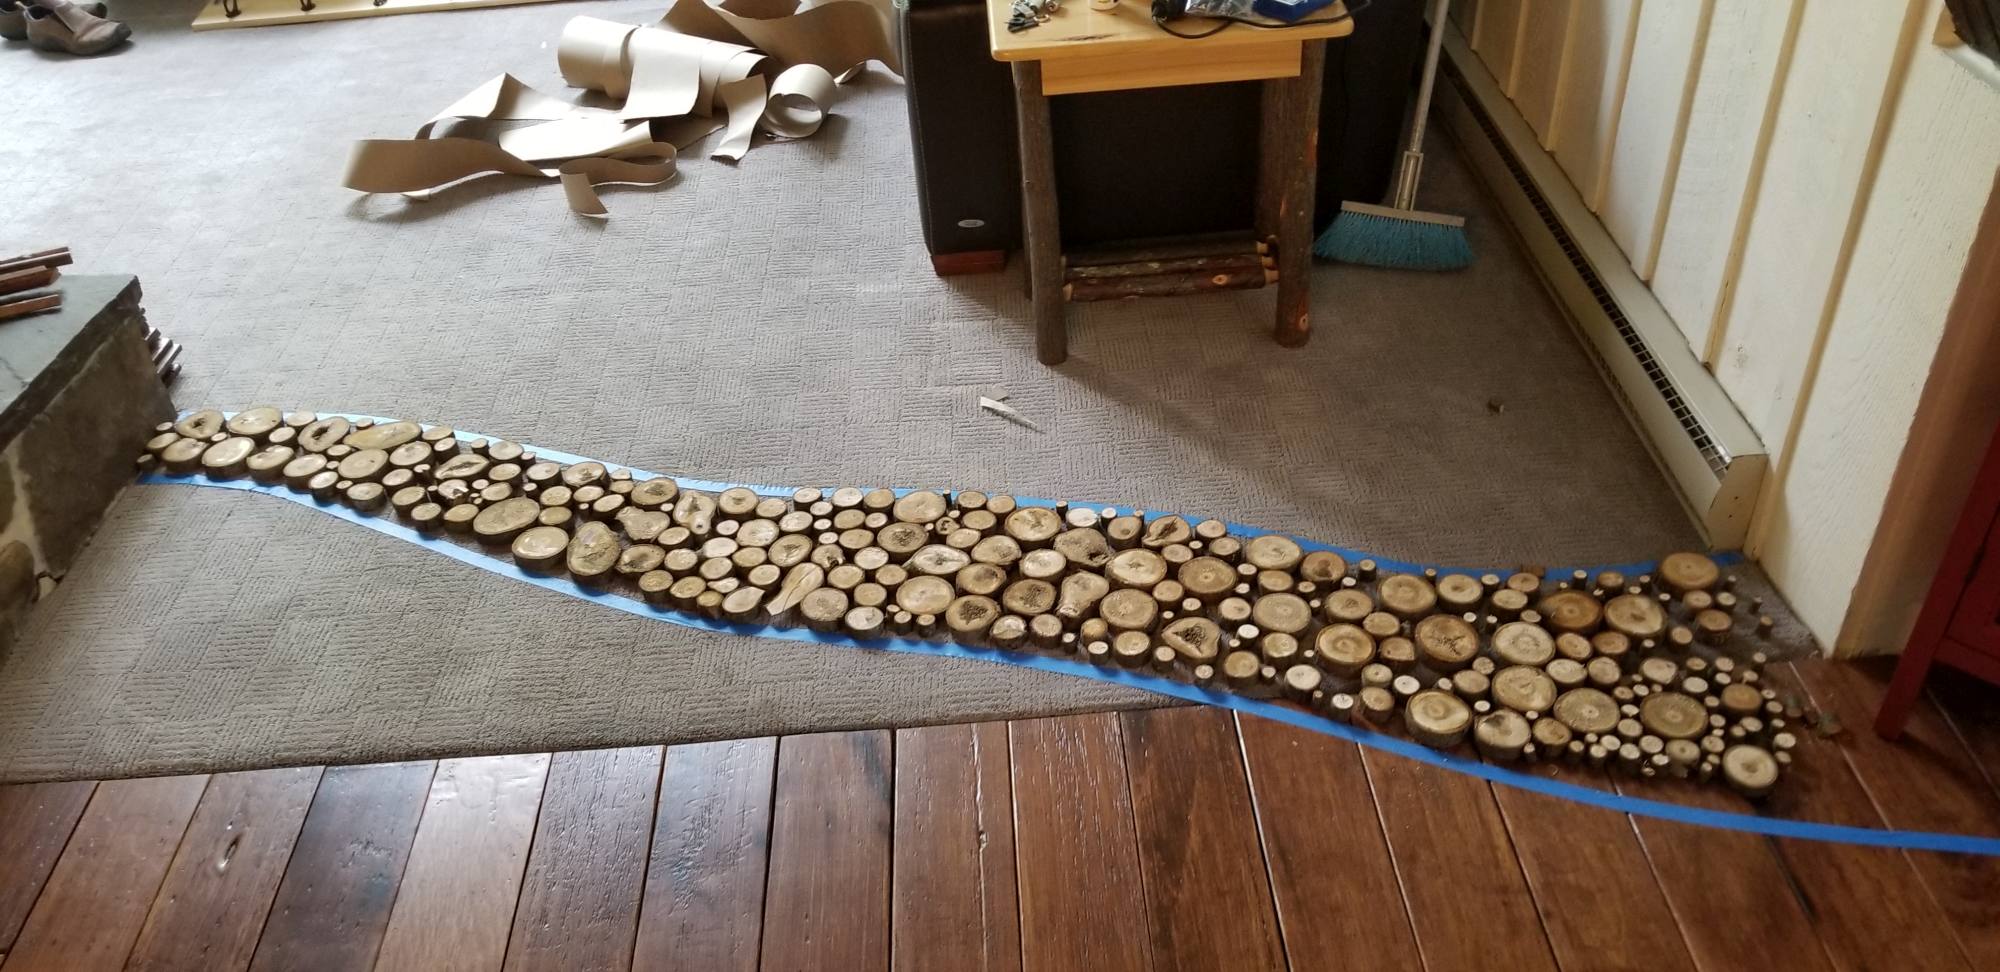
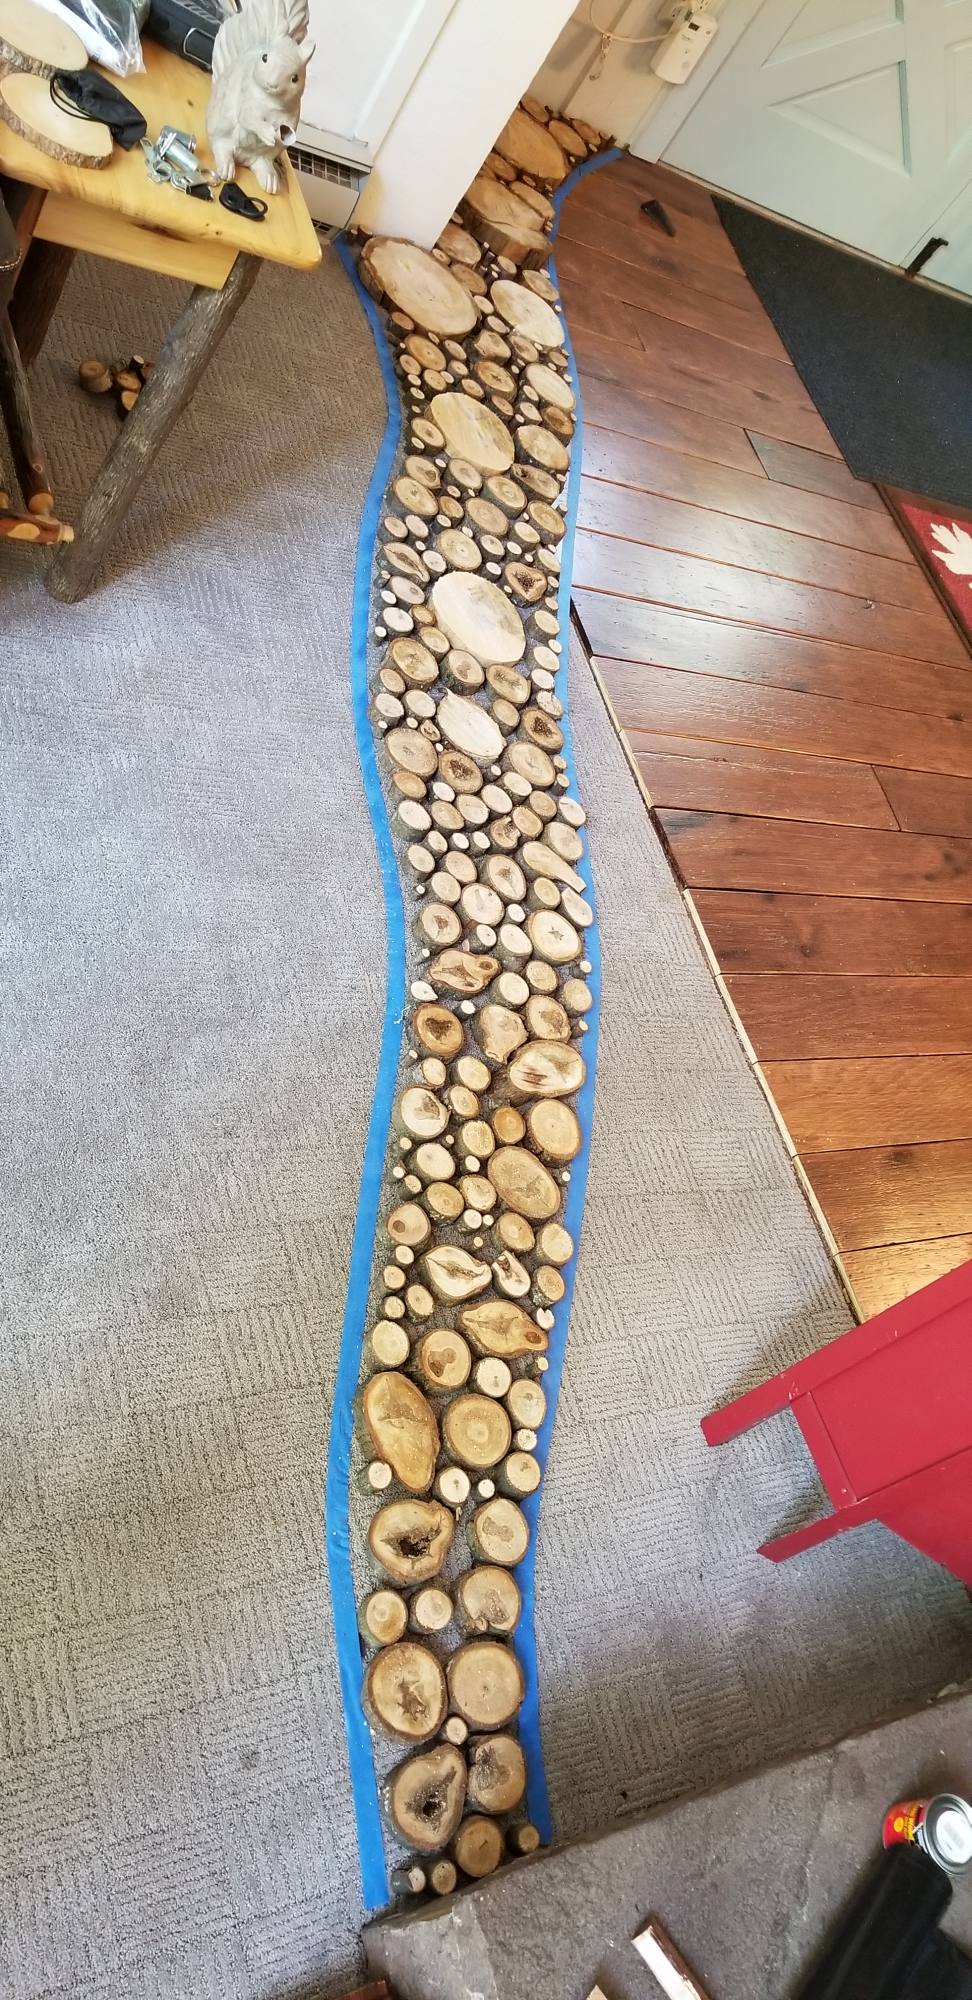
Das Ende Kornboden Inlay würde das Esszimmer vom Wohnzimmer getrennt. Beginnend in der Ecke des Speisesaals und es Weg in die Ecke des Wohnzimmers Kamin machen.
Wir wollten den Bodenbelag Inlay auf einer Seite breiter beginnen und ihn durch den Raum seinen Weg sanft geschwungenen.
Wir hatten die Idee, als wir das Esszimmer früher im Jahr tat, und das ist auch als ich anfing, für den Fluss der Holzscheiben schneiden und die Form des Bodenbelags Akzent Holzscheibe vorgezeichnet.
Wir wollten die Wohnzimmer Böden und die Einlage ein paar Monate später tun, so dass die Holzscheiben Zeit zum Trocknen ergab.
Nun, da die allgemeine Form des Ende Kornboden Inlay war an Ort und Stelle, der nächste Schritt war es in mit Holzscheiben zu füllen. I got a bunch of branches that had fallen on our property and started cutting them to the width I thought I needed… more on that later.
Ich schnitt genug Stücke Holz zu füllen im Inlay, mit einem Bündel verschiedener Dicken Zweig. Ich schnitt sich im Mai auf sie ein paar Monate trocknen müssen, bevor sie im Herbst Installation.
The flooring was 1/2″ thick and the floors are uneven so I cut the wood slices a bit thicker… at least that’s what I thought….that was a big mistake. It’s important to cut them to the right size right off the bat.
I used a miter saw to cut the slices, it went pretty quick considering how many slices were needed.
Important Tip: When cutting the wood pieces try to cut them as close to the final thickness as possible.
I didn’t do that with this project and it took me days to get the slices down to the right size.
I cut the slices 3/4″ and most of the wood slices needed to be about 1/2″… a big mistake.
That extra 1/4″ was a struggle to remove.
Ich hatte vor den meisten der Holzscheiben Monate so geschnitten, dass diejenigen trocken waren, als ich bereit war, sie zu installieren.
But I guess I was able to get the wood slices tighter together when I was actually doing the project… so I needed more wood slices.
Ich habe diesen Artikel auf die Holzscheiben Trocknen.
http://theplywood.com/drying-wood-in-oven
Using the oven on low heat (200 F), the wood slices were dry in a couple of hours so it worked really well.
The original plan was to cut each floorboard individually using a rotozip. I was going to cut them outside since the rotozip causes a lot of dust.
Stattdessen, I ended up cutting the floorboards in place using the Oscillating Multi-Tool. That worked really well and it didn’t make very much dust.
Nachdem die Platten geschnitten wurden, ging ich den Schnitt mit dem Bandschleifer über die Kurven und runden Ränder der Platten zu erweichen. Auf diese Weise gibt es keine Splitter. 🙂
Beim Platzieren der Scheiben Inlay, Sicherstellen, dass die verschiedenen Größen mischen. So sieht es eher organisch und natürlich.
Ich die Holzstücke an ihrem Platz gesichert mit Flüssigkeit Nägel. Es dauert nur ein Klecks auf der Rückseite jedes Stück und ein wenig Druck ausgeübt wird, um es zu Set.
I sealed the wood slices before applying the grout by applying a coat of the polyurethane. Otherwise the grout will darken the wood slices. You’ll be sanding everything down later but sealing the slices makes it easier to get them back to the lighter color.
I found an article from Bob Villa that talks about the grout that can be used with the wood slices. It’s called sawdust grout.
https://www.bobvila.com/articles/quick-tip-sawdust-grout/
Sawdust grout is a combination of 2 parts sawdust to 1 part polyurethane.
I used a water based, oil-modified fast drying polyurethane for the sawdust grout mix and the finish.
The polyurethane dries quickly and it’s orderless.
It’s the same one we used on the plywood wide plank floor boards in the living dining room and kitchen.
Using latex gloves grab a small glob of Grout and push it into the spaces between the wood slices.
I used a belt sander to sand down the wood pieces.
Natürlich, that was only after I fixed my huge mistake of cutting the wood slices the wrong thickness.
The sand paper I used was 36 grit. I wanted something that gave the wood pieces a rough texture so they wouldn’t be slippery.
Because sanding is a pretty messy task, I tented off the area, that way the dust didn’t go all over the house.
This is what the wood slices and the sawdust grout looked like after the sanding was done.
I sanded the wood slice inlay to the height of the flooring on either side of it. I also used the sander to knock off the edges of each of the wood slices, removing any hard edges that may be uncomfortable to walk on.
The polyurethane was the same one I used on the wood board flooring and in the sawdust grout mix.
I put three coats of finish on the end grain flooring inlay.
Although the poly is colorless, it did give the wood slices a little bit of a yellow tint.
The sawdust grout also darken quite a bit when I applied the poly on top of it.
[et_bloom_inline optin_id=”optin_7″]
We love the way the end grain flooring inlay turned out. It’s so much more character than a simple threshold would have given.
What do you think? Do you like the way it turned out? Was würden Sie anders machen? We’d love to hear your feedback.
The Amazon affiliate tracking id replacer tool updates the tracking id in your Amazon Affiliate…
There are already wainscoting calculators out there but they're too complicated. This wainscoting calculator uses…
In this post we’ll go over how to paint laminate cabinets. We did this project…
Let me first say that converting a box spring into a platform bed is not…
View Comments
I am in love! Thank you for the detailed instructions, and for making all the mistakes you have saved me from! Just so in love.... I will be doing this very soon!
Hi Amy,
LOL, yeah please avoid the mistakes I made. :)
Taking my mistakes out of the equation, this project would have taken a third of the time.
Dear Steve,
Your end grain flooring was very interesting. Kudos to you both. As you said, the result is far better than a standard threshold.
Creating the grout from sawdust and urethane was news to me. In all my projects I have used sawdust mixed with a waterproof glue such as Titebond III.
It's been 3 years since you installed this floor. Has it stood up well? Has there been any shrinkage and cracking?
Knowing what you do now, would you have changed your methods?
Best regards, Ted Chabane
Hi Ted, thanks for the kudos! :)
It has stood up very well, no shrinkage or cracking. And keep in mind this is in a vacation rental, so that's saying something!
What would I have changed... one things for sure, as I said in the article I would definitely be more careful about cutting them to the right thickness right off the bat.
Maybe one thing I would do differently is make the inlay more curvy. I think it would have looked even nicer had I exaggerated the curves in it more.
As far as the method of creating it, so far so good I don't think there is anything I'd do differently. :)
Love the look of the inlay, we are thinking doing more plywood flooring in our home we might add an inlay too. My wife and I did our bedroom in plywood flooring in 2017, it's held up real well. Getting the gel stain is a great idea and taking a knife to the knots and sanding them really looks great. Thanks for making a very clear description of the process. "well done"
Thanks Brad! The inlay definitely adds a completely unique look to the house. It worked out really well. Take a look at Pinterest, that's where I found inspiration for the inlay. There's all kinds of great pins on there that'll spark your inspiration. :)
I love this idea. We are slowly starting a kitchen remodel and will be removing a wall to have a more open space into the living room. Since we are doing majority of the work ourselves this flooring would be ideal for our budget!
Can you tell me how the floor has held up since installing it? With 4 kids and large dogs I want to make sure the floor will withstand normal wear and tear of a country family!
Thanks Heather!
The floors have held up very nicely! Remember this is in a vacation rental (where guests may not be as careful as we would be) and we also allow pets! So the floors get their fair share of abuse. lol
Also remember, I wasn't trying to get the floors to look perfect - that's why I distressed the planks before finishing them. Any dings and scratches they get add to that old, gnarly, country feel I'm doing for. :)