DIY rustikales Bauernhaus Weit Plank Sperrholz Bodenbelag - a closeup of the distressing and Knots This is a fantastic plywood flooring idea The finished plywood floor was made using a gel stain and finishing it with an oil-modified polyurethane Here's a step by step tutorial on installing plywood flooring
As you’d expect, DIY Rustic Wide Plank Plywood Flooring takes much longer to finish than just installing pre-made planks.
This project was the truest sense of DIY. Everything from cutting the plywood into wide plank boards, to sanding, staining, finishing and installing the plywood planks down… all of it DIY.
All things considered, the entire project, from start to finish didn’t take that long.
From cutting the planks out of plywood, to finally installing the floors in both the dining room and kitchen – took about a week.
If you’re willing to put in the time and sweat, it is absolutely worth it!
The floors look gorgeous (the pictures don’t do it justice) and you really would not know that they are stained plywood floors.
Read on to see what it took to make and install our rustic wide plank plywood floors and how you can install your own unique plywood flooring.
Bekanntgabe: Einige der Links unten sind Affiliate-Links. Wenn Sie sich entscheiden, eines dieser Produkte zu kaufen, Wir verdienen eine kleine Provision ohne zusätzliche Kosten für Sie. Wir empfehlen diese Produkte nur, weil wir haben Erfahrung mit ihnen und sie für unsere eigenen Projekte. Als Amazon Associates, Wir verdienen mit qualifizierten Einkäufen.
Some of the flooring in our Poconos vacation rental needed replacing. Namely, the floating hardwood floor in the dining room and kitchen and the carpet in the living room.
Our goal was to have new floors that look old, warm, and worn – like they had always been there. Grundsätzlich gilt, the more it looked like farmhouse flooring or barn wood the better it was for us.
We looked into tile, stone, and hardwood floors. The problem with all of them was that they all needed a level sub-floor and ours was uneven… like really uneven.
Since the entire house is made of rough-cut oak, the flooring is not even close to being level.
That makes tile, stone and even hardwood flooring very difficult to install. The extra difficulty also translates to very expensive installation costs.
It was time to get creative, DIY floors were in our future. To get more flooring ideas we turned to Pinterest. After a lot of scrolling, we came across rustic farmhouse wide plank plywood flooring!
On Pinterest, there was a gazillion (well maybe not quite that many) plywood flooring ideas, but the one that was the best fit for us was the wide plank flooring.
The pictures of the wide plank plywood flooring projects others had posted were incredible – this was it! This was the perfect flooring for uneven floors.
We were sold on the idea.
There’s a concept I came across on Pinterest which was instrumental in my choice of plywood over other flooring types.
It’s called wabi-sabi.
It’s a Japanese tradition that is the art of making broken things better than brand new.
The idea is to hi-light the imperfections – make them perfectly imperfect.
With this new perspective, I was looking for imperfections to show off – instead of avoiding them.
If (or when) the floors get a new scuff mark or scratch, it will add to the floor’s character. It’s a very freeing concept that I am really glad I came across.
Click on the picture to see the Pinterest pin that inspired me, I hope it does the same for you.
Most people decide to install plywood plank flooring because of it’s affordability.
It’s much cheaper to install a plywood floor than traditional hardwood or even a laminate, heck it’s even cheaper than doing vinyl.
For our plywood farmhouse floors, the cost wasn’t much of a factor in our decision-making process.
Versteh mich nicht falsch, it’s always nice to save some dough… it was just lower on our list.
Higher on our list was flooring that was sturdy, looked like it has always been there, fit with the style of the house and would be easy to install on an uneven floor.
Between the option of making wider planks and the spacing between each one – wide plank plywood flooring was a perfect fit for this house.
The spacing between each board makes it more forgiving in scenarios like ours where the floor isn’t level.
On top of that, the Japanese concept I came across helped me realize that any blemishes the floor will gain as it ages will only add to the floor’s beauty.
So it didn’t need to be as sturdy as hardwood, we’ll just embrace the imperfections that come along with it! 🙂
Another huge benefit to plywood floor planks is the design versatility.
I love how my plywood plank floors turned out. There really is nothing I would change, but one thing that’s great about plywood planks is that there is no limit to what you can do.
I LOVE the way the rustic plywood floor planks came out, but the plywood planks could have looked just as good with a modern look.
Take a look at plywood floor planks on Pinterest. You’ll see there is no limit to the style, Farbe, shape, size, or texture. It’s all just a matter of preference – how cool is that?
We knew that we saved quite a bit of money by choosing plywood faux plank flooring but we didn’t realize how much until someone asked for a breakdown in the comments.
We saved a ton!!
Natürlich, what you save in dollars you lose in time. We didn’t look at it as a lose of time though, it saw it as a great way to get our creative juices flowing and gave us a flooring that is completely unique – and it saved us a bunch of money to boot! Win – win – win!
Gesamtkosten
22 Sperrholzplatten zu 32 $/Blatt = 704 $
17 quarts of stain @16.30/quart = $276
5 gallons of Poly @ $12/gallon = $60
TOTAL = $1040
Quadratfuß
22 Sheets * 32 sq. ft./sheet = 704 sq. ft.
1040 $ / 704 m². ft. = $1.47 per sq. ft.
The only negative I saw with plywood floor planks was the durability. It’s not a hardwood so it would scratch easier than an oak flooring would.
Now with my new wabi-sabi perspective, I’m actually looking forward to the scratches and dents.
The blemishes will only add to the floor’s beauty. If there’s a scratch that is really ugly, I can add something creative to give it beauty.
Perfectly imperfect.
Hier ist eine Liste der Werkzeuge, die wir für dieses Projekt verwendet.
Affiliate-Links unten auf ähnliche Elemente sein kann, wenn genaue Einzelteile nicht online gefunden werden können.
Extra-Batterie für Fertig-Nagler
Dies sind die Vorräte an diesem Projekt verwendet.
Affiliate-Links unten auf ähnliche Elemente sein kann, wenn genaue Einzelteile nicht online gefunden werden können.
Varathane Kirschbaum Gel Stain – we used about 7 quarts
Ölmodifiziertes Polyurethan auf Wasserbasis – we used 2 gallons
3″ Natural Bristle brush – 6 brushes to apply the stain
4″ Polyester Synthetic Brush – 4 brushes to apply the poly
Abdeckpapier – We used the masking paper to protect the deck when applying the stain and poly
The plywood plank flooring thickness we used is 1/2″ thick. If our floors weren’t so uneven we could have used 3/4″, but the flexibility that a 1/2″ plywood has was perfect to conform to our uneven sub-floor’s contours.
I think an added benefit to the 1/2″ plywood is that the spaces in between the planks doesn’t hold dirt as easily.
It may sound like that’s a bit of a stretch but I think if it was 3/4″ plywood, the extra 1/4″ of plywood thickness may make it harder for a vacuum to suck out things that get stuck in the spaces.
We weren’t sure how the spaces were going to fair with dust and things falling in them but so far so good – nothing a good vacuuming can’t fix. 🙂
Other than things possibly getting stuck in the spaces between the planks, I don’t see any reason you can’t use 3/4″ thick plywood for your plank flooring. Davon abgesehen, I also don’t really see a benefit to using it over 1/2″ plywood.
We wanted the farmhouse or country kind of look, so a wide plank is what we went with.
We also wanted to reduce the amount of wasted plywood, so the width we came up with was 5 7/8″ for each board. That gives us 8 planks per sheet and a tiny strip leftover at the end.
We’ve seen other plywood floors where they went for 8 inch or even 12 inch boards. We didn’t want to make them that wide because we felt it made it obvious that it was a plywood floor.
And a wide board would have shown the dreaded plywood zebra pattern that I don’t care for (more on the plywood zebra pattern later).
There were a couple of questions in the comments about the type of plywood that was used for the plywood planks.
The plywood is regular 3-ply, cheapy weepy, plain Jane, rough finished 1/2″ pine plywood.
The exact name from Lowes is:
Plytanium 15/32″ CAT PS1-09 Square Structural Plywood Pine
Grundsätzlich gilt, the cheapest plywood we could get.
Since we wanted a rustic look the knots and imperfections weren’t a problem.
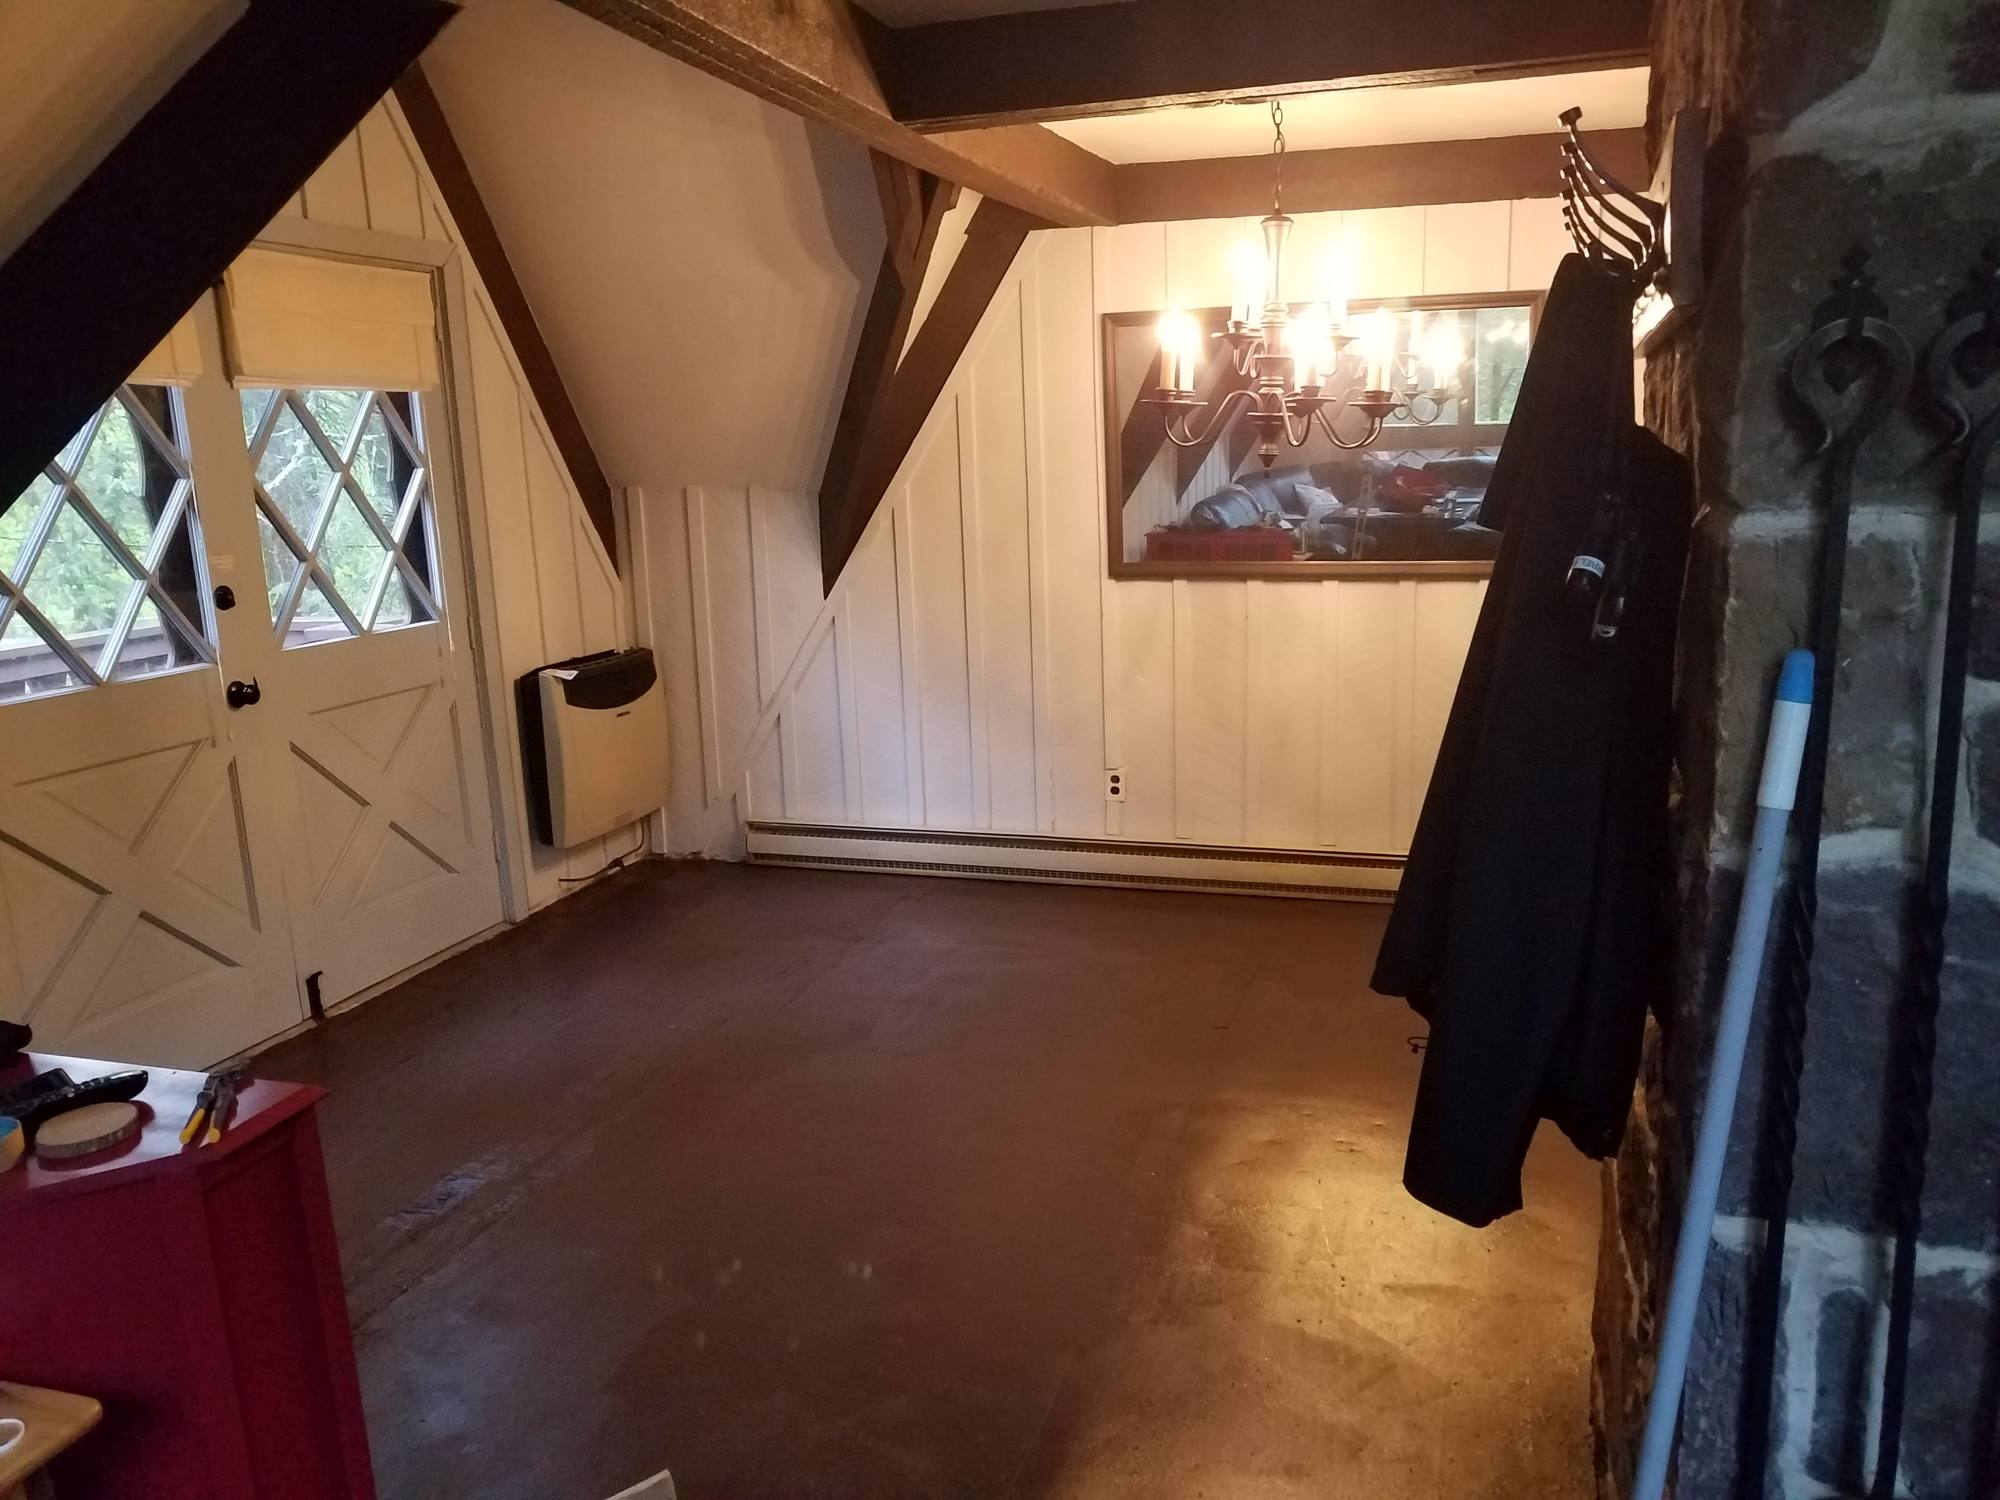
Here are some before pics of the space with the original floor.
We loved the color of the original floors, but the flooring never really went with the style of the house. It was a 3/8″ floating floor and the wood strips were fairly thin. Because it was floating and a pretty thin floor, it always sounded a bit hollow when you walked on it.
The real problem with the old flooring was buckling in some spots, probably because of the way it was installed.
That buckling was one of the reasons we felt the wide plank flooring made of plywood would be perfect for this space.
The wide plank flooring has spacing around each board, that spacing would prevent the new floor from buckling.
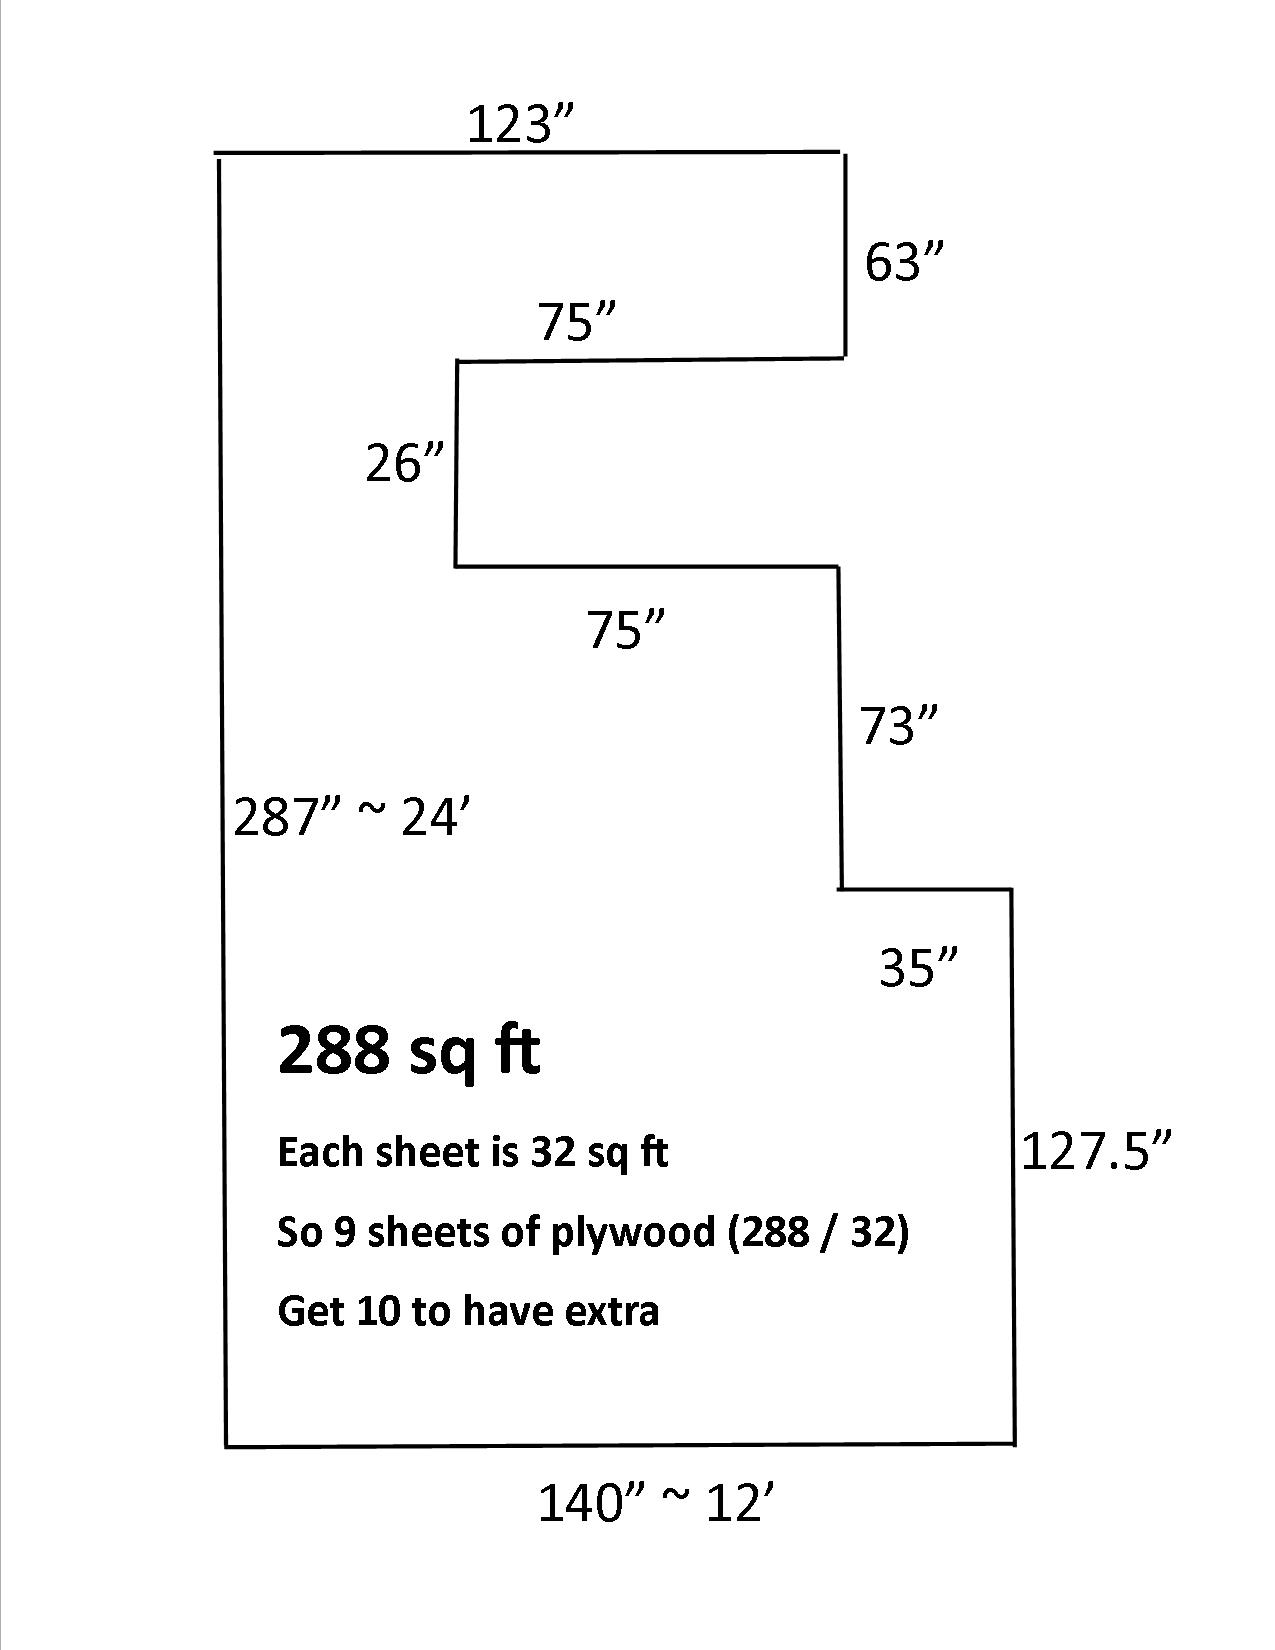
The measurements don’t need to be super precise. Rounding up the measurements and adding an extra plywood sheet to the total should give you enough wiggle room.
For our space, I treated it like a big rectangle. The length was 287″ (rounded up to 24′) and the width was 140″ (rounded up to 12′).
24 x 12 is 288 sq feet.
Each sheet of plywood is 4′ x 8′ so that gives you 32 square feet per sheet.
When I divided the total sq feet (288) by the sq feet per sheet (32) it told me I needed 9 sheets of plywood.
Then I added an extra sheet as a buffer.
We bought 10 sheets of 1/2″ plywood for our project and once completed, we had about 1 sheet left over.
Total Time: 2 people about 2 hours
The original floor was a 3/8″ hardwood floor that was installed with a lot of staples…. like a lot of staples.
Zunaechst, it felt like the staple removal was taking FOREVER.
Once we got into a rhythm though it really only took a couple of hours for us to get just about all of them out.
The subfloor we had was unpainted plywood.
If we installed the wide plank plywood flooring without first painting the lighter colored subfloor, it would have shown through the spaces in between the planks.
To prevent that from happening, we painted the subfloor a very dark brown color, using paint that we already had.
Any dark paint color would do the job – just stick to a paint that is an eggshell or satin.
You don’t want a shiny subfloor showing through the spaces between the boards.
Total Time: With the right blade this would take less than 2 hours for 10 sheets
I keep calling them planks or boards but basically, this step is where I took the sheets of plywood and cut them into long strips.
A lot of the Pinterest posts I came across said they had a person from Lowes or Zuhause Depot cut the sheets for them.
It’s definitely an option. I’ve used their cutting services in the past when the cuts didn’t need to be very precise.
In diesem Fall, I wanted more precise cuts, so I opted to do it myself.
It takes A LOT longer but I thought having consistently sized plywood planks was worth the extra time.
Dieser Weg, I was sure each piece was going to be about the same width.
To make cutting the pieces MUCH easier and to keep them the same width I made a jig.
They say hind site is 20/20, well looking back on it I would still cut the plywood strips for flooring myself.
I recently used the cutting services for another project where I didn’t care about the width they cut it an man o man, I don’t think there were two cuts that were the same width.
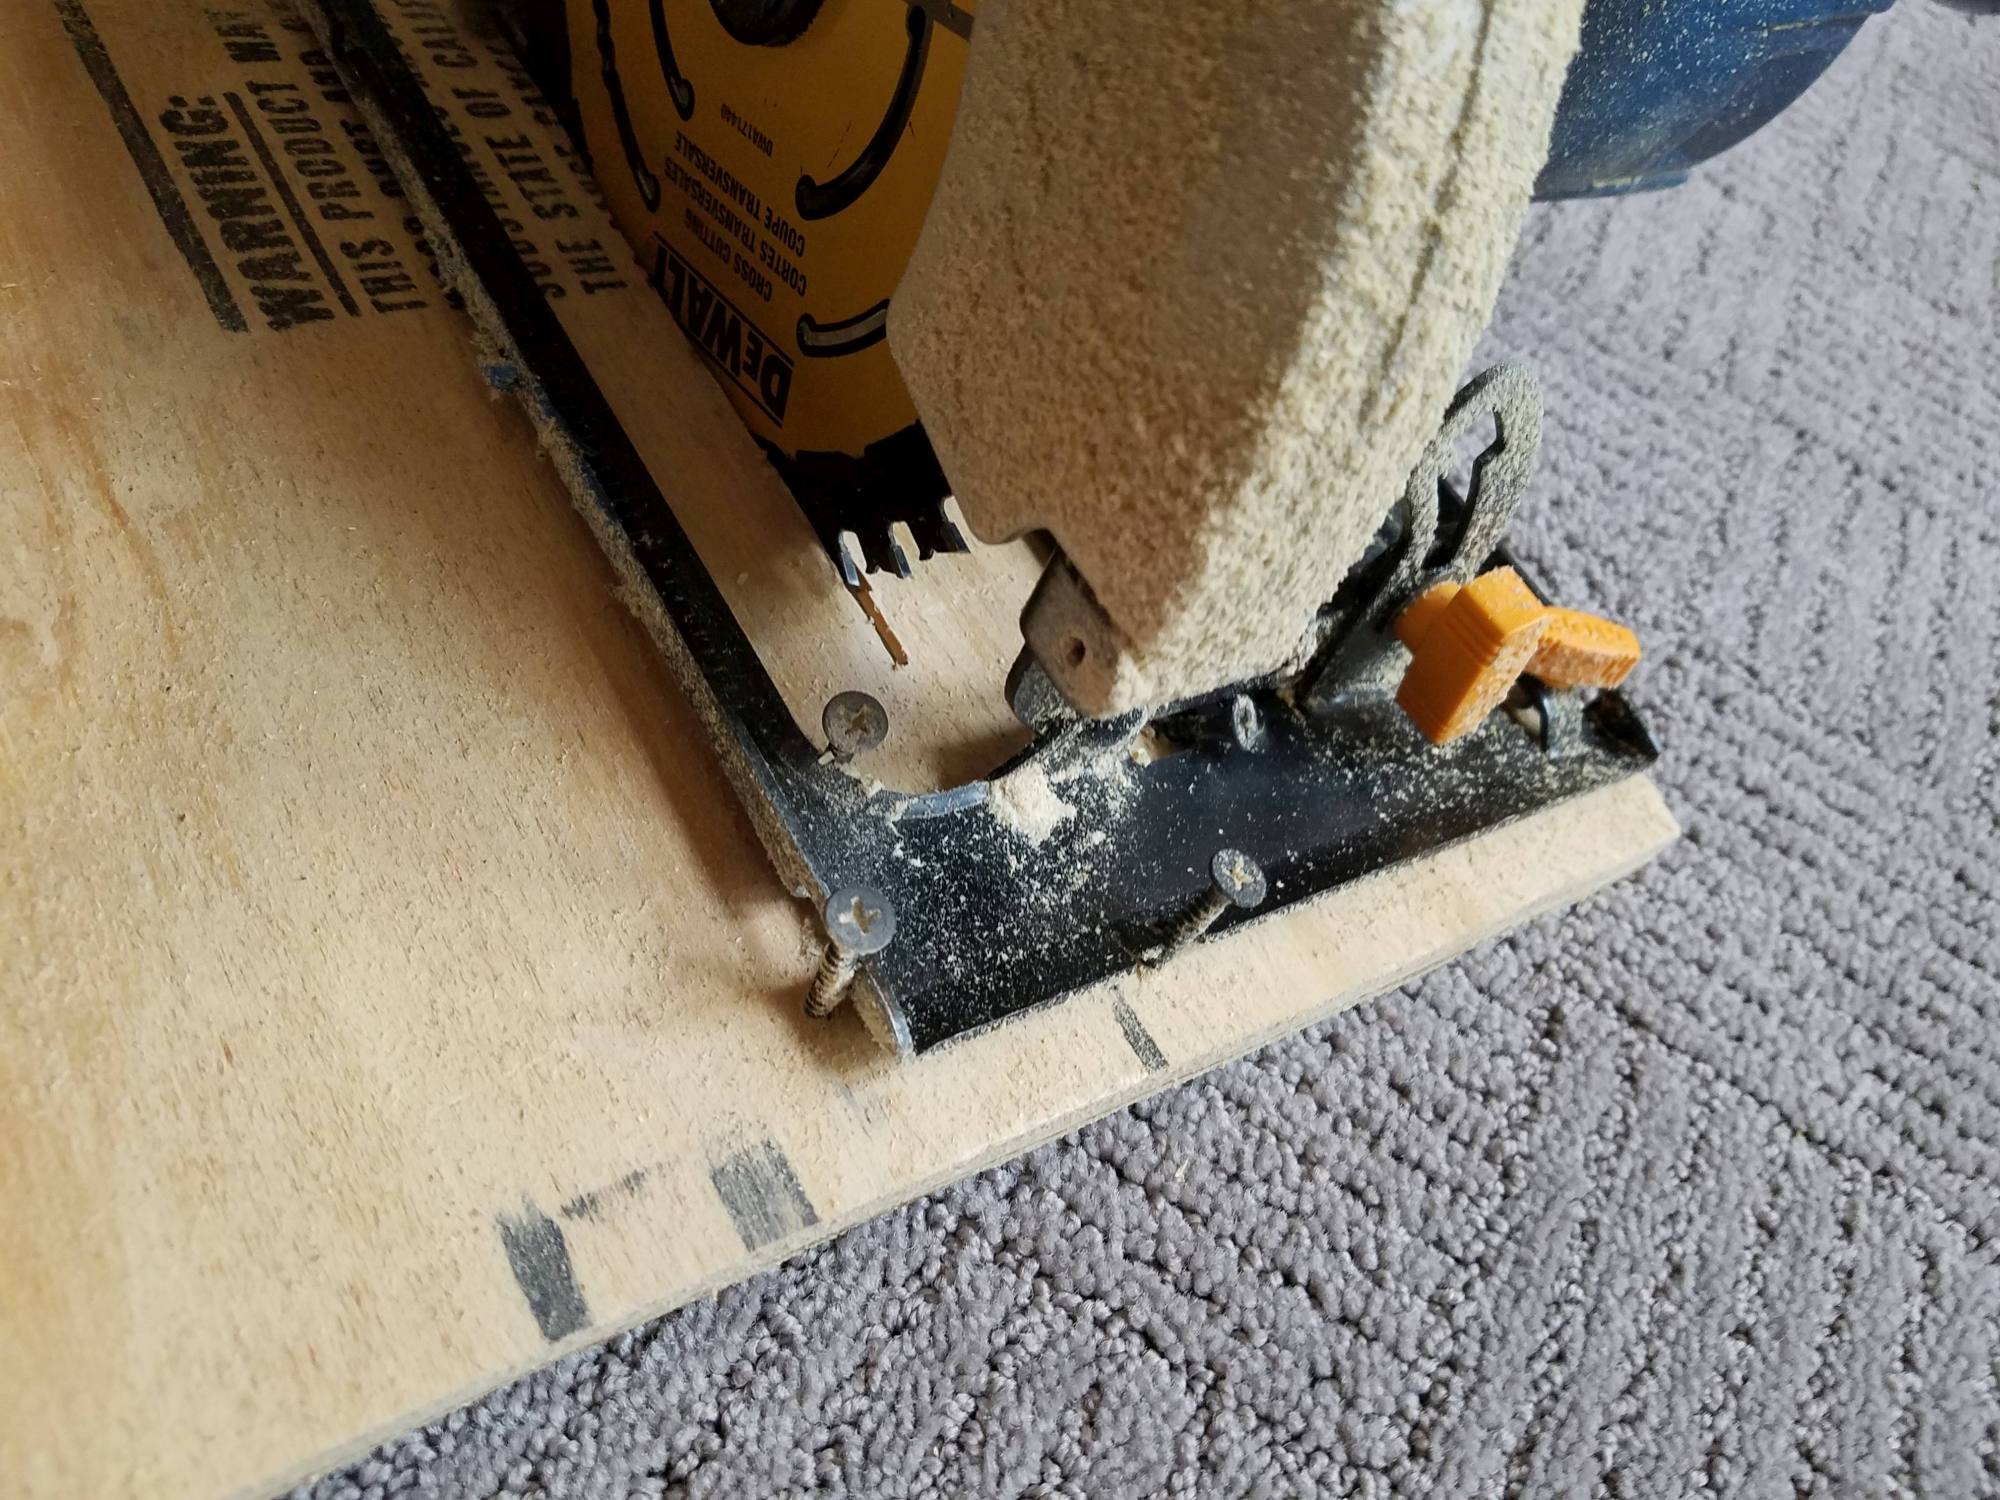
We had 10 sheets of plywood to cut into wide plywood planks. I figured that a plywood blade would be the best. I thought anything else would leave a really rough edge on the wood.
Gut, I was very, very wrong.
Do Not Use A Plywood Blade – Use a Cross Cut Blade instead
The plywood blade didn’t last very long and took a lot of effort to go through the plywood. It started smoking and having a lot more difficulty cutting barely halfway into the second sheet of plywood.
I ended up having to go out and buy another blade. This time I tried a cross cut blade, OMG what a difference.
The cross cut blade went through the plywood like butter and left an even better cut than the plywood blade did. I was able to do the rest of the plywood using just that one cross cut blade.
If you want to get the same cross cut blade I used, just click the picture below.
A jig is fancy talk for a template. It really made a tedious and time-consuming task super easy.
It was basically a 1/2″ piece of scrap plywood I had with a scrap piece of 1 x 4 screwed to it.
The space between the saw blade and the piece of 1 x 4 was 5 7/8″, the thickness we wanted our plywood flooring planks to be.
To make the jig I put the blade of the saw all the way up, secured the saw to the plywood with screws all around the saw, wedging it in place.
Then I slowly lowered the saw into the plywood and measured 5 7/8″ from the inside of the plunge cut and that’s where I screwed in the 1 x 4.
For more info on the jig and some extra tips on cutting the planks check out this post, 3 zeitsparende Tipps für DIY-Dielensperrholzböden.
Spitze: If you’re cutting your own boards you need to make a jig. When making your jig, extend the 1 x 4 way in front and way behind the saw, like it is in the pictures.
That lets you line up the saw way before the blade comes in contact with the plywood. It also gives more stability, ending up with a straighter cut.
Total Time: 2 people about a day and a half
This part took a while, but it’s important to put the time into it.
We sanded the face of the plywood to remove any splinters and the text that’s sometimes stamped on the plywood.
We also used the sander to round the edges all around the face of each plank.
The rounded edge gives it a really nice finished look and helps in cases like ours, where the floors aren’t very level.
Rounded edges give a soft transition between two planks when they don’t quite line up.
This is also where you choose which side of the plywood will be the face, the pretty side or the ugly side.
When we were choosing sides, I’d say we chose the ugly side 80% of the time.
It went against what I would normally do, but now I kinda wish I went with the ugly side more.
We used a belt sander to do most of the sanding. You could use a palm sander if you’re not doing too much flooring but in our case, the belt sander was much faster.
The sandpaper we used was 120 grit, it was perfect for the belt sander.
During this part of the project, you’ll have your doubts about using the gnarly part of the plywood.
BUT TRUST ME – once you put the stain on the plywood you will be blown away at how good it looks.
Schlussendlich, the most beautiful planks were the ones with imperfections.
Spitze:
If a plank has a knot or crack in it, don’t put it to the side or use it in an area you can’t see.
Stattdessen, make it more noticeable. Dig into the knot or crack with the sander to emphasis the crack or knot more. It’ll help remove splinters that are around the knot or crack and also add character.
Total Time: We did this at the same time as sanding so it’s included in the day and a half spent sanding
This is the distressing part of the distressed plywood floors.
There were three weapons of choice for applying the plywood’s character (a.k.a. distressing), ein Hammer, a big pair of pliers and a propane torch.
Out of the three I used the pliers the most and the hammer the least.
Using pliers, I’d repeatedly hit the face of the plywood with the back corner of the pliers.
With the hammer, I used the side of the hammer, and the claw to make indentations in the plywood.
If you look at the floor right above the hammer in the picture you’ll see the indentations the back of the pliers left.
I also used a utility knife to open up any cracks in the wood, to make them more pronounced.
I did it by putting the knife at an angle and cutting along the crack, opening up the crack, similar to what is done to cracks in concrete when you want to fill a crack.
The distressing (a.k.a character building) is a key step for distressed rustic plywood floors.
The where and tear makes the planks look authentic, the more distressing the better.
The propane torch was by far my favorite character builder – and it wasn’t because it spoke to my inner pyro…. well maybe a little because of my inner pyro lol.
Burning the plywood gives an instant amazing aged look.
This is another part of the process where I hesitated a lot.
But once the stain goes on, the plywood planks instantly transform into a beautifully aged floorboard!
Take a look at the before and after picture of the burned plywood plank.
When burning the wood there are definitely thoughts of Oh My God! This is too much!
Aber, as soon as the stain goes on, it blends the darkness of the burn the the rest of the plywood colors beautifully.
Whenever we came across a plank that looked a little boring, we burned some character into it to liven things up. 🙂
Take a look at the arrows in the picture, each one of those dark marks is the work of the propane torch.
Spitze: When burning the plywood, the lighter parts of the wood burn much easier than the darker parts.
Since I was avoiding that plywood zebra pattern, I didn’t burn the wood where there was a heavy pattern.
Burning that area would only emphasize the pattern – and I didn’t want that.
If the part of the wood was either only dark or only light then it was eligible for burning.
Here’s a video of how we burned the rustic wide plank plywood flooring.
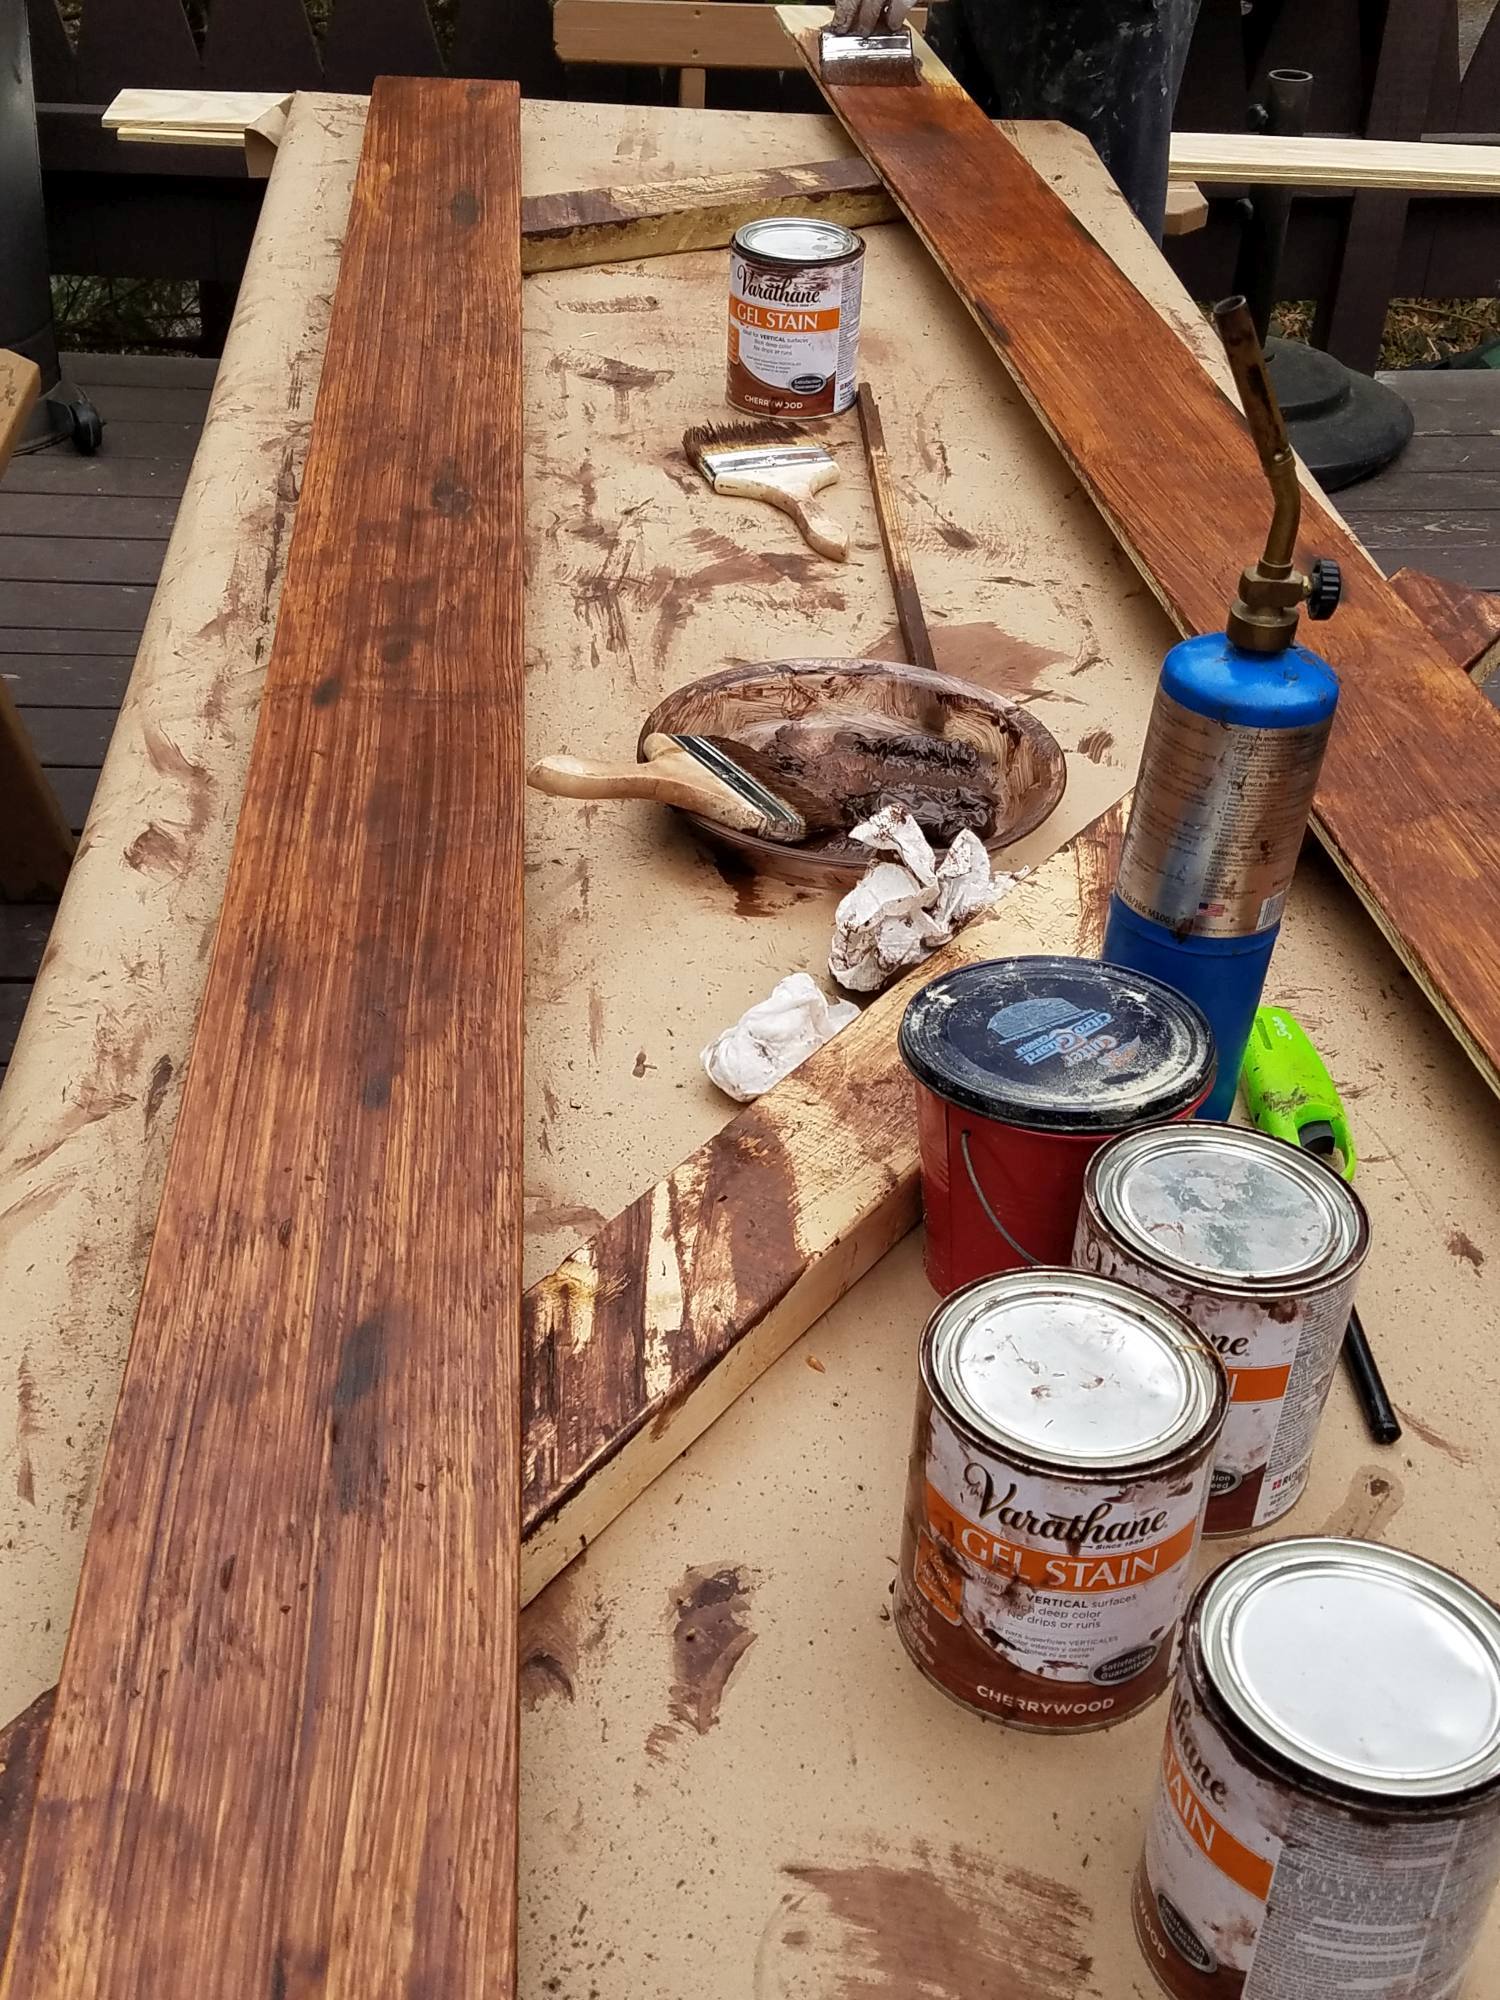
The process started with trying out a bunch of different stains on scrap pieces of plywood first, and this was by far our favorite!
We went with a gel stain instead of a regular stain because it does a really good job of covering up that plywood zebra pattern that we didn’t want.
It’s totally a personal preference, but I don’t like the pattern you get from regular stain on plywood floors.
Take a look at this picture I copied from Pinterest, for an example of what I’m talking about.
Regular stain is more liquid and gets absorbed by the plywood at different rates. Softer parts of the wood absorb the stain faster than the denser parts of the wood.
A workaround would also be to use a wood conditioner before applying regular stain.
Stattdessen, we used the gel stain.
Because we used the gel, we were able to skip the wood conditioner.
Plus, the gel stain added a nice wood grain pattern on the surface of the board, making it look less like plywood….BONUS!
The gel stain we used had a dark color and created a lighter stain on the wood. The result was a cherry colored wood with a dark grain pattern on top, exactly what we were looking for.
The thicker you applied the stain the darker the board would be.
Auch, the longer you waited before brushing the excess stain off the darker the plank will be.
If a plank had a heavy zebra pattern on it, we put the stain on thick and waited a bit more before dry brushing it.
That did a pretty good job of minimizing the zebra pattern.
The brush we used for the stain was a cheap wide (about 4″) real bristle brush.
The stain has a strong polyurethane smell to it, so we did the staining out on the deck and also let the boards dry out there.
If you’re going to do the same, make sure to first check the weather forecast!
We used about 7 quarts of stain to do our project.
Total Time: 2 people about a day
When we stained the plywood floors, we did one coat of stain using the dry brush technique.
Grundsätzlich gilt, first we applied the stain with the wet brush, then used a dry brush to brush off the excess stain.
With every pass of the dry brush, we would wipe off the dry brush on a paper towel to remove the majority of the stain from it.
We chose the dry brush method because it leaves a nice dark wood pattern.
When applying the stain and dry brushing, we were able to play with the texture that the stain leaves on the plywood.
Mixing it up and using wavy brush strokes to simulate a grain or brushing around a knot in the wood added uniqueness to each board.
Merken, the longer the stain is left on and the longer it dries before using the dry brush, the darker the board will be.
We typically applied the stain and waited a couple of minutes before using the dry brush.
If we came across a board with lot of that zebra pattern on it we applied a thicker coat and let it sit a little longer.
The thicker coat and longer wait time did a better job of masking the zebra pattern.
Once the stain was applied we waited 24 hours before applying the polyurathane.
Total Time: 2 people about a day and a half
For the finish we used a clear satin, water based, oil-modified polyurethane.
This product was perfect for our project because it didn’t change the color of the stain, dried quickly and best of all – it’s oderless!
If you’ve ever done any sort of polyurethane project. you know that the smell from polyurathane is no joke… and it lingers for days and days. This has no smell at all!
We went with a satin finish because we wanted an aged look and a glossy floor would be the opposite of that.
Three thin coats of poly were applied on all the boards, including the sides of the boards. Between each coat, we waited about 2 hours before applying the next coat.
We then waited 24 hours after the last coat before installing the boards.
We didn’t sand between the first and second coats but did do a light hand sanding with 120 grit sandpaper before applying the final coat.
The brush we used for the poly was a cheap wide (about 6″) synthetic brush.
We used 2 gallons of polyurethane for our project.
Spitze: When applying any polyurethane, bubbles are something you want to avoid.
That’s because the bubbles don’t pop. Stattdessen, they dry into poly… and that’s not a good look. lol
To prevent bubbles, mix the poly using a mixing stick using smooth circular motions.
No shaking the can here!
Aktualisieren: When we originally did the dining room floor we did a light sanding before the final coat of poly.
Recently we did the living room floor and for that flooring, we skipped the sanding before the poly.
We figured not sanding would give the planks a bit more texture and save us a boatload of time.
It worked out really well! From now on, we won’t be sanding before the final poly coat.
The spaces between each plank were perfect for the style we were looking for.
The spacing would give it more of that farmhouse feel and prevent the buckling that the previous floor suffered from.
A few of the posts on Pinterest mentioned using quarters as spacers, so that’s what we used.
Our breites Brettsperrholzboden has small variations in the spacing, mostly because of the uneven floors – but that’s ok – wabi-sabi. 😉
I used a tip I came across on one of the Pinterest posts, starting on the side of the room where the floor is the most visible.
For our space the most visible part of the floor was by the front door so that’s where we started.
When we reached the opposite end of the space we ended up with the last row of planks needing to be ripped in half.
Each plank was 8 feet long and the room was a little over 12 feet wide, so there weren’t too many seams to work with.
The rule of thumb is to not have two consecutive rows with seems less than a foot apart from each other.
I used a miter saw to cut the boards to length. Pretty straight forward. One tip is to make sure the blade reaches full speed before you start cutting into the plywood. That’ll give you a clean, smooth cut.
Spitze: Every once and a while making a cut would create a thin line of bare wood at the very edge of the cut. When that happened I used a dark colored sharpie to color that bare wood and that blended it right in.
I used a black sharpie but a brown sharpie would work just as well.
I actually used the sharpie a lot with the length-wise cuts.
Spitze: If you end up buying the same nail gun I’d recommend also buying an extra battery. It already comes with one battery, buying the extra battery will help keep your project moving along.
The plywood flooring we installed is 1/2″ thick and the previous flooring was 3/8″ thick.
The 1/8″ difference meant any spaces where the previous flooring used to fit – the new flooring no longer did.
That difference meant a lot of undercutting. Not only the door moldings but all the furring strips that cover the seams of the oak boards on the walls.
I could have done it with a dovetail saw, but since I had quite a few cuts to do, I bought an oscillating tool. It worked perfectly!
The tool comes with a bunch of different attachments. I haven’t used it for anything else yet but I can think of a few different uses for it in the future.
Also, all told, it took roughly a week to do the plywood plank floors – from complete start to complete finish. Including the old floor removal, subfloor painted, 10 sheets of plywood cut into strips, geschliffen, betrübt, stained, polyied and installed.
This was a good sized project with a lot of effort put into it, but it was well worth it. We now have a completely unique floor that fits perfectly with the house, and looks fantastic!!
In the fall, we’re going to install the same rustic wide plank plywood flooring in the living room, and I’m really looking forward to it.
We’re also going to do a unique transition between the living room and dining room floors… can’t wait.
Aktualisieren: Gut, we redid the living floors recently and we also installed the wood slice accent flooring. Everything turned out perfect!
We wrote about those experiences also, check out those posts here:
[et_bloom_inline optin_id=”optin_7″]
Here’s some more pics of the work in progress and the finished plywood plank flooring.
Lass mich wissen was du denkst, dort etwas hätten Sie getan haben unterschiedliche?
Sagen Sie Ihre Meinung in den Kommentaren unten!
The Amazon affiliate tracking id replacer tool updates the tracking id in your Amazon Affiliate…
There are already wainscoting calculators out there but they're too complicated. This wainscoting calculator uses…
In diesem Beitrag erfahren Sie, wie Sie Laminatschränke streichen. We did this project…
Let me first say that converting a box spring into a platform bed is not…
View Comments
This is a great blog post. Thank you so much for putting the time in for it.
I’m wondering if you think finishing the boards before installing would work. I have 3 cats and 3 dogs, so finishing it in place would mean trying to keep pet fur out of the finish and that would be nearly impossible around here. Can you see any issue with finishing each board in my shop before bringing it in and installing them? I’m sure it would take a lot longer, but I can’t think of any other solutions. Even if I could keep all 6 animals out of the main living areas I need to put flooring in, the hair still manages to float around.
I feel like little touchups would be doable. Just not the entire surface at once.
Hi Candace,
Oh yeah, definitely! That's exactly what we did! I guess I need to make that clearer in the post. :)
Ja, we didn't have a shop to finish them but We did all the cutting, sanding, staining, and poly-ing out on the deck.
Finishing the boards before installing them I think was the key to them holding up so well, because it allowed us to stain and poly the board tops as well as each side of the boards, That protects them from spills.
It didn't really take all that long to finish them before installing them. I kinda prefer doing it that way anyways. No worries about the stain smell in the house, no waiting for it to dry and of course no desperate attempts to stop anyone from walking on the floor before it was okay. :)
Pretty nice post. I just stumbled upon your blog and wished to say that I’ve truly enjoyed browsing your blog posts. In any case I will be subscribing to your rss feed and I hope you write again soon!
Thank you for such a great blog post. It looks as though you made the floor quite a few years ago. How is it holding up?
Hi Georgina! Vielen Dank!
It's holding up really well. It gets nick and scratches, the beauty of it all just adds more character to the floors. I haven't had to do much to it at all, there were a couple of places where the edge of a plank got dinged and the natural wood color was showing. I used a black sharpie to fill in the wood and voila, more character. I couldn't be happier with the flooring. :)
Hallo. This was EXTREMELY thorough and helpful. I'm about to do this in my home. What I'm mostly curious about is how it's held up all these years later? Because it's a softer wood that's been my biggest concern. Auch, are you satisfied with the 1/2" or do you wish you'd gone with 3/4" thickness? I've heard arguments both ways. Dank im Voraus!
Hi Allyson,
Vielen Dank für die netten Worte! I'm glad it's helpful. 🤗
Ehrlich, it's held up sooo much better than I would have ever expected, remember this flooring is in a vacation rental. There are new dings and dents that happen, but because I already added plenty of dings and scratches to the flooring I feel very differently about the new dings. It all just adds to the character!
1/2" or 3/4" is a fantastic question. I was VERY hesitant to do 1/2" - I ended up going with the 1/2" because the floor I was installing this on was SOOO un-even. I needed to install something with a certain amount of give and 3/4" plywood has very little give.
Schlussendlich, I don't regret using the 1/2" plywood at all. I don't think 3/4" would have extended the life of the flooring at all.
One thing I do regret is not putting more spacers under the planks in the areas where the floor dipped significantly. Maybe I should have even used a floor leveling compound in those spots. I was eager to get started with the flooring and let that get the better of me. lol
Your question made me think of what I would have done differently, and that is basically the only thing I would change. If you have super un-even floors like I did, you should level off the floor as much as you can before installing the flooring.
Best of luck with your install!!
Could you do the staining after the floor is installed
You can of course. We did it before installing the flooring for two reasons. First we installed the planks with spacing between each plank and it doesn't take much spacing to see the naked wood on the sides. The other reason was to protect the wood a bit more, especially in the kitchen. We were afraid that it would warp if renters (it's a vacation rental) kept dropping liquids on the floor. we felt staining and poly-ing the sides of the wood helped give the flooring a bit more protection. 🙂
Hi again. Thanks for your previous response, it was very helpful. I did come up with another question about the quantity of stain & polyurethane. In the article itself you said you used about:
-7 quarts of the gel stain and
-2 gallons of the polyurethane,
but in the cost breakdown you said you used:
-17 quarts of stain
-5 gallons of Poly
Did I maybe misread it? I'm flooring about 1200 sqf so I'm trying to get the right ballpark amount of each item. Vielen Dank!
Hi Allyson!
Wow, great catch! They are kind of both right. :)
When I wrote the first article it was after doing the flooring in the dining room and kitchen, so the numbers in the article are relative to that space.
Then, after I did the living room I had more information to share and started writing another post, and updating the original post.
Das:
-7 quarts of the gel stain and
-2 gallons of the polyurethane
Was what we used when doing the dining room and the kitchen roughly, 288 sq ft
These:
-17 quarts of stain
-5 gallons of Poly
Are the sum of the living room AND the dining room and kitchen roughly 704 sq ft
Hope that helps and best of luck on your project!!!
Thank you for the detailed instructions! My husband and I recently did our living and dining room with plywood plank flooring. For cost reasons we used a non gel stain. We also applied the polyurethane after installing the floors. Other than that we didn't really make any changes. It turned out absolutely beautiful and we're excited to tackle the remaining rooms soon.
That's great Anita, congrats! :)
Excellent project and this is what were going to do now for our flooring. The link for the gel stain took us to Home Depot which seems they are going to discontinued this brand. At least for the color we want. Says discontinued. So will be looking for different brand of Gel stain.
Hi Ethan, I tried the link and it seems to be in stock again.
I absolutely love the idea of using plywood for rustic flooring! The wide planks really add character, and it seems like a fun DIY project. I can't wait to try this in my own home. Thanks for the inspiration!
Vielen Dank, I'm glad you found the post inspiring!
I absolutely love the idea of DIY rustic wide plank plywood flooring! Your step-by-step guide is super helpful, and the photos really give me inspiration for my own home. Can't wait to try this out—thanks for sharing your project ideas!
Vielen Dank! I'm glad you found it inspirational. :)